Adding Tensorflow to an existing Android OpenCV application (where OpenCV digitizes image and
provides callback for video frames)
Video demo of the Code working
FIRST: you should read the other option on cloning the code because it explains the code they provide (and you will be using this code here --adding it to YOUR project)
****************CODE *************
STEP 1: To add TensorFlow to your own apps on Android, the simplest way is to add the following lines to your Gradle build file (build.gradle):
allprojects {
    repositories {
        jcenter()
    }
}

dependencies {
    compile 'org.tensorflow:tensorflow-android:+'
}
This automatically downloads the latest stable version of TensorFlow as an AAR and installs it in your project.
STEPS 2- 4 FROM http://nilhcem.com/android/custom-tensorflow-classifier
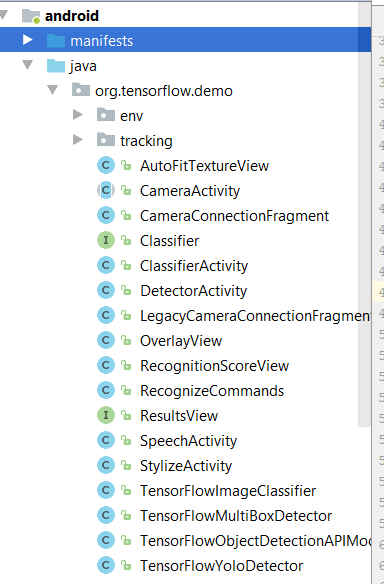
STEP 2: Obtain the original TensorFlow Android sample sources (org.tensorflow.demo code) see https://github.com/tensorflow/tensorflow
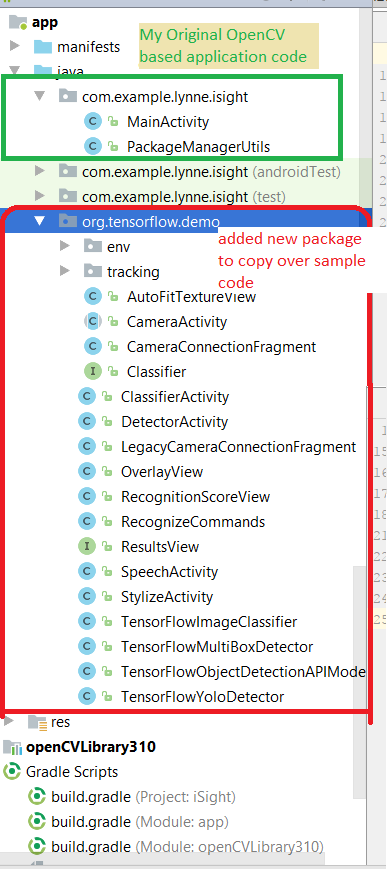
STEP 3: Move TensorFlow’s Android sample files (from step 2) into your existing Android Project (this is the org.tensorflow.demo package) under the java directory
- You actually don't need all the code but, doesnt hurt to have it --- note you will probably choose to use only one of ClassifierActivity.java or DetectorActivity.java
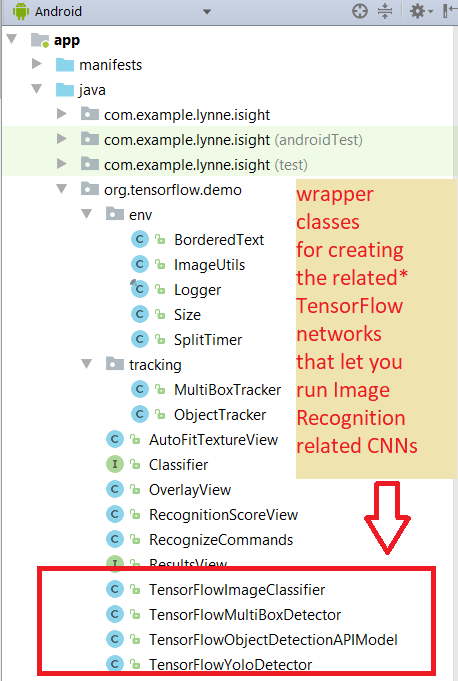
Now you will NEED to REMOVE some of the files that you don't need and will prevent compilation --basically that is all the Activity based classes. This is what you end up with
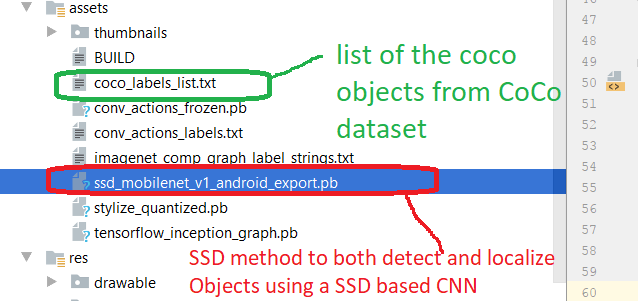
STEP 4: move your mobile packaged (you must make sure it is compressed for use with Mobile API) trained tensorflow model (a .pb file) and class lablels file (.txt) file to your assets directory in the Android app
General Guidelines MUST follow about TYPE of model for use in the code DetectorActivity.java and ClassifierActivity.java
- If doing DetectorActivity (for identification AND localization) - a model using SSD(DetectorActivity) or Yolo (DetectorActivity) or Multi-box(DetectorActivity
- If doing ClassifierActivity (only identification) - original v1 Inception model
- EXAMPLE 1 Download the pre-trained ImageNet model (inception5h) to your assets folder or whatever tensorflow model that uses (also the sample code has some pre-trained models on coco and imageNet training sets ) you can also copy over :
- EXAMPLE 2 - pre-trained model from cloned example code from STEP 2-- you will have a TEXT file that lists out the objects your trained model can detect and the mobile compressed CNN model file
STEP 5: Modify your Activity to create an instance of your Detector either TensorFlowImageClassifier (for only identification), TensorFlowMultiBoxDetector (for id+location), TensorFlowObjectDetectionAPIModel (uses SSD algorithm for id+location) or TensorFlowYolo( uses YOLO algorithm for id+location)
USE the Original Cloned Codes DectectorActivity or ClassifierActivity for hints on how to do this.
STEP 5.1 Add following to your Android Activity class --here I am assumming it uses OpenCV to capture image
In the class variables add instance of the helper class Detector (see Step 5.2) that I discuss below//declare Tensorflow objects
Detector tensorFlowDetector = new Detector();
In the method of you activity like onCreate that sets up your Activity add the following to
call the setupDetector method that will load from the assets file your trained CNN modelthis.tensorFlowDetector.setupDetector(this);Later wherever you have grabbed an image you can not process it through the tensorFlowDetector object....
in the code below the OUTPUT of the tensorFlowDetector.processImage() method is a Bitmap that you
can display in your Activity that shows the original image with the dection results written on top//now call detection on bitmap and it will return bitmap that has results drawn into it
// with bounding boxes around each object recognized > threshold for confidence
// along with the label
Bitmap resultsBitmap = this.tensorFlowDetector.processImage(bitmap);
STEP 5.2 The helper Detector.java class
I created the following Detector.java code in my application package directory. This class reuses the code ideas found in the original
cloned code's DetectorActivity --but, it is not an activity it is simply a class that has:
Components of the Detector class explained
class variable detector = instance of org.tensorflow.demo.Classifier associated with one of the TensorFlow* classes
class variable MODE = instance of Detector.DetectorMode which lets you specify the kind of TensorFlow* as one of following
private enum DetectorMode {
TF_OD_API, MULTIBOX, YOLO; // means using TensorFlowObjectDetectionAPIModel or
TensorFlowMultiBoxDetector or TensorFlowYolo
}
METHOD setupDetector(Activity parent_Activity)method to setup instance of a Classifier stored in class variable detector depending on the MODE value set for this class (for YOLO, MULTIBOX or Object Detection API (uses SSD trained model))
* expects the trained model (.pb file) and the trained labels list (.txt file) to be located
* in the applications assets directory --see above for hardcoded locations for each type of
* detector
* @param parent_Activity parent Activity that invokes this method as need to be able to
* grab assets folder of application as well as output a toast message to "owning" Activity in case problems with creating the Detector.
METHOD Bitmap processImage(Bitmap imageBitmap)
method to process the Image by passing it to the detector (Classifier instance previously setup) using as input the imageBitmap
* @param imageBitmap image want to process
* @return Bitmap which is bitmap which has drawn on top rectangles to represent the locations of detected objects in the image along with their identity and confidence valueIF you want to do something different than simply create a BitMap you can alter this method to do it
NOT IMPLEMENTED YET -- CODE YOU MUST DO
1) See below in code you must add some code to get it into the required input bitmap structure YOUR TRAINED CNN requires.
SIZE = the size of the CNN input layer will be different for each trained CNN and you will need to resize your input image to the appropriate size
FORMAT = some CNNs may train on RGB or instead on YUV or instead on HSV --you need to convert your RGB image into the appropriate format for the input to your CNN
2) You should also wrap the code that performs the inference in a background thread and use some kind of control flag (see cloned code DectorActivity use of isProcessingFrame to ignore incomming frames if the last frame is still being processed by your Tensorflow CNN).
import android.app.Activity;
import android.graphics.Bitmap;
import android.graphics.Canvas;
import android.graphics.Color;
import android.graphics.Matrix;
import android.graphics.Paint;
import android.graphics.Rect;
import android.graphics.RectF;
import android.graphics.Typeface;
import android.os.SystemClock;
import android.util.Size;
import android.util.TypedValue;
import android.widget.Toast;
import org.tensorflow.demo.*;
import org.tensorflow.demo.Classifier;
import org.tensorflow.demo.env.BorderedText;
import org.tensorflow.demo.env.ImageUtils;
import org.tensorflow.demo.env.Logger;
import org.tensorflow.demo.tracking.MultiBoxTracker;
import java.io.IOException;
import java.util.LinkedList;
import java.util.List;
import java.util.Random;
/**
* Created by Lynne on 11/7/2017.
*/
public class Detector {
private static final Logger LOGGER = new Logger();
// Configuration values for the prepackaged multibox model.
private static final int MB_INPUT_SIZE = 224;
private static final int MB_IMAGE_MEAN = 128;
private static final float MB_IMAGE_STD = 128;
private static final String MB_INPUT_NAME = "ResizeBilinear";
private static final String MB_OUTPUT_LOCATIONS_NAME = "output_locations/Reshape";
private static final String MB_OUTPUT_SCORES_NAME = "output_scores/Reshape";
private static final String MB_MODEL_FILE = "file:///android_asset/multibox_model.pb";
private static final String MB_LOCATION_FILE =
"file:///android_asset/multibox_location_priors.txt";
private static final int TF_OD_API_INPUT_SIZE = 300;
private static final String TF_OD_API_MODEL_FILE =
"file:///android_asset/ssd_mobilenet_v1_android_export.pb";
private static final String TF_OD_API_LABELS_FILE = "file:///android_asset/coco_labels_list.txt";
// Configuration values for tiny-yolo-voc. Note that the graph is not included with TensorFlow and
// must be manually placed in the assets/ directory by the user.
// Graphs and models downloaded from http://pjreddie.com/darknet/yolo/ may be converted e.g. via
// DarkFlow (https://github.com/thtrieu/darkflow). Sample command:
// ./flow --model cfg/tiny-yolo-voc.cfg --load bin/tiny-yolo-voc.weights --savepb --verbalise
private static final String YOLO_MODEL_FILE = "file:///android_asset/graph-tiny-yolo-voc.pb";
private static final int YOLO_INPUT_SIZE = 416;
private static final String YOLO_INPUT_NAME = "input";
private static final String YOLO_OUTPUT_NAMES = "output";
private static final int YOLO_BLOCK_SIZE = 32;
// Which detection model to use: by default uses Tensorflow Object Detection API frozen
// checkpoints. Optionally use legacy Multibox (trained using an older version of the API)
// or YOLO.
private enum DetectorMode {
TF_OD_API, MULTIBOX, YOLO;
}
private static final Detector.DetectorMode MODE = Detector.DetectorMode.TF_OD_API;
// Minimum detection confidence to track a detection.
private static final float MINIMUM_CONFIDENCE_TF_OD_API = 0.6f;
private static final float MINIMUM_CONFIDENCE_MULTIBOX = 0.1f;
private static final float MINIMUM_CONFIDENCE_YOLO = 0.25f;
private static final boolean MAINTAIN_ASPECT = MODE == Detector.DetectorMode.YOLO;
private static final Size DESIRED_PREVIEW_SIZE = new Size(640, 480);
private static final boolean SAVE_PREVIEW_BITMAP = false;
private static final float TEXT_SIZE_DIP = 10;
private Integer sensorOrientation;
private org.tensorflow.demo.Classifier detector;
private long lastProcessingTimeMs;
private Bitmap rgbFrameBitmap = null;
private Bitmap croppedBitmap = null;
private Bitmap cropCopyBitmap = null;
private boolean computingDetection = false;
private long timestamp = 0;
private Matrix frameToCropTransform;
private Matrix cropToFrameTransform;
private MultiBoxTracker tracker;
private byte[] luminanceCopy;
private BorderedText borderedText;
int cropSize;
/**
* method to setup instance of a Classifier stored in class variable detector depending on the MODE
* value set for this class (for YOLO, MULTIBOX or Object Detection API (uses SSD trained model))
* expects the trained model (.pb file) and the trained labels list (.txt file) to be located
* in the applications assets directory --see above for hardcoded locations for each type of
* detector
* @param parent_Activity parent Activity that invokes this method as need to be able to
* grab assets folder of application as well as output a toast message to
* Activity in case problems with creating the Detector.
*/
public void setupDetector(Activity parent_Activity){
//
cropSize = TF_OD_API_INPUT_SIZE;
//create Detector as instance of either TensorFlowYoloDetect,
// TensorFlowMultiBoxDetector or TensorFlowObjectDetectionAPIModel
//depending on the MODE set for this class
if (MODE == Detector.DetectorMode.YOLO) {
detector =
TensorFlowYoloDetector.create(
parent_Activity.getAssets(),
YOLO_MODEL_FILE,
YOLO_INPUT_SIZE,
YOLO_INPUT_NAME,
YOLO_OUTPUT_NAMES,
YOLO_BLOCK_SIZE);
cropSize = YOLO_INPUT_SIZE;
} else if (MODE == Detector.DetectorMode.MULTIBOX) {
detector =
TensorFlowMultiBoxDetector.create(
parent_Activity.getAssets(),
MB_MODEL_FILE,
MB_LOCATION_FILE,
MB_IMAGE_MEAN,
MB_IMAGE_STD,
MB_INPUT_NAME,
MB_OUTPUT_LOCATIONS_NAME,
MB_OUTPUT_SCORES_NAME);
cropSize = MB_INPUT_SIZE;
} else {
try {
detector = TensorFlowObjectDetectionAPIModel.create(
parent_Activity.getAssets(), TF_OD_API_MODEL_FILE, TF_OD_API_LABELS_FILE, TF_OD_API_INPUT_SIZE);
cropSize = TF_OD_API_INPUT_SIZE;
} catch (final IOException e) {
LOGGER.e("Exception initializing classifier!", e);
Toast toast =
Toast.makeText(
parent_Activity.getApplicationContext(), "Classifier could not be initialized", Toast.LENGTH_SHORT);
toast.show();
}
}
}
/**
* method to process the Image by passing it to the detector (Classifier instance previously setup)
* using as input the imageBitmap
* @param imageBitmap image want to process
*
* @return Bitmap which is bitmap which has drawn on top rectangles to represent the locations of
* detected objects in the image along with their identity and confidence value
*/
protected Bitmap processImage(Bitmap imageBitmap) { // ADD some controller logic --see cloned code's DetectorActivity use of isProcessingFrame--
// to drop frames and NOT process them if the last frame being processed is not done yet
/* if (isProcessingFrame == true) return; */
++timestamp;
final long currTimestamp = timestamp;
//if detector not set up do not process the image
if (this.detector == null)
return imageBitmap;
//downsize input imageBitMap to appropriate size cropSize
this.croppedBitmap = ImageUtil.scaleBitmapDown(imageBitmap, this.cropSize); // YOU MUST ALSO ADD CODE TO CREATE THE KIND OF BITMAP INPUT TO YOUR TRAINED CNN
//Now pass this to Classifier detector to perform inference (recognition)
LOGGER.i("Preparing image " + currTimestamp + " for detection in bg thread.");
//run in background -- TO DO make in background
LOGGER.i("Running detection on image " + currTimestamp);
final long startTime = SystemClock.uptimeMillis();
final List<Classifier.Recognition> results = detector.recognizeImage(croppedBitmap);
lastProcessingTimeMs = SystemClock.uptimeMillis() - startTime;
//Now create a new image where display the image and the results of the recognition
Bitmap newResultsBitmap = Bitmap.createBitmap(imageBitmap);
final Canvas canvas = new Canvas(newResultsBitmap); //grab canvas for drawing associated with the newResultsBitmap
final Paint paint = new Paint();
paint.setStyle(Paint.Style.STROKE);
paint.setStrokeWidth(2.0f);
paint.setTextSize(paint.getTextSize()*2); //double default text size
Random rand = new Random();
float label_x, label_y; //location of where will print the recogntion result label+confidence
//setup thresholds on confidence --anything less and will not draw that recognition result
float minimumConfidence = MINIMUM_CONFIDENCE_TF_OD_API;
switch (MODE) {
case TF_OD_API:
minimumConfidence = MINIMUM_CONFIDENCE_TF_OD_API;
break;
case MULTIBOX:
minimumConfidence = MINIMUM_CONFIDENCE_MULTIBOX;
break;
case YOLO:
minimumConfidence = MINIMUM_CONFIDENCE_YOLO;
break;
}
final List<Classifier.Recognition> mappedRecognitions =
new LinkedList<Classifier.Recognition>();
//dummy paint
paint.setColor(Color.RED);
canvas.drawRect(new RectF(100,100,200,200), paint);
canvas.drawText("dummy",150,150, paint);
//cycle through each recognition result and if confidence > minimumConfidence then draw the location as a rectange and display info
for (final Classifier.Recognition result : results) {
final RectF location = result.getLocation();
// if (location != null && result.getConfidence() >= minimumConfidence) {
if (location != null && result.getConfidence() >= 0) {
//setup color of paint randomly
// generate the random integers for r, g and b value
paint.setARGB(255, rand.nextInt(255), rand.nextInt(255), rand.nextInt(255));
//we must scale the original location to correctly resize
RectF scaledLocation = this.scaleBoundingBox(location, croppedBitmap.getWidth(), croppedBitmap.getHeight(),imageBitmap.getWidth(), imageBitmap.getHeight());
canvas.drawRect(scaledLocation, paint);
result.setLocation(scaledLocation);
//draw out the recognition label and confidence
label_x = (scaledLocation.left + scaledLocation.right)/2;
label_y = scaledLocation.top + 16;
canvas.drawText(result.toString(), label_x, label_y, paint);
mappedRecognitions.add(result); ///do we need this??
}
} /* when done processing Frame set your controller logic appropriately so the very next incomming frame will be processed
isProcessingFrame = false; */
return newResultsBitmap;
}
/**
* have Rectangle boundingBox represented in a scaled space of
* width x height we need to convert it to scaledBoundingBox rectangle in
* a space of scaled_width x scaled_height
* @param boundingBox
* @param width
* @param height
* @param scaled_width
* @param scaled_height
* @return scaledBoundingBox
*/
public RectF scaleBoundingBox( RectF boundingBox, int width, int height, int scaled_width, int scaled_height){
float widthScaleFactor = ((float) scaled_width)/width;
float heightScaleFactor = ((float) scaled_height)/height;
RectF scaledBoundingBox = new RectF(boundingBox.left*scaled_width, boundingBox.top*heightScaleFactor,
boundingBox.right*scaled_width, boundingBox.bottom*heightScaleFactor);
return scaledBoundingBox;
}
}
Special NOTE: FROM readme file in download of samples on tensorflow.org
1. Install the latest version of Bazel as per the instructions [on the Bazel
website](https://bazel.build/versions/master/docs/install.html).
2. The Android NDK is required to build the native (C/C++) TensorFlow code. The
current recommended version is 14b, which may be found
[here](https://developer.android.com/ndk/downloads/older_releases.html#ndk-14b-downloads).
3. The Android SDK and build tools may be obtained
[here](https://developer.android.com/tools/revisions/build-tools.html), or
alternatively as part of [Android
Studio](https://developer.android.com/studio/index.html). Build tools API >=
23 is required to build the TF Android demo (though it will run on API >= 21
devices).
Android Inference Library
Because Android apps need to be written in Java, and core TensorFlow is in C++, TensorFlow has a JNI library to interface between the two. Its interface is aimed only at inference, so it provides the ability to load a graph, set up inputs, and run the model to calculate particular outputs. You can see the full documentation for the minimal set of methods inTensorFlowInferenceInterface.java
The demos applications use this interface, so they’re a good place to look for example usage. You can download prebuilt binary jars at ci.tensorflow.org.


