Adding Tensorflow to an existing Android OpenCV application (where OpenCV digitizes image and
provides callback for video frames)
Video demo of the Code working
FIRST: you should read the other option on cloning the code because it explains the code they provide (and you will be using this code here --adding it to YOUR project)
************CODE***********
STEP 1: Unzip the code to a directory
STEP 2: Separately create a new bland ANdroid project and add the OpenCV module to the project (see class materials on help for this)
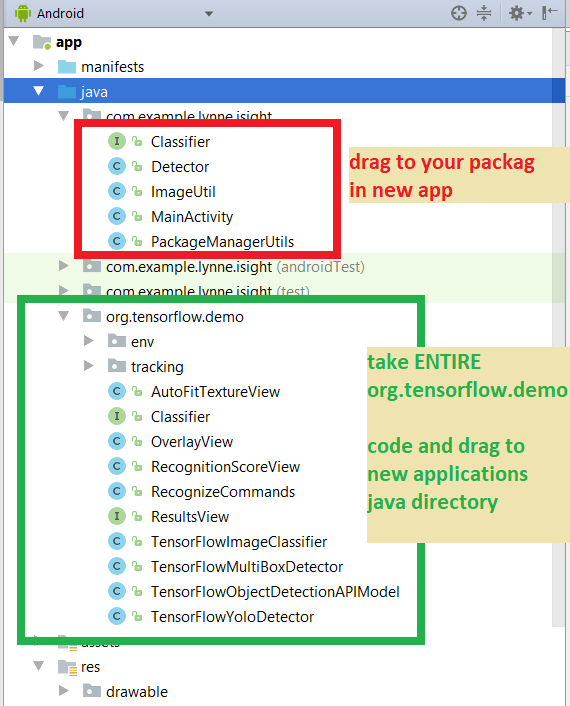
STEP 3: Copy over ALL the java code from the zip directory application to your new application
STEP 3.1) my com.examp.lynne.isight will go to whatever the package name is of YOUR new applicaiton code
STEP 3.2) copy the package code org.tensorflow.demo into your java directory

A quick explanation of the Detector.java code --- this basically is a simplified version of the original code in DetectorActivity in the cloned code (from tensorflow.org's github) --- I simply sets up one of 3 CNNs - TensorFlowObjectDetectionAPIModel OR TensorFlowYoloDetector OR TensorFlowMultiBoxDetector based on the hardcoded class variable called MODE (currently set for TensorFlowObjectDetectionAPIModel.
Then it uses this CNN to run on images that OpenCV captures from the camera.
-
Various trained models and object list (this is list of objects can detect) are in the assests directory.
-
Each of the TensorFlow* CNN class represent different CNN's like the TensorFlowObjectDetectionAPIModel uses SSD (single shot detector) algorithm to create the CNN and use it. The TensorFlowYoloDetector uses the Yolo algorithm
-
Controll of the camera and any image processing can be done by OpenCV. The input to the CNN requires a specially formatted image and is specific to the trained model and will require you to CHANGE THIS CODE for any new models either you create or try to use and this will include: choosing color space, size of input image and how you put the 2D image pixels into a 1D input array for the CNN. Currently this code:
-
resizes the rgb image to 300x300 for the TensorFlowObjectDetectionAPIModel that uses the ssd trained model in the assets file.
-
|
Now the Detecor class is used inside my MainActivity class
//declare Tensorflow objects
Detector tensorFlowDetector = new Detector();
//LATER ON IN CODE
public void onCameraViewStarted(int width, int height) {
    //in case the TensorFlow option is chosen you must create instance of Detector
    //depending on value of MODE variable in Detector class will load one of a few hard
    // coded types of tensorflow models (ObjectDetectionAPIModel or Yolo or Multibox) and
    // the associated asset files representing the pre-trained model file (.pb extension) and
    // the class labels --objects we are detecting (*.txt) see Detector class for details
    this.tensorFlowDetector.setupDetector(this);
}
//LATER ON WHEN YOU WANT TO USE THE DETECTOR --say in onCameraFrame()
/going to use created instance of Detector class to perform detection
//convert imageMat to a bitmap
Bitmap bitmap = Bitmap.createBitmap(imageMat.width(),  imageMat.height(),Bitmap.Config.ARGB_8888);;
Utils.matToBitmap(imageMat,bitmap);


//now call detection on bitmap and it will return bitmap that has results drawn into it
//   with bounding boxes around each object recognized > threshold for confidence
//   along with the label
Bitmap resultsBitmap = this.tensorFlowDetector.processImage(bitmap);


//convert the bitmap back to Mat
Mat returnImageMat = new Mat();
Utils.bitmapToMat(resultsBitmap,returnImageMat);


return returnImageMat;
STEP 4: Make an assets file in your project and then Copy over ALL assets file from the zipped application assets directory
STEP 5: Copy over ALL the resources files from zipped application to your new applications resoruces directory
STEP 6: Change the Google Cloud VIsion key in the res/strings.xml to point to YOUR key you registered
with your google cloud vision account ----THAT IS IF YOU WANT THE Google cloud vision code to also work
*****but has nothing to do with the tensorflow stuff
STEP 7: Copy over the Manifest file from zipped directory to your new application
STEP 8: Run the code (see video above for results)
STEP 9: Now your ready to edit --add whatever you want --get rid of stuff--this App looks like part of Project 2
WARNING --- this code does not address issue explictly of dropped frames and relies on OpenCV to
handle this with its internal code.
WARNING 2 - whether you run this code OR the original cloned code that uses Android Camera rather than OPENCV --the code is NOT fast --- and some of you for some of your applications do not want to process video frames but, have the user take picture -stop the video frames process and then when
user prompts in some way continue ---it wont feel so bad then.
