Keras in Tensorflow 2.0 -- a collection of basic code snipets
***** taken from https://colab.research.google.com/github/tensorflow/docs/blob/master/site/en/tutorials/quickstart/advanced.ipynb#scrollTo=i-2pkctU_Ci7 *******
Importing Tensorflow in your python program
import tensorflow as tf |
# ANOTHER example where also load specific layers from import tensorflow as tf from tensorflow.keras.layers import Dense, Flatten, Conv2D
from tensorflow.keras import Model |
DATAset Loading
Loading a pre-exising Dataset (comes with TensorFlow- MNIST
mnist = tf.keras.datasets.mnist
(x_train, y_train), (x_test, y_test) = mnist.load_data()
x_train, x_test = x_train / 255.0, x_test / 255.0
Batching and shuffling data loaded above--setting up training and testing datasets, randomizing (shuffle) and batching(consecuitive samples in one batch)
--from_tensor_slices = creates data set which are slices as specified inside
-----shuffle = randomizes data and select 10,000 elements
-----batch = Combines consecutive elements (in this case 32) of this dataset into batches.
Read about Loading images with tf.keras - https://www.tensorflow.org/tutorials/load_data/images
-
OPTION 1: Using tf.keras.preprocessing
# The 1./255 is to convert from uint8 to float32 in range [0,1].
image_generator = tf.keras.preprocessing.image.ImageDataGenerator(rescale=1./255)


#define parameters
BATCH_SIZE = 32
IMG_HEIGHT = 224
IMG_WIDTH = 224
STEPS_PER_EPOCH = np.ceil(image_count/BATCH_SIZE)
#use image_generator to load images in a sepcified directory data_dir train_data_gen = image_generator.flow_from_directory(directory=str(data_dir),
batch_size=BATCH_SIZE,
shuffle=True,
target_size=(IMG_HEIGHT, IMG_WIDTH),
classes = list(CLASS_NAMES))
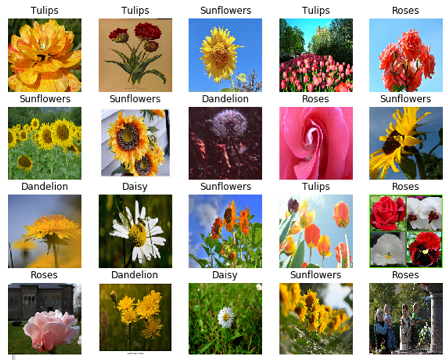
#function to load a batch of images
def show_batch(image_batch, label_batch):
  plt.figure(figsize=(10,10))
  for n in range(25):
      ax = plt.subplot(5,5,n+1)
      plt.imshow(image_batch[n])
      plt.title(CLASS_NAMES[label_batch[n]==1][0].title())
      plt.axis('off')


#call function to load images
image_batch, label_batch = next(train_data_gen)
show_batch(image_batch, label_batch)


******** THIS IS WHAT YOU WILL GEET DEPENDING ON THE IMAGES IN YOUR DIRECTORY*******
OPTION 2: Loading them as a DataSet
#+++++++++++++++++++++++++++++++++++++++++++++++++++++++++
#setup the directory as a Dataset list
list_ds = tf.data.Dataset.list_files(str(data_dir/'*/*'))
#+++++++++++++++++++++++++++++++++++++++++++++++++++++++++
#for informaiton --lets print out first 5 files
for f in list_ds.take(5):
  print(f.numpy())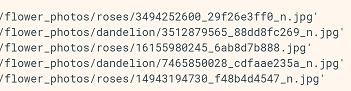
#+++++++++++++++++++++++++++++++++++++++++++++++++++++++++
#function that converts a file paths to an (image_data, label) pair:
def get_label(file_path):
  # convert the path to a list of path components
  parts = tf.strings.split(file_path, '/')
  # The second to last is the class-directory
  return parts[-2] == CLASS_NAMES
def decode_img(img):
# convert the compressed string to a 3D uint8 tensor
img = tf.image.decode_jpeg(img, channels=3)
# Use `convert_image_dtype` to convert to floats in the [0,1] range.
img = tf.image.convert_image_dtype(img, tf.float32)
# resize the image to the desired size.
return tf.image.resize(img, [IMG_WIDTH, IMG_HEIGHT]) def process_path(file_path):
label = get_label(file_path)
# load the raw data from the file as a string
img = tf.io.read_file(file_path)
img = decode_img(img)
return img, label #+++++++++++++++++++++++++++++++++++++++++++++++++++++++++ #USE Dataset.map to create a dataset of image, label pairs:
# Set `num_parallel_calls` so multiple images are loaded/processed in parallel.
labeled_ds = list_ds.map(process_path, num_parallel_calls=AUTOTUNE) for image, label in labeled_ds.take(1):
print("Image shape: ", image.numpy().shape)
print("Label: ", label.numpy())
#+++++++++++++++++++++++++++++++++++++++++++++++++++++++++
#function to setup images data sets with shuffle and batching
def prepare_for_training(ds, cache=True, shuffle_buffer_size=1000):
  # This is a small dataset, only load it once, and keep it in memory.
  # use `.cache(filename)` to cache preprocessing work for datasets that don't
  # fit in memory.
  if cache:
    if isinstance(cache, str):
      ds = ds.cache(cache)
    else:
      ds = ds.cache()

  ds = ds.shuffle(buffer_size=shuffle_buffer_size)

  # Repeat forever
  ds = ds.repeat()

  ds = ds.batch(BATCH_SIZE)

  # `prefetch` lets the dataset fetch batches in the background while the model
  # is training.
  ds = ds.prefetch(buffer_size=AUTOTUNE)

  return ds
#+++++++++++++++++++++++++++++++++++++++++++++++++++++++++
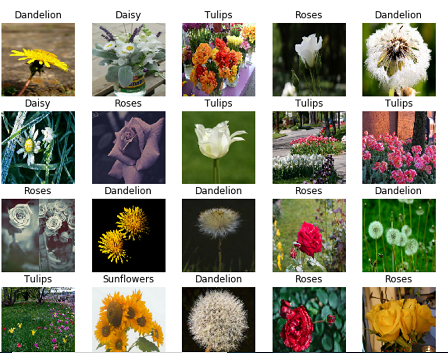
# call previous function to prepare the images in labeled_ds for trainingtrain_ds = prepare_for_training(labeled_ds)
#+++++++++++++++++++++++++++++++++++++++++++++++++++++++++
# show a batch of the images
image_batch, label_batch = next(iter(train_ds))
show_batch(image_batch.numpy(), label_batch.numpy())
# NOTICE: they are shuffled as compared to images shown before
Creating a NN (not CNN) using Sequential and adding layers
read about TF Keras optimzers and loss functions which in part define how Networks "learn" their weights
model = tf.keras.models.Sequential([ |
#another example of an optimizer(Stochastic gradient descent optimize) and loss funciton (mean squared error) |
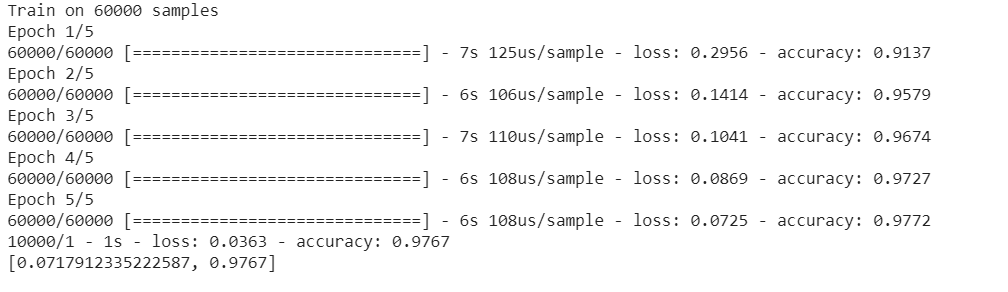
Training and Testing our Previous simple NN --using fit and evaluate (method of Sequential class)
#take training data and match labels and train for 5 epochs
model.fit(x_train, y_train, epochs=5)
#using testing day and matched labels persrforms testing #returns the loss value & metrics values for the model in test mode. model.evaluate(x_test, y_test, verbose=2) |
OUTPUT from above on our simple NN
|
Creating a CNN using Sequential and adding layers
ex 1: here adding to model a single 2D convolutional layer
ex 2: creating a class for our model - with 1 2D convolution layer + Relu + softmax layer (cant get much smaller)
#Create model and add one 2D convolution layer to it model = Sequential() |
#model with one 2D convolution layer with Relu activation fucntion, flatten data, then Relu followed by Softmax layers
class MyModel(Model):
def __init__(self):
super(MyModel, self).__init__()
self.conv1 = Conv2D(32, 3, activation='relu')
self.flatten = Flatten()
self.d1 = Dense(128, activation='relu')
self.d2 = Dense(10, activation='softmax') |
Setting up Optimizer and Loss function for our previous CNN
loss_object = tf.keras.losses.SparseCategoricalCrossentropy() |
Setting up metrics to measure loss&accuracy in training and testing
train_loss = tf.keras.metrics.Mean(name='train_loss')
train_accuracy = tf.keras.metrics.SparseCategoricalAccuracy(name='train_accuracy') |
Train & Test our CNN Model -- create function train_step that uses GradientTape
NOTE: you do not have to set up all this code you can simply call .fit() and .evaluate() as shown in NN example above.
# STEP 1 Create afunction train_step
@tf.function

def train_step(images, labels):
  with tf.GradientTape() as tape:
     predictions = model(images)
     loss = loss_object(labels, predictions)

  gradients = tape.gradient(loss, model.trainable_variables)
  optimizer.apply_gradients(zip(gradients, model.trainable_variables))
train_loss(loss) train_accuracy(labels, predictions) |
#STEP 2: Create a function test_step
@tf.function
def test_step(images, labels):
   predictions = model(images)
   t_loss = loss_object(labels, predictions)
test_loss(t_loss) test_accuracy(labels, predictions) |
#STEP 3: perform training for 5 EPOCHS train and test EPOCHS = 5 for epoch in range(EPOCHS): for images, labels in train_ds: train_step(images, labels) for test_images, test_labels in test_ds: test_step(test_images, test_labels) template = 'Epoch {}, Loss: {}, Accuracy: {}, Test Loss: {}, Test Accuracy: {}' print(template.format(epoch+1, train_loss.result(), train_accuracy.result()*100, test_loss.result(), test_accuracy.result()*100)) # Reset the metrics for the next epoch train_loss.reset_states() train_accuracy.reset_states() test_loss.reset_states() test_accuracy.reset_states() |
OUTPUT of training & Testing above Epoch 1, Loss: 0.1386866271495819, Accuracy: 95.80000305175781, Test Loss: 0.06485684961080551, Test Accuracy: 97.91999816894531 |
Advanced: what about scaling larger models so can run more efficiently --check out estimators (not covered) --- what are estimators
Estimators encapsulate the following actions:
training
evaluation
prediction
export for serving including deployment onto ML pipelines using TFX
You can run Estimator-based models on a local host or on a distributed multi-server environment without changing your model. Furthermore, you can run Estimator-based models on CPUs, GPUs, or TPUs without recoding your model.
