Basics behind NodeJS+Express + Google Cloud Vision
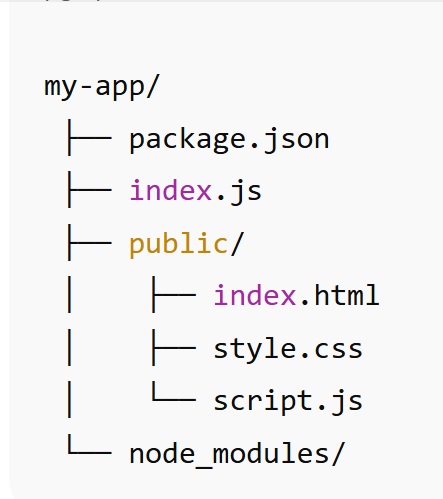
It’s a tiny image-labeling web app. In the browser, a user selects an image and clicks Upload. Your Express server receives that image (via Multer), sends the raw bytes to Google Cloud Vision’s Label Detection API, gets back a list of labels (e.g., “Cat”, “Mammal”, “Pet”), and returns those labels as JSON. The page then renders the labels as a list. There are 2 primary files index.js & index.html described below. Depending on your IDE setup your project file structure (& IDE of choice) ****MAY*** look something like the following:
PRE-REQ: install in NodeJS+Express Project appropriate modules
npm install @google-cloud/vision multer
@google-cloud/vision
-
Purpose: The official Google Cloud Vision API client library for Node.js.
-
What it does:
It lets your code easily call Google Cloud Vision services (like label detection, OCR, logo detection, etc.) without manually sending REST API requests.
multer
-
Purpose: Middleware for handling multipart/form-data, primarily used for file uploads in Express.
-
What it does:
It parses incoming HTTP POST requests that contain file uploads (e.g., form submissions from HTML <input type="file">).
UNDERSTANDING/PRE-REQ: Google Cloud Project (GAE) deploymet special setup
What “credentials” are needed by your GAE webappWhen your app calls the Google Cloud Vision API, Google’s servers must know who you are and that you have permission to use the Vision API.
In Node.js, the Vision client library (@google-cloud/vision) automatically looks for those credentials in a few standard ways.How the Vision client finds credentialsWhen you create this client: const client = new ImageAnnotatorClient(); you aren’t explicitly passing any credentials. Instead, the library automatically searches for them in this order (simplified):
Example: running locally vs. deployed
Permissions you needThe service account (whether it’s your own or the default App Engine one) must have a role that includes Vision access.
Without that, the Vision client will return an authorization error. SummarySo we can say
It means:
|
CODE:
index.js
Explanation (see steps in code below)
STEP 1:
Import the required modules — Express (for building the web server), Google Cloud Vision (for performing image analysis), and Multer (for handling image uploads).
STEP 2:
Initialize the Express application, create a Vision API client, and configure Multer to store uploaded images in memory rather than on disk.
STEP 3:
Tell Express to serve static files from the public directory so that users can access the HTML, CSS, and JavaScript files through their browsers.
STEP 4:
Enable JSON body parsing in Express to handle data sent in JSON format from client requests.
STEP 5:
Define a POST route (for example, /analyze) that uses Multer middleware to receive and process an uploaded image file from the client’s form submission.
STEP 6:
This step is triggered by the frontend script inside your webpage.
When a user selects an image and clicks “Analyze,” the script in the browser sends the image file to this backend route using an HTTP POST request.
Here, the uploaded image (req.file.buffer) is passed to the Google Cloud Vision API for analysis (such as label or text detection).
Once the Vision API returns its results, the backend sends the analysis data back to the browser as a JSON response.
The frontend script then displays these results dynamically to the user on the webpage.
STEP 7:
Add a centralized error-handling function that captures any runtime or Vision API errors and returns a clean, structured error message to the client.
STEP 8:
Start the Express server and listen on the specified port so that the application can accept and respond to incoming requests from the frontend.
const express = require('express');
const { ImageAnnotatorClient } = require('@google-cloud/vision');
const multer = require('multer');
const path = require('path');
const app = express();
const port = 3000;
//STEP 1: Configure Multer for file uploads
//Uses in-memory storage so you don’t write to disk; Vision can read the buffer directly.
//Enforces a 5 MB limit to avoid very large uploads. |
index.html
explanation of html (can make part of ejs instead)
- A standard multipart form with a file input named "image" (this must match upload.single('image') on the server).
- An empty <div> to display the results.
- SCRIPT - Prevents the default submit, builds a FormData object (which includes the chosen file), and posts it to /upload.
-
Expects a JSON response with a labels array.
-
If present, renders the labels as an unordered list; otherwise shows a generic error.
use-case Flow: request–response flow at runtime
-
User navigates to / → server sends index.html.
-
User picks an image and clicks Upload → JS intercepts the submit, posts a FormData with field image to /upload.
-
Express + Multer parse the multipart body; req.file.buffer holds the image bytes (max 5 MB).
-
Vision API (client.labelDetection) analyzes the image and returns label annotations (each with description, score, etc.).
-
Server responds with { "labels": ["Cat", "Mammal", "Whiskers", ...] }.
-
Browser renders the list of labels inside #results.
<!DOCTYPE html>
<html lang="en">
<head>
<meta  charset="UTF-8">
<meta  name="viewport" content="width=device-width,  initial-scale=1.0">
<title>Google Cloud Vision API Demo</title>
</head>
<body>

<h1>Upload  an Image for Label Detection</h1>
<form  action="/upload" method="POST"  enctype="multipart/form-data">
<input  type="file" name="image" accept="image/*"  required>
<button  type="submit">Upload Image</button>
</form>
<div id="results"></div> <script>
document.querySelector('form').addEventListener('submit', async (event) => {
event.preventDefault();
const formData = new FormData(event.target);
const response = await fetch('/upload', {
method: 'POST',
body: formData
}); |
(OPTIONAL) Setup Credentials json file for running locally
step by step so you can create a service account key file for local testing of your Vision API app.OverviewYou’re going to:
This lets your local Node.js app authenticate exactly like it will on App Engine. Step-by-Step Guide1. Open the Google Cloud ConsoleGo to: Make sure you’ve selected the same project where your Vision API is enabled.
2. Click “Create Service Account”Give it:
Click Create and continue.
3. Assign a roleUnder Grant this service account access to project, choose:
Click Continue then Done.
4. Generate a keyIn the list of service accounts:
A .json file will be downloaded to your computer — this is your key file. It looks something like this (simplified example): { "type": "service_account",
"project_id": "my-vision-demo",
"private_key_id": "b1a2c3d4e5f678901234567890abcdef12345678",
"private_key": "-----BEGIN PRIVATE KEY-----\nMIIEv...<snip>...==\n-----END PRIVATE KEY-----\n",
"client_email": "vision-demo@my-vision-demo.iam.gserviceaccount.com",
"client_id": "123456789012345678901",
"auth_uri": "https://accounts.google.com/o/oauth2/auth",
"token_uri": "https://oauth2.googleapis.com/token",
"auth_provider_x509_cert_url": "https://www.googleapis.com/oauth2/v1/certs",
"client_x509_cert_url": "https://www.googleapis.com/robot/v1/metadata/x509/vision-demo%40my-vision-demo.iam.gserviceaccount.com"
}
5. Set the environment variableIn your terminal (macOS/Linux): export GOOGLE_APPLICATION_CREDENTIALS="/path/to/your/vision-demo-key.json" Or on Windows PowerShell: setx GOOGLE_APPLICATION_CREDENTIALS "C:\path\to\your\vision-demo-key.json" To confirm: echo $GOOGLE_APPLICATION_CREDENTIALS
6. Test locally (from command line ---or you do it from your IDE)Now in the same terminal: npm install node index.js Open http://localhost:3000, upload an image, and you should see detected labels. Behind the scenes:
7. When you deploy to App EngineYou can delete or ignore the environment variable — App Engine automatically uses its default service account, and your code will still work without modification.
|
