|
CS6320: SW Engineering of Web Based Systems |
||||||
|
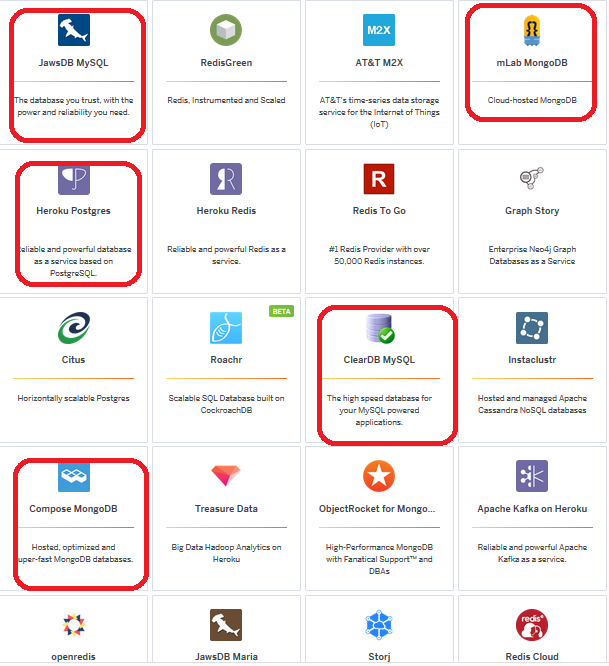
Heroku --Data Solutions (focusing on database type solutions)
MongoDB (3 vendors), MySQL (cleardb vendor), Postgres, Redis and more
GO HERE FOR MongoDB example !!!!!!!!!!!!!!!!
-
Postgress Example (beginning)...
STEP 1: Start by setting up the use of postgress addon inside your applicaiton directory on your development machine type
heroku addons:create heroku-postgresql:hobby-dev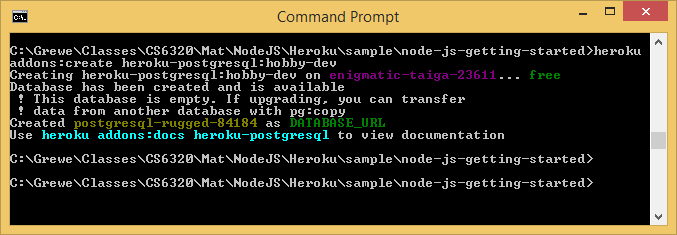
This creates a database, and sets a
DATABASE_URLenvironment variable (you can check by runningheroku config).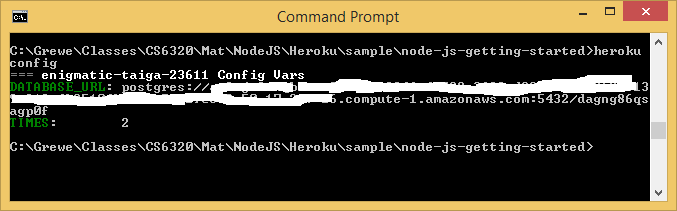
NOTE: Heroku is actually using Amazon AWS for postgress data storage
GO OVER THIS TUTORIAL TO FINISH EXPERIMENTING WITH DATABASE ON HEROKU https://devcenter.heroku.com/articles/getting-started-with-nodejs#provision-a-database
STEP 2: create the code in index.js (or wherever) to access/manipulate your database as you see fit and create any supporting view pages in views/pages directory
//PUT INSIDE YOUR index.js file (or whereever)
// Assumes DATABASE_URL in the heroku configs points to your PostGres database
// setups the url /db to connect to database and does a query from a table test_table
var pg = require('pg');
    app.get('/db', function (request, response) {
    pg.connect(process.env.DATABASE_URL, function(err, client, done) {
      client.query('SELECT * FROM test_table', function(err, result) {
        done();
        if (err)
         { console.error(err); response.send("Error " + err); }
        else
         { response.render('pages/db', {results: result.rows} ); }
      });
    });
  });
You must create a View in location views/pages/db.ejs
<!DOCTYPE html>
<html>
<head>
</head>
<body>
<div class="container">
<h2>Database Results</h2>
<ul>
<% results.forEach(function(r) { %>
<li><%= r.id %> - <%= r.name %></li>
<% }); %>
</ul>
</div>
</body>
</html>
STEP 3: Create the Postgress Database table you will be using. To do this you must install locally same version of postgress as Heroku uses. It will have a module called pg that contains psql for doing this.
YOU MUST ALSO read about each database useage on Heroku --for example Postgres is documented at https://devcenter.heroku.com/articles/heroku-postgresql, It shows you how to add the dependency for the pg module = postgres module to access postgress database on Heroku
Once you have Postgres installed locally, use the
heroku pg:psqlcommand to connect to the remote database, create a table and insert a row:$ heroku pg:psql psql (9.3.2, server 9.3.3) SSL connection (cipher: DHE-RSA-AES256-SHA, bits: 256) Type "help" for help. => create table test_table (id integer, name text); CREATE TABLE => insert into test_table values (1, 'hello database'); INSERT 0 1 => \q
STEP 4: run your /db url
Now when you access your app’s
/dbroute, you will see something like this: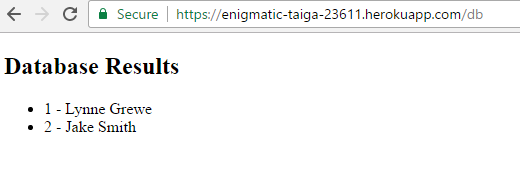
MongoDB Example ...read all about on Heroku MLab MongoDB page
MySQL Example (beginning)....
NOTE: at this time you must put credit card on account (even if using the free tier ignite level of MySQL) -- this is called verification see https://devcenter.heroku.com/articles/account-verification.... THESE POLICIES ARE SET BY HEROKU AND CAN CHANGE AT ANY TIME
- Add any add-on to the app, even if the add-on is free. The only exceptions to this are the free plans for the Heroku Postgres and Heroku Connect add-ons, which can be added without verification.
If you choose to do a credit card this is YOUR REPONSIBILITY not mine. I suggest buying a $5 visa gift card to limit your risk
NOTE: cleardb (.com) is a MySQL service that is separate from Heroku that Heroku uses to support MySQL.
heroku addons:create cleardb:ignite
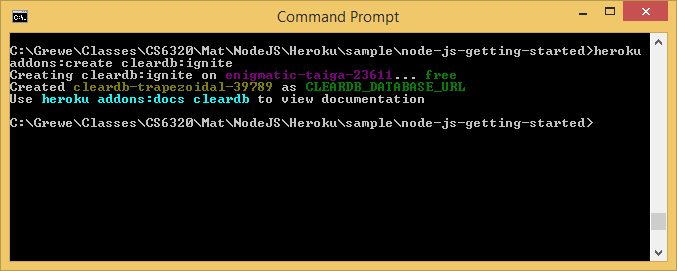
This creates a database, and sets a
DATABASE_URLenvironment variable (you can check by runningheroku config(when I run this I get the following --I have both a Postgres and MySQL database for this app specified but, not setup yet)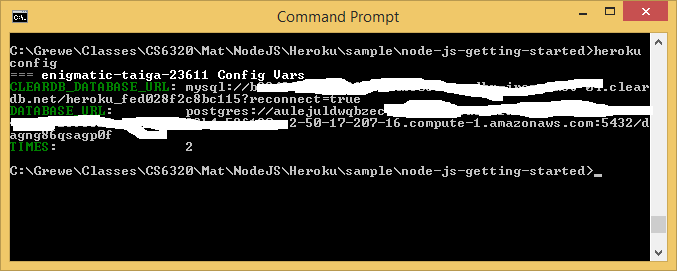
GO OVER THIS TUTORIAL TO FINISH EXPERIMENTING WITH DATABASE ON HEROKU https://devcenter.heroku.com/articles/cleardb and most importantly this tutorial that shows steps for NodeJS
Removing the ClearDB Add-On For Heroku
If you want to remove our Heroku Add-On (hopefully in order to move to a dedicated cluster!), simply use the following heroku command:
heroku addons:remove cleardb
Using SSL with NodeJS on Heroku
While we automatically generate SSL certificates for encryption purposes, the private key file must be modified in order to work with Heroku’s MySQL libraries.
To begin, download your certificates from your ClearDB dashboard, then run the following command on your private key file (the file with the name “key” in it):
$ openssl rsa -in cleardb_id-key.pem -out cleardb_id-key-no-password.pem
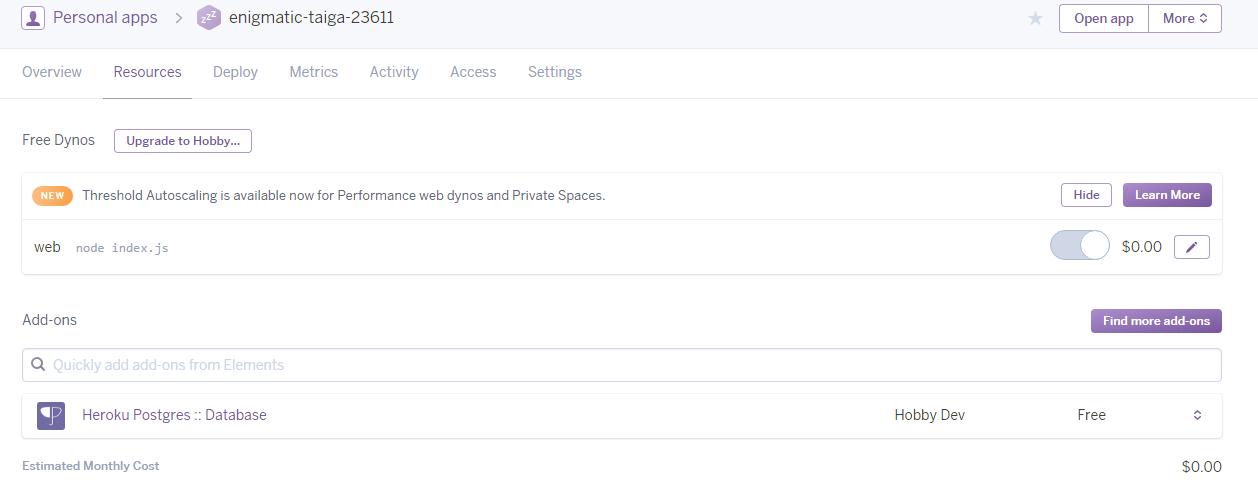
Using Heroku web console rather than command line
this is a dummy app I have deployed in my account
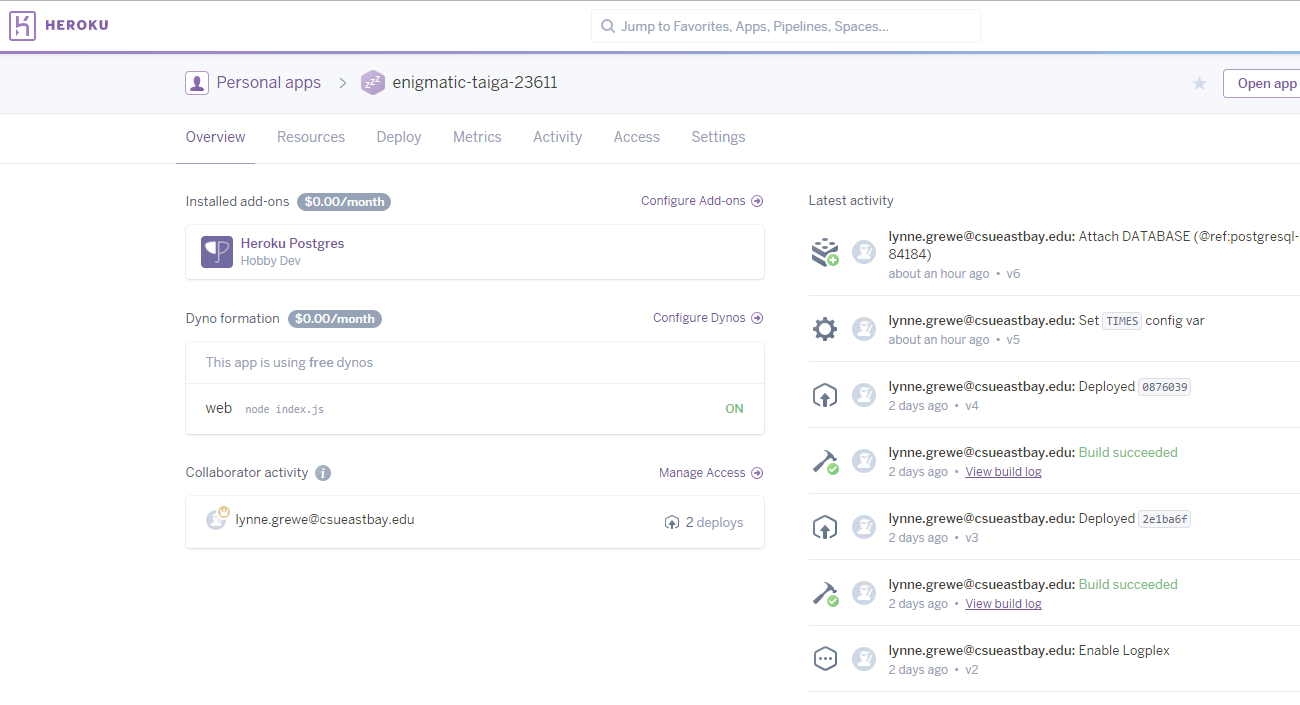
you can see I am using a Postgress database and my main app is index.js