CS4521: Mobile and Topics in Web Programming |
||||||
|
Google AdMob with Firebase
follow steps at https://firebase.google.com/docs/admob/android/quick-start
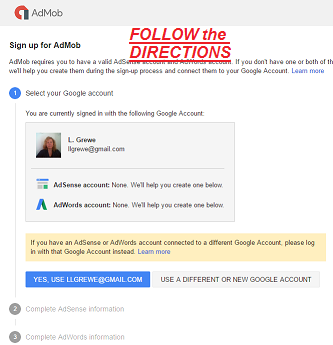
step 1: create project in Firebase console (if you don't have one yet)
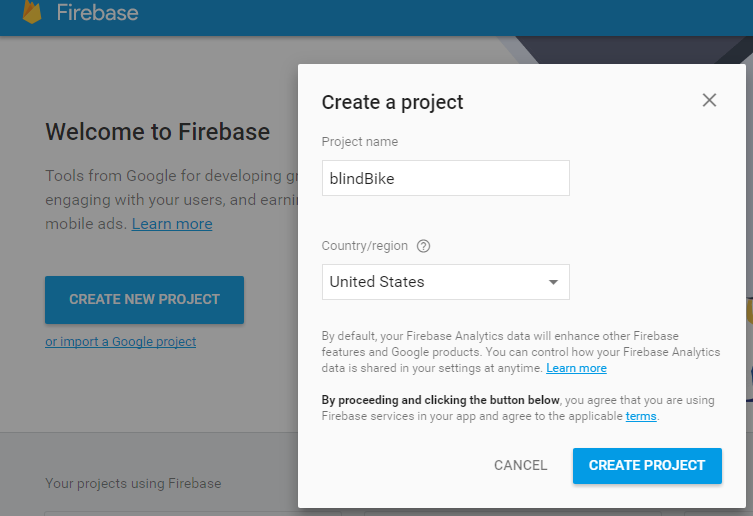
step 2: Add firebase to your project

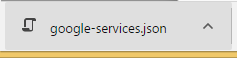
step 3: download the created google-services.json file to /app directory of project
step 4: add to build.gradle file at project level
buildscript {
    // ...
    dependencies {
        // ...
        classpath 'com.google.gms:google-services:3.0.0'
    }
}
step 5: add to build.gradle file for the app
Then, in your module Gradle file (usually the app/build.gradle), add the apply plugin line at the bottom of the file to enable the Gradle plugin:
apply plugin: 'com.android.application'

android {
  // ...
}

dependencies {
  // ...
  compile 'com.google.firebase:firebase-core:9.8.0'
  compile 'com.google.firebase:firebase-ads:9.8.0'


  // Getting a "Could not find" error? Make sure you have
  // the latest Google Repository in the Android SDK manager
}

// ADD THIS AT THE BOTTOM
apply plugin: 'com.google.gms.google-services'
step 6: sync project because of changes in steps 4 and 5, compile project to make sure everything setup
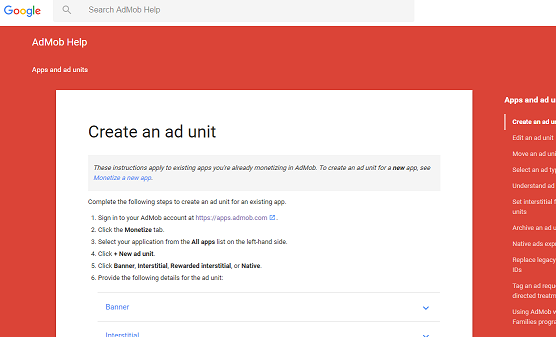
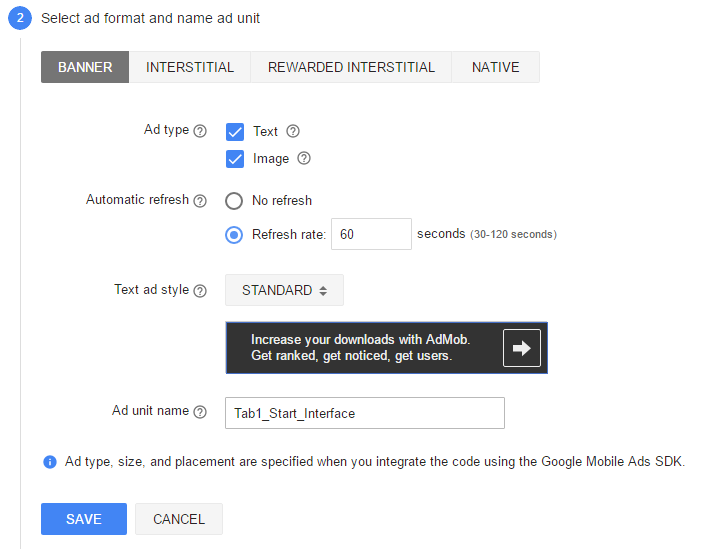
step 7: for each activity you want an Advertisement to appear in create an "ad unit" with its own unique ad id
- follow instructions on developer.google.com https://support.google.com/admob/answer/3052638 (or search for "google Ad Mob adding an ad unit")
You will create Admob
you will then setup a application for admob (one time for each app you want to serve ads in ) and then specify the kind of Ad you want to show
Give an Ad unit
name that you can remember
you will get and Ad id for you unit that looks like:
ca-app-pub-XXXXXXXXXXXXXXXX/NNNNNNNNNN
step 8:add string in your strings.xml file that contains your new ad id (if you have multiople ad its, you will add a line for each)
<string name="banner_ad_unit_id">ca-app-pub-3940256099942544/6300978111</string>MAKE SURE WHEN TESTING -- you use a Test Ad Unit ID -- SEE https://firebase.google.com/docs/admob/android/quick-start
......Current the example above is a testing id -- but check with google info to make sure works.
You can get in trouble if you develop and test with a REAL Ad ID
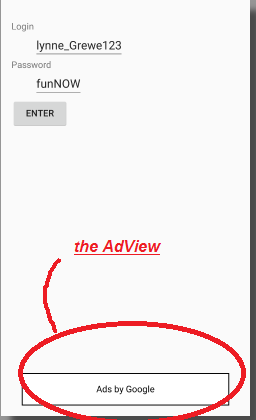
step 9: Place an AdView in (each) Activity layout you want Ad to appear and add
xmlns:ads="http://schemas.android.com/apk/res-auto"
tag to your top Layout tag
XML LAYOUT FILE
<ScrollView xmlns:android="http://schemas.android.com/apk/res/android"
android:id="@+id/ScrollView01"
android:layout_width="match_parent"
android:layout_height="match_parent"
android:fillViewport="true">
<LinearLayout xmlns:android="http://schemas.android.com/apk/res/android"
android:layout_width="match_parent"
android:layout_height="match_parent"
android:focusable="true"
android:focusableInTouchMode="true"
xmlns:ads="http://schemas.android.com/apk/res-auto"
>
<RelativeLayout xmlns:android="http://schemas.android.com/apk/res/android"
xmlns:tools="http://schemas.android.com/tools"
android:layout_width="match_parent"
android:layout_height="match_parent"
android:paddingBottom="@dimen/activity_vertical_margin"
android:paddingLeft="@dimen/activity_horizontal_margin"
android:paddingRight="@dimen/activity_horizontal_margin"
android:paddingTop="@dimen/activity_vertical_margin"
tools:context="computervision.grewe.bikerappcs4521.MainActivity$PlaceholderFragment">
<TextView
android:id="@+id/section_label"
android:layout_width="wrap_content"
android:layout_height="wrap_content" />
<Button
android:layout_width="wrap_content"
android:layout_height="wrap_content"
android:text="Enter"
android:id="@+id/button_biker_enter"
android:layout_below="@+id/editText_Password"
android:layout_alignParentStart="true" />
<TextView
android:layout_width="wrap_content"
android:layout_height="wrap_content"
android:textAppearance="?android:attr/textAppearanceSmall"
android:text="Login"
android:id="@+id/textView"
android:layout_below="@+id/section_label"
android:layout_alignParentStart="true" />
<EditText
android:layout_width="wrap_content"
android:layout_height="wrap_content"
android:id="@+id/editText_Login"
android:text="lynne_Grewe123"
android:layout_below="@+id/textView"
android:layout_toEndOf="@+id/textView" />
<TextView
android:layout_width="wrap_content"
android:layout_height="wrap_content"
android:text="Password"
android:id="@+id/textView2"
android:layout_below="@+id/editText_Login"
android:layout_alignParentStart="true" />
<EditText
android:layout_width="wrap_content"
android:layout_height="wrap_content"
android:id="@+id/editText_Password"
android:text="funNOW"
android:layout_below="@+id/textView2"
android:layout_alignStart="@+id/editText_Login" />
<com.google.android.gms.ads.AdView
android:id="@+id/adView"
android:layout_width="wrap_content"
android:layout_height="wrap_content"
android:layout_centerHorizontal="true"
android:layout_alignParentBottom="true"
ads:adSize="BANNER"
ads:adUnitId="@string/banner_ad_unit_id">
</com.google.android.gms.ads.AdView>
</RelativeLayout>
</LinearLayout>
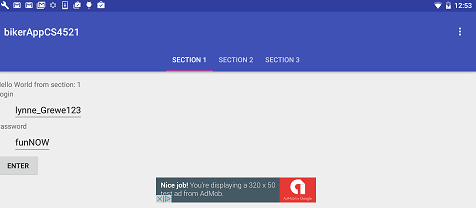
</ScrollView>Resulting Interface with AdView on the bottom
step 10: initialize MobileAds using following in your Main Activity (launch) class
call
MobileAds.initialize()in theonCreate()method of theMainActivityclass.
like the followingMobileAds.initialize(getApplicationContext(), "ca-app-pub-3940256099942544~3347511713");where you substitute YOUR AdMob Application ID
TIP: To find your app ID, click the App management (in your MobAd account) option under the settings dropdown (located in the upper right-hand corner) on the AdMob account page. App IDs have the form
ca-app-pub-XXXXXXXXXXXXXXXX~NNNNNNNNNN.
step 11: Load the Ad into the AdView in your Interface
The last change needed is for you to add to your app's main activity class some Java code that loads an ad into the
AdView, as follows. (NOTE if the AdView is inside a Fragment UI instead you do this in the onCreateView method of the Fragment class)MainActivity.java (excerpt)
package ...
import ...
import ...
import com.google.android.gms.ads.AdRequest;
import com.google.android.gms.ads.AdView;
public class MainActivity extends ActionBarActivity {
...
protected void onCreate(Bundle savedInstanceState) {
super.onCreate(savedInstanceState);
setContentView(R.layout.activity_main);
MobileAds.initialize(getApplicationContext(), "ca-app-pub-3940256099942544~3347511713");
AdView mAdView = (AdView) findViewById(R.id.adView);
AdRequest adRequest = new AdRequest.Builder().build();
mAdView.loadAd(adRequest); /*** special note replace the AdRequest line above with the following if doing Development and Testing
see https://firebase.google.com/docs/admob/android/targeting#test_ads
AdRequest request = new AdRequest.Builder()**/
.addTestDevice(AdRequest.DEVICE_ID_EMULATOR) // All emulators
.addTestDevice("AC98C820A50B4AD8A2106EDE96FB87D4") // An example device ID
.build();
}
...
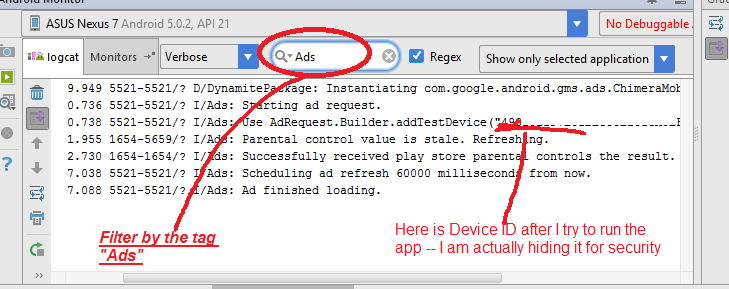
}HOW TO FIND your system ID needed in above code for testing: The Mobile Ads SDK uses the tag "Ads" when writing to logcat. In Android Studio's logcat viewer, you can filter for that tag when you View the system log. This makes it easier to find your device's ID.
step 12: NOTE: if you are putting your Ad at the bottom make sure you don't overlay any other GUI elements in its location or the Ad will not show --> RUN IT