CS4521: Mobile and Topics in Web Programming |
||||||
|
Demo Doing NodeJS on AWS Lambda where DEVELOP LOCALLY
FOLLOW https://www.youtube.com/watch?v=71cd5XerKss
0) assumes you have installed NodeJS and npm on local machine
- Search the registry for new versions of all the packages installed.
- If there's a newer version, then install it.
- Point dependent packages at the new version, if it satisfies their dependency.
- Remove the old versions, if no other package names them as a dependency.
Installing Node.js
Install the latest "Long Term Support (LTS)" version of Node.js. It can be downloaded from the URL https://nodejs.org/en/download. To verify you have Node.js and its package manager (npm), try running the commands:
and:node -vnpm -vwhich should run and print out the version numbers of your node and npm programs.
What is npm???
npm makes it easy for Javascript developers to share the code that they've created to solve particular problems, and for other developers to reuse that code in their own applications.
nstalling stuff:
npm installYou probably got npm because you want to install stuff. That's what package managers do, they install stuff.
npm install blerginstalls the latest version ofblerg. You can also giveinstalla tarball, a folder, or a url to a tarball. If you runnpm installwithout any arguments, it tries to install the current folder.This command can do a lot of stuff.
npm help installwill tell you more than you ever wanted to know about it.Showing things:
npm lsThe
npm lscommand shows what's on your system, and also what's available in the registry. The arguments are beautifully colored greps. For instancenpm ls installedwould show you what's installed on your system.npm ls installed marakwould show you all the packages installed on your system created by Marak.
npm help lsfor more info.Updating packages:
npm updateThe
updatecommand does a few things.
So basically, update behaves a lot like a "standard" package manager's update command, except that it also checks to make sure that the new version isn't going to break anything before it points stuff at it.
You see, npm keeps you out of dependency hell.
Development:
npm linkThe link command symlinks a package folder into your system, so that changes are automatically reflected. It also installs the
"dependencies"and"devDependencies"packages from your package.json file.This is one of the most useful tools for developing programs with node. Give your thing a name and a version in a
package.jsonfile. Specify a few dependencies and amainmodule. Then runnpm link, and go to town coding it and testing it out in the node repl. It's great.
Making a Package: The
package.jsonfile.The
package.jsonfile goes in the root of your package. It tells npm how your package is structured, and what to do to install it.Most of the time, you only need the
"name","version", and"main"fields (even for node-waf compiled addons).If you don't know json, then it's about time you learn it. It's pretty easy.
1) Create directory where you want to make your app
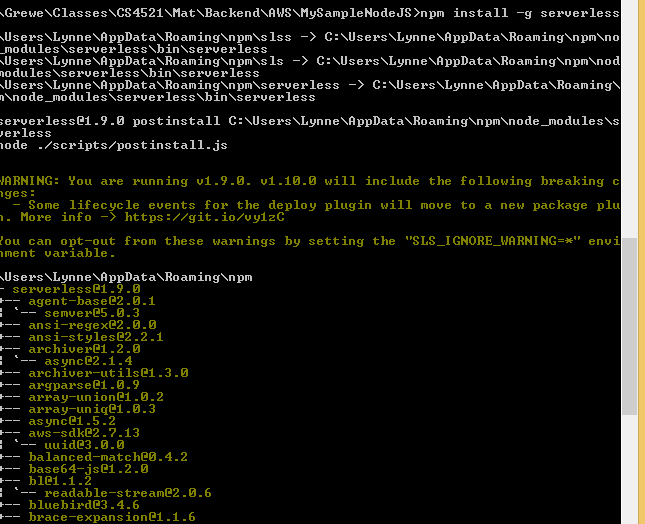
2) Install the Serverless NodeJS framework (https://www.npmjs.com/package/serverless ) npm install -g serverless
{The Framework uses new event-driven compute services, like AWS Lambda, Google CloudFunctions, and more. It's a command-line tool, providing scaffolding, workflow automation and best practices for developing and deploying your serverless architecture. }
and will getnpm install -g serverless
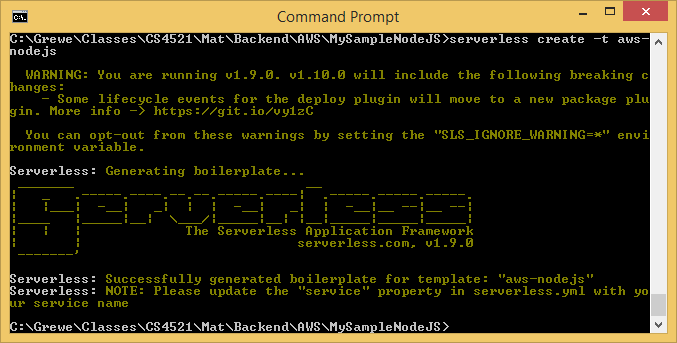
2) Create "project" using the AWS template from the Serverless NodeJS framework
serverless create -t aws-nodejsand will get
We get the following files made in the directory
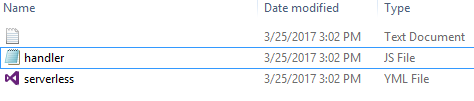
handler.js file // this is the code that will be executed based on any request to it
//event = contact protocol (http), parameters passed to request, post/get data,etc.
//response = is the response will send back from this function --currently a stupid message'use strict';
module.exports.hello = (event, context, callback) => {

    //this is where you will add your code and also alter the resonse object below as desired
   const response = {
      statusCode: 200,
      body: JSON.stringify({
            message: 'Go Serverless v1.0! Your function executed successfully!',
            input: event,
           }),
  };


// to the original calling request we return the response created above
callback(null, response);
// Use this code if you don't use the http event with the LAMBDA-PROXY integration // callback(null, { message: 'Go Serverless v1.0! Your function executed successfully!', event }); };serverless.yml // file that configures our serverless framework nodejs application
// most of the configuration file is commented out
CHANGE the name of the application ---here calling it grewe_nodejs_lambda_test# Welcome to Serverless!
#
# This file is the main config file for your service.
# It's very minimal at this point and uses default values.
# You can always add more config options for more control.
# We've included some commented out config examples here.
# Just uncomment any of them to get that config option.
#
# For full config options, check the docs:
# docs.serverless.com
#
# Happy Coding!
service: grewe-nodejs-lambda-test
# You can pin your service to only deploy with a specific Serverless version
# Check out our docs for more details
# frameworkVersion: "=X.X.X"
provider:
      name: aws
      runtime: nodejs4.3
# you can overwrite defaults here
# stage: dev
# region: us-east-1
# you can add statements to the Lambda function's IAM Role here
# iamRoleStatements:
# - Effect: "Allow"
# Action:
# - "s3:ListBucket"
# Resource: { "Fn::Join" : ["", ["arn:aws:s3:::", { "Ref" : "ServerlessDeploymentBucket" } ] ] }
# - Effect: "Allow"
# Action:
# - "s3:PutObject"
# Resource:
# Fn::Join:
# - ""
# - - "arn:aws:s3:::"
# - "Ref" : "ServerlessDeploymentBucket"
# - "/*"
# you can define service wide environment variables here
# environment:
# variable1: value1
# you can add packaging information here
#package:
# include:
# - include-me.js
# - include-me-dir/**
# exclude:
# - exclude-me.js
# - exclude-me-dir/**
functions:
hello:
handler: handler.hello
# The following are a few example events you can configure
# NOTE: Please make sure to change your handler code to work with those events
# Check the event documentation for details
# events:
# - http:
# path: users/create
# method: get
# - s3: ${env:BUCKET}
# - schedule: rate(10 minutes)
# - sns: greeter-topic
# - stream: arn:aws:dynamodb:region:XXXXXX:table/foo/stream/1970-01-01T00:00:00.000
# - alexaSkill
# - iot:
# sql: "SELECT * FROM 'some_topic'"
# - cloudwatchEvent:
# event:
# source:
# - "aws.ec2"
# detail-type:
# - "EC2 Instance State-change Notification"
# detail:
# state:
# - pending
# Define function environment variables here
# environment:
# variable2: value2
# you can add CloudFormation resource templates here
#resources:
# Resources:
# NewResource:
# Type: AWS::S3::Bucket
# Properties:
# BucketName: my-new-bucket
# Outputs:
# NewOutput:
# Description: "Description for the output"
# Value: "Some output value"
changed to simple yml file that triggers our code for http get request to URI /create/users
#simple test function for nodejs on AWS lambdaservice: grewe_nodejs_lambda_test # NOTE: update this with your service nameprovider: name: aws runtime: nodejs4.3#dealing with events functions: hello: handler: handler.hello events: - http: path: users/create method: get
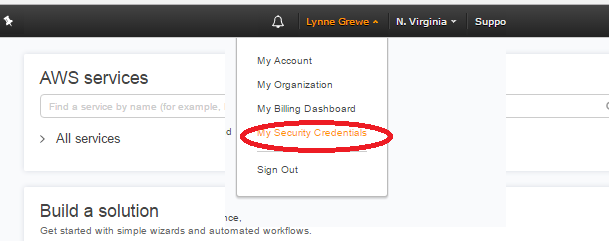
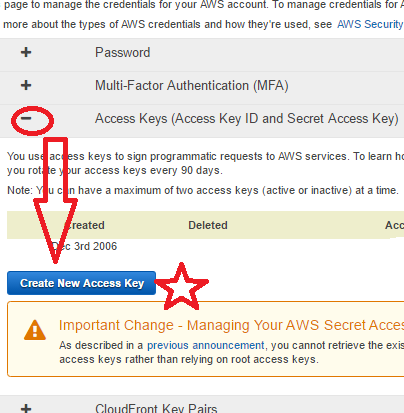
3) Create credentials for app to interact with AWS:
---special note: showing creating credentials to access all of AWS account which might be more than you need --read up more about AWS credentials to see how you might make some just for certain access-----
log into AWS console and to to "My Security Credentials"
FOLLOW DIRECTIONS HERE https://www.youtube.com/watch?v=71cd5XerKss
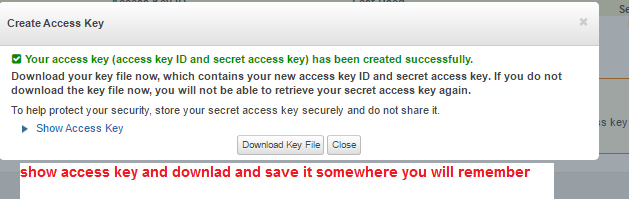
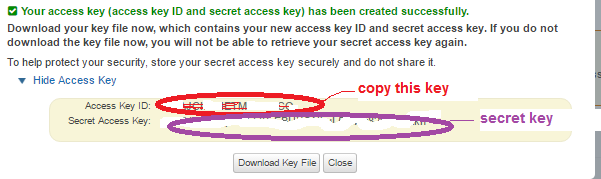
4) Setup Security Credentials created in #3
type the following
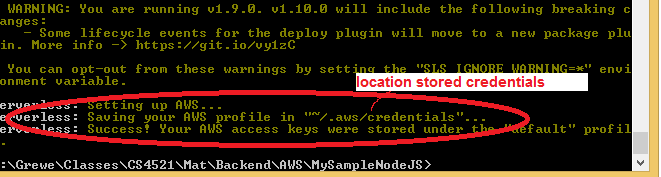
serverless config credentials --provider aws --key YOUR_KEY_FROM_3 --secret PASTE_SECRET_KEY_HEREand will get
location of stored credentials
5) Deploy Application
type the following
serverless deployand will get
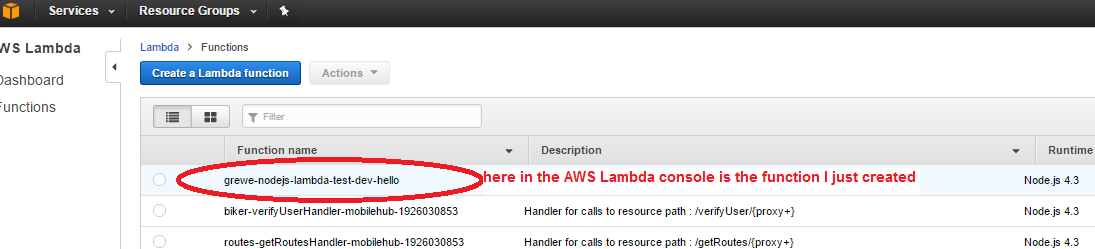
go into your AWS Lambda console and you will see the new function we just deployed
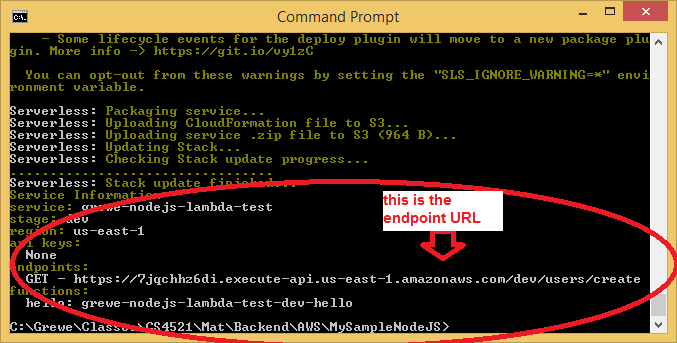
6) Test your deployed application at the Endpoint You Specified
above the endpoint I deployed to was https://7jqchhz6di.execute-api.us-east-1.amazonaws.com/dev/users/create

7) Edit your Code (*.js file and/or config *.yml) and re-Deploy Application as you wish and test
TIP: finish going over video https://www.youtube.com/watch?v=71cd5XerKss to see how make a second
function
TIP: if you want to create a new "stage" like going from dev (see url above is default) to production type in:
type the following
serverless deploy -stage production
and will get endpoint url https://whatever/production/user/create instead of the /dev/user/create