Android: Views and ViewGroups
-
An Activity can contain views and ViewGroups.
-
android.view.View = base class for all Views.
- example sub-classes include: TextView, ImageView, etc.
-
android.view.ViewGroup = Layout for views it contains, subclasses include
android.widget.LinearLayout
android.widget.AbsoluteLayout
android.widget.TableLayout
android.widget.RelativeLayout
android.widget.FrameLayout
android.widget.ScrollLayout
LinearLayout (<LinearLayout> or android.widget.LinearLayout)
- arranges by single column or row.
- child views can be arranged vertically or horizontally.
Examples
<LinearLayout xmlns:android="http://schemas.android.com/apk/res/android"
    android:layout_width="fill_parent"
    android:layout_height="fill_parent"
    android:orientation="vertical" >

   <Text View
      android:layout_width=“fill_parent”
      android:layout_height=“wrap_content”
      android:text=“@string/hello”/>

</LinearLayout>
<?xml version="1.0" encoding="utf-8"?>
<LinearLayout xmlns:android="http://schemas.android.com/apk/res/android"
 android:layout_width="fill_parent"
 android:layout_height="fill_parent"
 android:orientation="vertical" >

<Button
   android:id="@+id/btn_webbrowser"
   android:layout_width="fill_parent"
   android:layout_height="wrap_content"
   android:text="Web Browser"
   android:onClick="onClickWebBrowser" />

<Button
   android:id="@+id/btn_makecalls"
   android:layout_width="fill_parent"
   android:layout_height="wrap_content"
   android:text="Make Calls"
   android:onClick="onClickMakeCalls"  />

<Button
   android:id="@+id/btn_showMap"
   android:layout_width="fill_parent"
   android:layout_height="wrap_content"
   android:text="Show Map"
   android:onClick="onClickShowMap" />

<Button
   android:id="@+id/btn_launchMyBrowser"
   android:layout_width="fill_parent"
   android:layout_height="wrap_content"
   android:text="Launch My Browser"
   android:onClick="onClickLaunchMyBrowser" />

</LinearLayout>
Common View and ViewGroups Parameters ---can set in XML or code
in XML android:orientation="vertical"
in Code ll.setOrientation("VERTICAL"); //where ll is LinearLayout instance
Attribute Description layout_width specifies width of View or ViewGroup
YOU MUST READ THIS ABOUT SCREEN DENSITY
- fill_parent = take same width as parent
- match_parent
- wrap_content = takes only enough width for content in this item
- 100dp = 100 density-independent pixel (1dp = 1 pixel on a 160dpi screen, baseline density of Android) ,RECOMMENDED UNITS--then Android will scale the size of item to density of screen. Actual pixels = dp*(dpi /160) ---see below for dpi.
- For example, suppose you have specified a button with layout_width=160dp, then on a machine (or emulator) with mdpi the actual pixels taken up are 160dp * (160/160) = 160px. BUT, on a hdpi machine of 240dpi, the actual pixels 160*(240/160) = 240px --- so IN EACH CASE WILL SCALE TO TAKE UP THE SAME PORTION OF THE SCREEN
- 100sp = 100 scale-independent pixel --used for specifying font sizes
- 100pt = 100 point, 1 point = 1/72 of an inch, based on physical screen size
- 100px = 100 pixel = actual pixels on the screen. NOT recommented as your UI may not render correctly on devices with different screen resolutions
NOTE: DPI Android current screen density/ resolution bases (see documentation to make sure current):
- ldpi = low density pixels per inch = 120dpi
- mdpi = medium density pixels per inch = 160dpi
- hdpi = high density pixels per inch = 240dpi
- xhdpi = Extra high density =320dpi
.
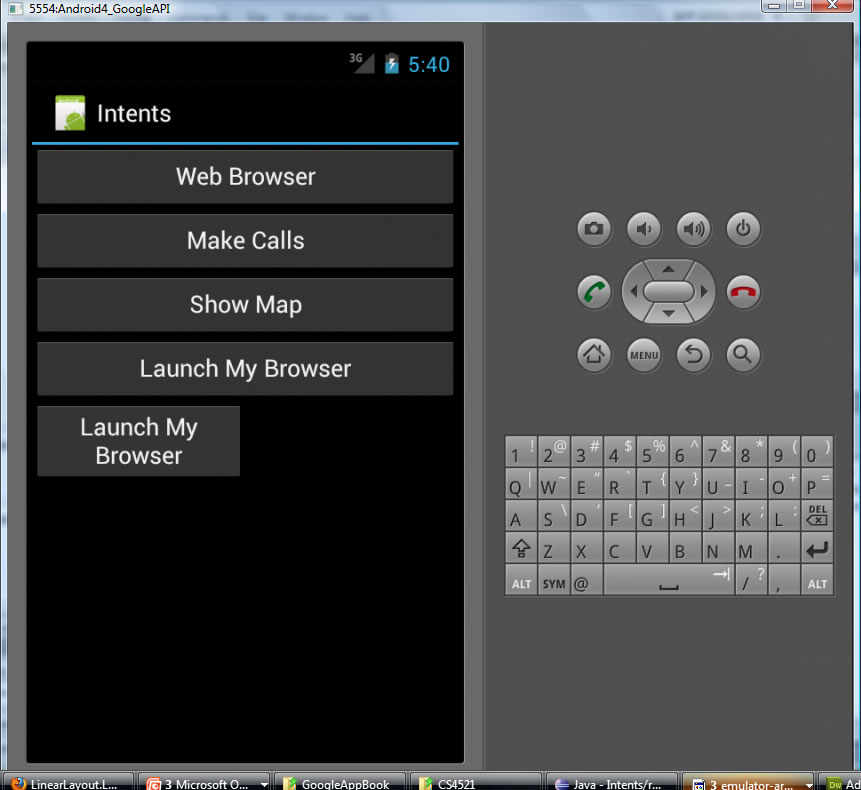
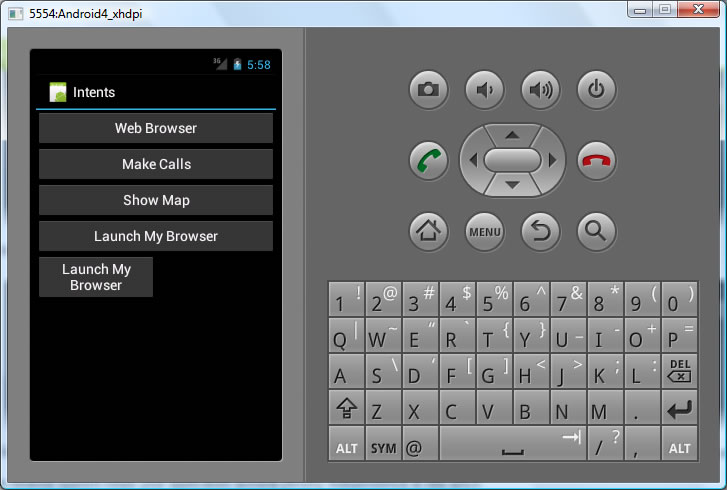
Because use layout_width=160dp, it scales the button to take up same size on 2 different resolution screen devices!!!!!!!!!!! This is what you want!!!!
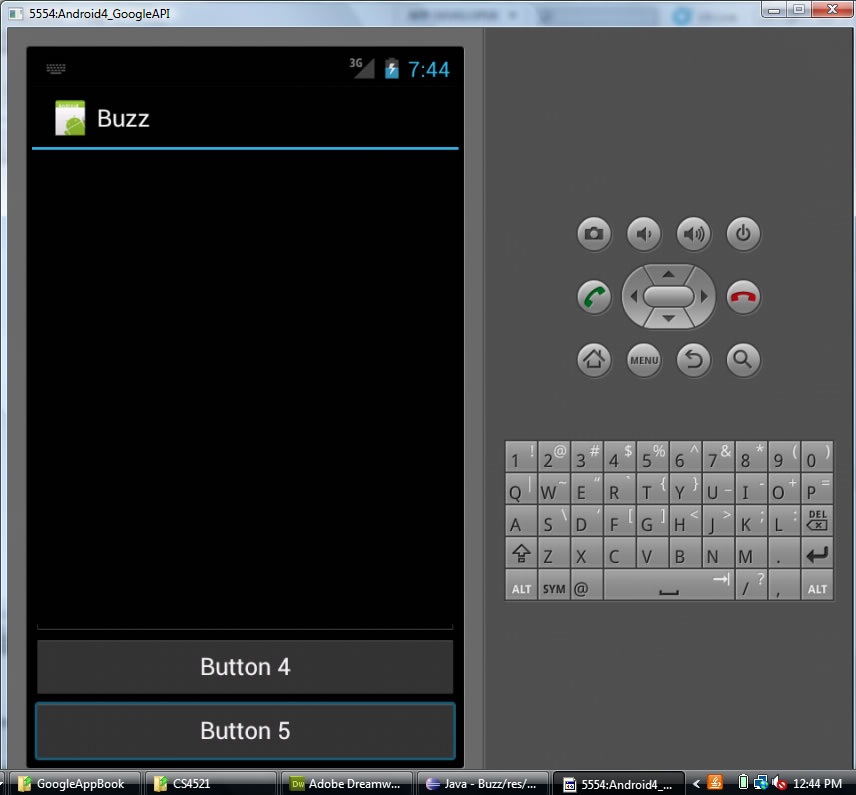
Bottom Button at 160dp layout_width with emulator with LARGER
Bottom Button at 160dp layout_width with emulator with SMALLER SCREEN
.
layout_height specifies height
- same as width
layout_marginTop extra space on top
- 100dp = 100 density-independent pixel (1dp = 1 pixel on a 160dpi screen, baseline density of Android) ,RECOMMENDED UNITS--then Android will scale the size of item to density of screen
- 100sp = 100 scale-independent pixel --used for specifying font sizes
- 100pt = 100 point, 1 point = 1/72 of an inch, based on physical screen size
- 100px = 100 pixel = actual pixels on the screen. NOT recommented as your UI may not render correctly on devices with different screen resolutions
Example: (TextView below some buttons)
<TextView
            android:id="@+id/app_name"
            android:layout_height="wrap_content"
            android:layout_width="wrap_content"
            android:textStyle="bold"
            android:textSize="16sp"
            android:textColor="@color/white"
            android:text="This is a test to show you the how this text area will look.  It has some longer content."
            android:layout_marginLeft="20dip"
            android:layout_marginRight="20dip"
            android:layout_marginTop="12dip"
            android:layout_marginBottom="4dip" />
layout_marginBottom extra space on bottom side
- same as marginTop
layout_marginLeft extra space on left side
- same as marginTop
layout_marginRight extra space on right side
- same as marginTop
layout_gravity how child views are positioned
- left, right, center, top, bottom, center_vertical, fill_vertical, center_horizontal, fill_horizontal, fill, clip_vertical, clip_horizontal, start,end
- SEE API for details
Example:
<LinearyLayout ******
<Button
andriod:layout_width="160dp"
android:layout_height="wrap_content"
android:text="Button 1"
android:layout_gravity="left"
android:layout_weight="1" /><Button
andriod:layout_width="160dp"
android:layout_height="wrap_content"
android:text="Button 2"
android:layout_gravity="center"
android:layout_weight="2" /><Button
andriod:layout_width="160dp"
android:layout_height="wrap_content"
android:text="Button 3"
android:layout_gravity="right"
android:layout_weight="3" />layout_weight how much extra space in layout should be allocated to View (only when in LinearLayout or TableView)
- Indicates how much of the extra space in the LinearLayout will be allocated to the view associated with these LayoutParams. Specify 0 if the view should not be stretched. Otherwise the extra pixels will be pro-rated among all views whose weight is greater than 0.
- Are relative numbers --- totals up all weights and does then a percentage...you see in above example Button 3 has weight of 3 out of 6 total for all buttons, this means will take up about 3/6 or 1/2 of screent and you see it does that vertically.
- SEE above example
- Question: what will happen if you change the LinearLayout of the above example to orientation horizontal and layout-width=0db for all buttons? Try it out. (now Button 3 will have height to only contain content but, will take up 3/6 or 1/2 of the screen width.
layout_x x-coordinate
- used in AbsoluteLayout where you specify the examct location of the children.
- 100dp = 100 density-independent pixel (1dp = 1 pixel on a 160dpi screen, baseline density of Android) ,RECOMMENDED UNITS--then Android will scale the size of item to density of screen. Actual pixels = dp*(dpi /160) ---see below for dpi
- 100sp = 100 scale-independent pixel --used for specifying font sizes
- 100pt = 100 point, 1 point = 1/72 of an inch, based on physical screen size
- 100px = 100 pixel = actual pixels on the screen. NOT recommented as your UI may not render correctly on devices with different screen resolutions
- Example DO NOT USE ABSOLUTELAYOUT is DEPRECIATED!!!
<?xml version="1.0" encoding="utf-8"?>
<AbsoluteLayout xmlns:android="http://schemas.android.com/apk/res/android"
                   android:layout_width="fill_parent"
                   android:layout_height="fill_parent" >
 <Button
                   android:id="@+id/button1"
                   android:layout_width="180dp"
                   android:layout_height="wrap_content"
                   android:layout_x="125dp"
                   android:layout_y="361dp"
                   android:text="Button" />
<Button android:id="@+id/button2" android:layout_width="113dp" android:layout_height="wrap_content" android:layout_x="12dp" android:layout_y="361dp" android:text="Button" /></AbsoluteLayout>layout_y y-coordinate
- same as x-coordinate
- see example above
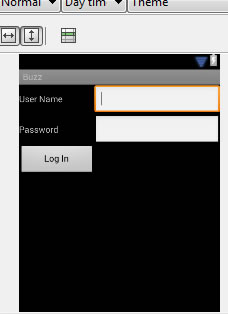
TableLayout (<TableLayout> or android.widget.TableLayout)...see also GridLayout
- arranges table in rows and columns
- Fills table row at a time from left to right creates columns (cells) one item per cell.
Example
(NOTE: if you need to create an empty cell is one location add <TextView/> to it.
 |
<?xml version="1.0" encoding="utf-8"?>
<TableLayout xmlns:android="http://schemas.android.com/apk/res/android"
       android:layout_width="match_parent"
       android:layout_height="match_parent" >
 <TableRow
       android:id="@+id/tableRow1"
       android:layout_width="wrap_content"
       android:layout_height="wrap_content" >
 <TextView
       android:id="@+id/textUserNameLabel"
       android:layout_width="120dp"
       android:layout_height="wrap_content"
       android:text="User Name" />
 <EditText
       android:id="@+id/txtUserName"
       android:layout_width="200dp"
       android:layout_height="wrap_content"
       android:inputType="textPersonName" >
<requestFocus /> </EditText> </TableRow> <TableRow
android:id="@+id/tableRow2"
android:layout_width="wrap_content"
android:layout_height="wrap_content" >
 <TextView
       android:id="@+id/txtPasswordLabel"
       android:layout_width="fill_parent"
       android:layout_height="wrap_content"
       android:text="Password" />
 <EditText
       android:id="@+id/txtPassword"
       android:layout_width="wrap_content"
       android:layout_height="wrap_content"
       android:password="true"
       android:inputType="enter password" />
</TableRow> <TableRow
android:id="@+id/tableRow3"
android:layout_width="wrap_content"
android:layout_height="wrap_content" >
 <Button
       android:id="@+id/buttonLogIn"
       android:layout_width="wrap_content"
       android:layout_height="wrap_content"
       android:text="Log In" />
</TableRow> </TableLayout> |
(NOTE: if you need to create an empty cell is one location add <TextView/> to it.)
|
<?xml version="1.0" encoding="utf-8"?>
<TableLayout xmlns:android="http://schemas.android.com/apk/res/android"
       android:layout_width="match_parent"
       android:layout_height="match_parent" >
 <TableRow
       android:id="@+id/tableRow1"
       android:layout_width="wrap_content"
       android:layout_height="wrap_content" >
 <TextView
       android:id="@+id/textUserNameLabel"
       android:layout_width="120dp"
       android:layout_height="wrap_content"
       android:text="User Name" />
 <EditText
       android:id="@+id/txtUserName"
       android:layout_width="200dp"
       android:layout_height="wrap_content"
       android:inputType="textPersonName" >
<requestFocus /> </EditText> </TableRow> <TableRow
android:id="@+id/tableRow2"
android:layout_width="wrap_content"
android:layout_height="wrap_content" >
 <TextView
       android:id="@+id/txtPasswordLabel"
       android:layout_width="fill_parent"
       android:layout_height="wrap_content"
       android:text="Password" />
 <EditText
       android:id="@+id/txtPassword"
       android:layout_width="wrap_content"
       android:layout_height="wrap_content"
       android:password="true"
       android:inputType="enter password" />
</TableRow> <TableRow
android:id="@+id/tableRow3"
android:layout_width="wrap_content"
android:layout_height="wrap_content" >
<TextView />
 <Button
       android:id="@+id/buttonLogIn"
       android:layout_width="wrap_content"
       android:layout_height="wrap_content"
       android:text="Log In" />
</TableRow> </TableLayout> |

RelativeLayout (<RelativeLayout> or android.widget.RelativeLayout)\
- arranges child views relative to each other (like relative layout in CSS if you are familiar)
- uses layout parameters like layout_alignLeft="@+id/SPECIFY_ID_OF_ITEM_TO_BE_LEFT_OF")
- layout_below ="@+id/SPECIFY_ID_OF_ITEM_TO_BE_BELOW")
- layout_alignParentTop, layout_alignParentBottom, layout_alignParentRight, layout_alignParentLeft, **** SEE API
Example
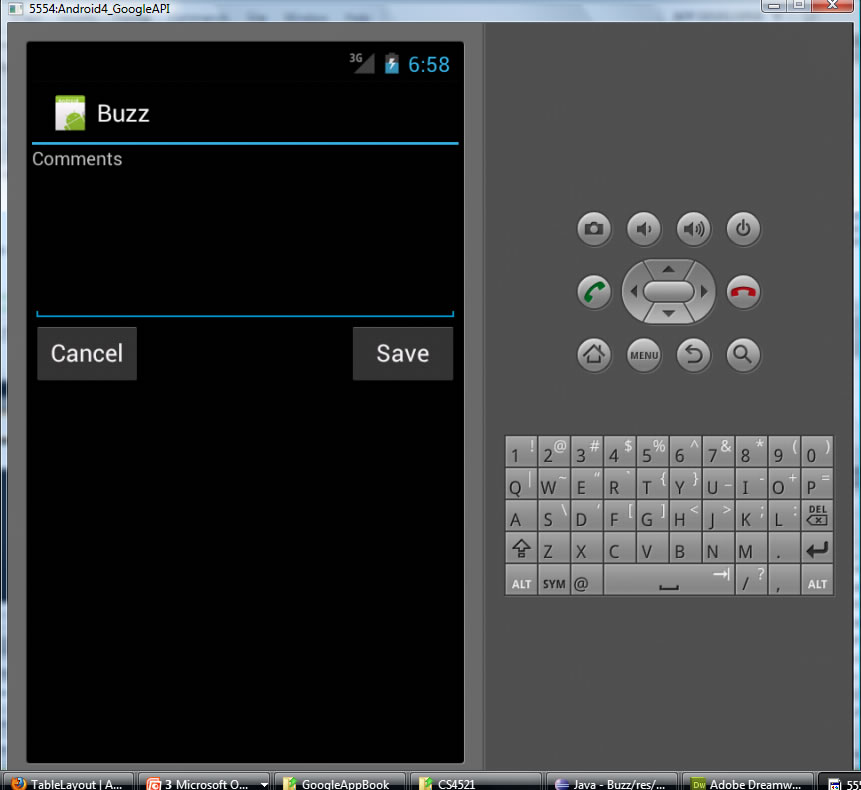 |
<?xml version="1.0" encoding="utf-8"?>
<RelativeLayout xmlns:android="http://schemas.android.com/apk/res/android"
       android:layout_width="fill_parent"
       android:layout_height="fill_parent" >
 <TextView
         android:id="@+id/lblComments"
         android:layout_width="wrap_content"
         android:layout_height="wrap_content"
         android:layout_alignParentLeft="true"
         android:layout_alignParentTop="true"
         android:text="Comments" />
<EditText
         android:id="@+id/txtComments"
         android:layout_width="fill_parent"
         android:layout_height="170px"
         android:textSize="18sp"
         android:layout_alignLeft="@+id/lblComments"
         android:layout_below="@+id/lblComments"
         android:layout_centerHorizontal ="true" />
<Button
         android:id="@+id/btnSave"
         android:layout_width="125px"
         android:layout_height="wrap_content"
         android:text ="Save"
         android:layout_below="@id/txtComments"
         android:layout_alignRight="@+id/txtComments" />
 <Button
         android:id="@+id/btnCancel"
         android:layout_width="124px"
         android:layout_height="wrap_content"
         android:text ="Cancel"
         android:layout_below="@id/txtComments"
         android:layout_alignLeft="@+id/txtComments" />
</RelativeLayout> |
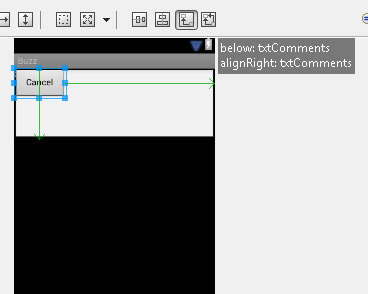
NOTE: below is the Eclipse GUI editing view of the above RelativeLayout Interface --notice how you can't even see the Save button, but, see the comments it is there but, doesn't show it aligned to the Right correctly and the Cancel button is on top (again not shown below the txtComments).
|
<<<All not perfect in the Complier's visualizaiton of a RelativeLayout |
TableLayout (<TableLayout> or android.widget.TableLayout)...see also GridLayout
- arranges table in rows and columns
- Fills table row at a time from left to right creates columns (cells) one item per cell.
Example
(NOTE: if you need to create an empty cell is one location add <TextView/> to it.
|
<?xml version="1.0" encoding="utf-8"?>
<TableLayout xmlns:android="http://schemas.android.com/apk/res/android"
       android:layout_width="match_parent"
       android:layout_height="match_parent" >
 <TableRow
       android:id="@+id/tableRow1"
       android:layout_width="wrap_content"
       android:layout_height="wrap_content" >
 <TextView
       android:id="@+id/textUserNameLabel"
       android:layout_width="120dp"
       android:layout_height="wrap_content"
       android:text="User Name" />
 <EditText
       android:id="@+id/txtUserName"
       android:layout_width="200dp"
       android:layout_height="wrap_content"
       android:inputType="textPersonName" >
<requestFocus /> </EditText> </TableRow> <TableRow
android:id="@+id/tableRow2"
android:layout_width="wrap_content"
android:layout_height="wrap_content" >
 <TextView
       android:id="@+id/txtPasswordLabel"
       android:layout_width="fill_parent"
       android:layout_height="wrap_content"
       android:text="Password" />
 <EditText
       android:id="@+id/txtPassword"
       android:layout_width="wrap_content"
       android:layout_height="wrap_content"
       android:password="true"
       android:inputType="enter password" />
</TableRow> <TableRow
android:id="@+id/tableRow3"
android:layout_width="wrap_content"
android:layout_height="wrap_content" >
 <Button
       android:id="@+id/buttonLogIn"
       android:layout_width="wrap_content"
       android:layout_height="wrap_content"
       android:text="Log In" />
</TableRow> </TableLayout> |
(NOTE: if you need to create an empty cell is one location add <TextView/> to it.)
|
<?xml version="1.0" encoding="utf-8"?>
<TableLayout xmlns:android="http://schemas.android.com/apk/res/android"
       android:layout_width="match_parent"
       android:layout_height="match_parent" >
 <TableRow
       android:id="@+id/tableRow1"
       android:layout_width="wrap_content"
       android:layout_height="wrap_content" >
 <TextView
       android:id="@+id/textUserNameLabel"
       android:layout_width="120dp"
       android:layout_height="wrap_content"
       android:text="User Name" />
 <EditText
       android:id="@+id/txtUserName"
       android:layout_width="200dp"
       android:layout_height="wrap_content"
       android:inputType="textPersonName" >
<requestFocus /> </EditText> </TableRow> <TableRow
android:id="@+id/tableRow2"
android:layout_width="wrap_content"
android:layout_height="wrap_content" >
 <TextView
       android:id="@+id/txtPasswordLabel"
       android:layout_width="fill_parent"
       android:layout_height="wrap_content"
       android:text="Password" />
 <EditText
       android:id="@+id/txtPassword"
       android:layout_width="wrap_content"
       android:layout_height="wrap_content"
       android:password="true"
       android:inputType="enter password" />
</TableRow> <TableRow
android:id="@+id/tableRow3"
android:layout_width="wrap_content"
android:layout_height="wrap_content" >
<TextView />
 <Button
       android:id="@+id/buttonLogIn"
       android:layout_width="wrap_content"
       android:layout_height="wrap_content"
       android:text="Log In" />
</TableRow> </TableLayout> |
FrameLayout (<FrameLayout> or android.widget.FrameLayout)
- placeholder on screen to display a singe view
- View add to FrameLayout are always top left of layout
- **** SEE API
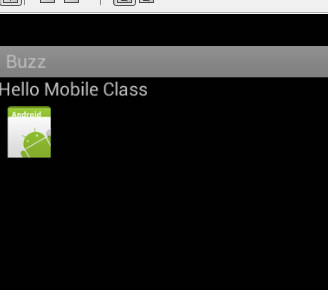
Example
 |
<?xml version="1.0" encoding="utf-8"?>
<RelativeLayout xmlns:android="http://schemas.android.com/apk/res/android"
       android:layout_width="match_parent"
       android:layout_height="match_parent" >
 <TextView
         android:id="@+id/lblComments"
         android:layout_width="wrap_content"
         android:layout_height="wrap_content"
         android:layout_alignParentLeft="true"
         android:layout_alignParentTop="true"
         android:text="Hello Mobile Class" />
 <FrameLayout
         android:id="@+id/frameLayout1"
         android:layout_width="wrap_content"
         android:layout_height="wrap_content"
         android:layout_alignLeft="@+id/lblComments"
         android:layout_below="@+id/lblComments"
         android:layout_centerHorizontal="true" >
<ImageView
         android:src="@drawable/droid"
         android:layout_width="wrap_content"
         android:layout_height="wrap_content"/>
</FrameLayout>
</RelativeLayout> |
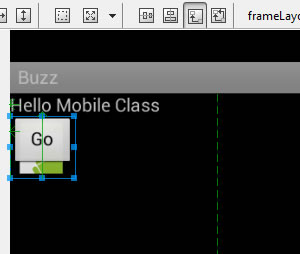
What happens when you add another item to your FrameLayout ---- THEY OVERLAP --- THIS IS ONE WAY YOU CAN DO ANIMATION
|
<?xml version="1.0" encoding="utf-8"?>
<RelativeLayout xmlns:android="http://schemas.android.com/apk/res/android"
       android:layout_width="match_parent"
       android:layout_height="match_parent" >
 <TextView
         android:id="@+id/lblComments"
         android:layout_width="wrap_content"
         android:layout_height="wrap_content"
         android:layout_alignParentLeft="true"
         android:layout_alignParentTop="true"
         android:text="Hello Mobile Class" />
 <FrameLayout
         android:id="@+id/frameLayout1"
         android:layout_width="wrap_content"
         android:layout_height="wrap_content"
         android:layout_alignLeft="@+id/lblComments"
         android:layout_below="@+id/lblComments"
         android:layout_centerHorizontal="true" >
<ImageView
         android:src="@drawable/droid"
         android:layout_width="wrap_content"
         android:layout_height="wrap_content"/>
<Button
 android:id="@+id/btnDoit"
 android:layout_width="50dp"
 android:layout_height="40dp"
 android:text="Go"/>
</FrameLayout>
</RelativeLayout>
|
ScrollView (<ScrollView> or android.widget.ScrollView)
- A type of FrameLayout that can scroll through a list of views that take up more spance than physical display
- Only one item (view or viewgroup) can be added to ScrollView
- Commonly add a LinearLayout to ScrollView, the LinearLayout containing a linear set of items (arranged vertically or horizontally)
- **** SEE API
Example
|
need attributes of focasable below

<?xml version="1.0" encoding="utf-8"?>
<ScrollView xmlns:android="http://schemas.android.com/apk/res/android"
         android:layout_width="fill_parent"
         android:layout_height="fill_parent" >
 <LinearLayout
         android:layout_width="fill_parent"
         android:layout_height="wrap_content"
         android:focusable="true"
         android:focusableInTouchMode="true"
         android:orientation="vertical">
 <Button
         android:id="@+id/button1"
         android:layout_width="fill_parent"
         android:layout_height="wrap_content"
         android:text="Button 1" />
<Button
         android:id="@+id/button2"
         android:layout_width="fill_parent"
         android:layout_height="wrap_content"
         android:text="Button 2" />
<Button
         android:id="@+id/button3"
         android:layout_width="fill_parent"
         android:layout_height="wrap_content"
         android:text="Button 3" />
 <EditText
         android:id="@+id/txt"
         android:layout_width="fill_parent"
         android:layout_height="600dp"
         android:inputType="textMultiLine" />
 <Button
         android:id="@+id/button4"
         android:layout_width="fill_parent"
         android:layout_height="wrap_content"
         android:text="Button 4" />
<Button
         android:id="@+id/button5"
         android:layout_width="fill_parent"
         android:layout_height="wrap_content"
         android:text="Button 5" />
</LinearLayout>
</ScrollView> |