Android: Views .....more
We will look at some of the views (GUI components)that Android has
-
TextView, EditText, Button, ImageButton, CheckBox, ToggleButton, RadioButton, RadioGroup
Important to ID your Views (gui components) in XML--for code access
When you define your Views using XML it is important to have the android:id parameter uniquely defined so that you can
grab a "handle" to it in your code.Example for Activity with Button example below
<Button
    android:id="@+id/btn_webbrowser"
    android:layout_width="fill_parent"
    android:layout_height="wrap_content"
    android:text="Web Browser"
    android:onClick="onClickWebBrowser" />
How access your View (gui component) in code specified in an Activity--GET A HANDLE
Activity.findViewById(R.id.gui_component_id); // here you have defined the gui component in xml to have parameter android:id=@+id/gui_component_id
OR
this.findViewById
Example for Activity with Button example above
Button btn1 = (Button) findViewById(R.id.btn_webbrowser);
How access your View (gui component) in code specified in a Fragment--GET A HANDLE
getActivity().findViewById(R.id.gui_component_id); // here you have defined the gui component in xml to have parameter android:id=@+id/gui_component_id
//note the above you get the Activity of this Fragment
Example for Fragement with Button example below
Button btn1 = (Button) getActivity().findViewById(R.id.btn_webbrowser);
Button (<Button> or android.widget.Button)
- Button, has an onClickListener event handler
Examples
<?xml version="1.0" encoding="utf-8"?>
<LinearLayout xmlns:android="http://schemas.android.com/apk/res/android"
 android:layout_width="fill_parent"
 android:layout_height="fill_parent"
 android:orientation="vertical" >

<Button
   android:id="@+id/btn_webbrowser"
   android:layout_width="fill_parent"
   android:layout_height="wrap_content"
   android:text="Web Browser"
   android:onClick="onClickWebBrowser" />

<Button
   android:id="@+id/btn_makecalls"
   android:layout_width="fill_parent"
   android:layout_height="wrap_content"
   android:text="Make Calls"
   android:onClick="onClickMakeCalls"  />

<Button
   android:id="@+id/btn_showMap"
   android:layout_width="fill_parent"
   android:layout_height="wrap_content"
   android:text="Show Map"
   android:onClick="onClickShowMap" />

<Button
   android:id="@+id/btn_launchMyBrowser"
   android:layout_width="fill_parent"
   android:layout_height="wrap_content"
   android:text="Launch My Browser"
   android:onClick="onClickLaunchMyBrowser" />

</LinearLayout>
TextView (<TextView> or android.widget.TextView)
- displays text to user, not editable (see EditText for editable)
Example
<LinearLayout xmlns:android="http://schemas.android.com/apk/res/android"
    android:layout_width="fill_parent"
    android:layout_height="fill_parent"
    android:orientation="vertical" >

   <Text View
      android:layout_width=“fill_parent”
      android:layout_height=“wrap_content”
      android:text=“@string/hello”/>

</LinearLayout>
Example BasicViews1 with Button, ImageButton, EditText, CheckBox, RadioGroup (and RadioButtons)
--see (Books/Android/Source Code/BasicViews1)
main.xml
<?xml version="1.0" encoding="utf-8"?>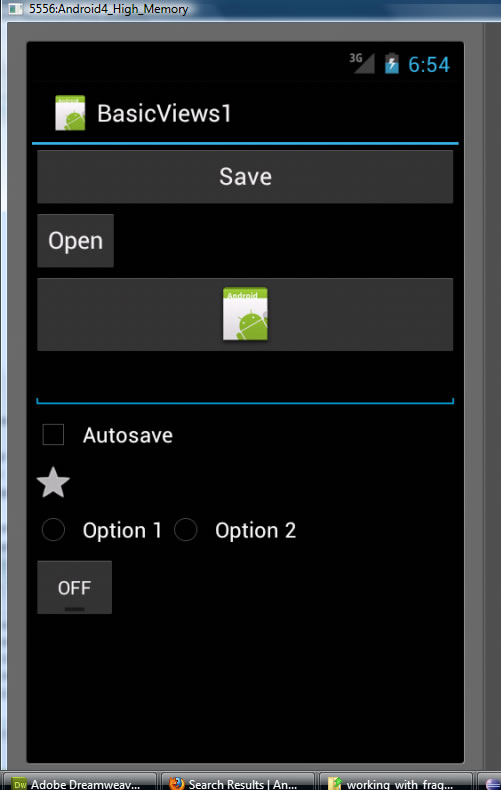
<LinearLayout xmlns:android="http://schemas.android.com/apk/res/android" android:layout_width="fill_parent" android:layout_height="fill_parent" android:orientation="vertical" > <Button android:id="@+id/btnSave" android:layout_width="fill_parent" android:layout_height="wrap_content" android:text="@string/save" android:onClick="btnSaved_clicked"/><Button android:id="@+id/btnOpen" android:layout_width="wrap_content" android:layout_height="wrap_content" android:text="Open" /><ImageButton android:id="@+id/btnImg1" android:layout_width="fill_parent" android:layout_height="wrap_content" android:src="@drawable/ic_launcher" /><EditText android:id="@+id/txtName" android:layout_width="fill_parent" android:layout_height="wrap_content" /><CheckBox android:id="@+id/chkAutosave" android:layout_width="fill_parent" android:layout_height="wrap_content" android:text="Autosave" /><CheckBox android:id="@+id/star" style="?android:attr/starStyle" android:layout_width="wrap_content" android:layout_height="wrap_content" /><!-- TRY THIS FOR VERTICAL ORIENTATION, commented out now <RadioGroup android:id="@+id/rdbGp1" android:layout_width="fill_parent" android:layout_height="wrap_content" android:orientation="vertical" > <RadioButton android:id="@+id/rdb1" android:layout_width="fill_parent" android:layout_height="wrap_content" android:text="Option 1" /> <RadioButton android:id="@+id/rdb2" android:layout_width="fill_parent" android:layout_height="wrap_content" android:text="Option 2" /></RadioGroup> --> <RadioGroup android:id="@+id/rdbGp1" android:layout_width="fill_parent" android:layout_height="wrap_content" android:orientation="horizontal" > <RadioButton android:id="@+id/rdb1" android:layout_width="wrap_content" android:layout_height="wrap_content" android:text="Option 1" /> <RadioButton android:id="@+id/rdb2" android:layout_width="wrap_content" android:layout_height="wrap_content" android:text="Option 2" /> </RadioGroup> <ToggleButton android:id="@+id/toggle1" android:layout_width="wrap_content" android:layout_height="wrap_content" /></LinearLayout>CheckBox, can alter by applying style to it ?[package:][type:]name
<CheckBox android:id="@+id/star" style="?android:attr/starStyle" android:layout_width="wrap_content" android:layout_height="wrap_content" />RadioGroup, encloses two RadioButtons --multiple options that are mutually exclusive
can alter orientation of grouping<RadioGroup android:id="@+id/rdbGp1" android:layout_width="fill_parent" android:layout_height="wrap_content" android:orientation="vertical" > Changes it to vertical , above image show horizontalToggleButton, between On/Off (labeled OFF in image above)
can alter orientation of grouping<ToggleButton android:id="@+id/toggle1" android:layout_width="wrap_content" android:layout_height="wrap_content" />
Example BasicViews1 EVENT Handling
--see (Books/Android/Source Code/BasicViews1)
OPTION 1: Register eventhandling method for a GUI component (view) in XML
Notice is the above GUI in main.xml of this Activity the Save Button has its event handler registered with the xml paramater andoird:onClick="btnSaved_clicked" and this means we need in our Activity that uses this xml file as GUI interface specification a method called btnSaved_clicked()
OPTION 2: Register eventhandling class instance
For Button = android.view.View.OnClickListener
For RadioGroup = android.view.View.OnCheckcedChangeListener
For CheckBox = android.view.View.OnClickListener
For ToggleButton = android.view.View.OnClickListener
Read API for details on the EventHandler class that is needed for any view/widget in your GUI you wish to respond to!!
Step1: Grab instance of GUI component (view) you wish to do event handling with
a) You may have instance of it already if you created the view in the code
Button b = new Button;b) You created the view using an xml file, it must have and android:id="@+id/button_id_name_xml_file associated with it
Button b = (Button) findViewById(R.id.button_id_name_xml_file)Step2: Create your own *Listener class (e.g. extends OnClickListener) and create instance of it
a) You can create class and even store in different java file, then you like any other class create an instance of it
MyOnClickListener ml = new MyOnClickListener();b) You can create an anonymous class inside the Activity or as shown below directly inside the method call as a parameter to the registration method. --- SEE BELOW example
Step 3: Register for your view the instance you made in step 2.
Given an instance ml of your Listener register it on the view as shown here for button b
b.setOnClickListener(ml); //registers for view b the OnClickListener instance ml
BasicViews1Activity
See all the OnClickListeners....package net.learn2develop.BasicViews1;import android.app.Activity; import android.os.Bundle; import android.view.View; import android.widget.Button; import android.widget.CheckBox; import android.widget.RadioButton; import android.widget.RadioGroup; import android.widget.RadioGroup.OnCheckedChangeListener; import android.widget.Toast; import android.widget.ToggleButton;public class BasicViews1Activity extends Activity { public void btnSaved_clicked (View view) { DisplayToast("You have clicked the Save button1"); } /** Called when the activity is first created. */ @Override public void onCreate(Bundle savedInstanceState) { super.onCreate(savedInstanceState); setContentView(R.layout.main);//method to handle events for Save Button, registered in XML parameter when button defined public void btnSaved_clicked(View view) { DisplayToast("You have clicked the Save button 1"); } //---Button view-- Button btnOpen = (Button) findViewById(R.id.btnOpen); btnOpen.setOnClickListener(new View.OnClickListener() { //short cut of creating instance directly of class you define right here annonomously public void onClick(View v) { DisplayToast("You have clicked the Open button"); } });//---CheckBox--- CheckBox checkBox = (CheckBox) findViewById(R.id.chkAutosave); checkBox.setOnClickListener(new View.OnClickListener() { public void onClick(View v) { if (((CheckBox)v).isChecked()) DisplayToast("CheckBox is checked"); else DisplayToast("CheckBox is unchecked"); } });//---RadioButton--- RadioGroup radioGroup = (RadioGroup) findViewById(R.id.rdbGp1); radioGroup.setOnCheckedChangeListener(new OnCheckedChangeListener() { public void onCheckedChanged(RadioGroup group, int checkedId) { RadioButton rb1 = (RadioButton) findViewById(R.id.rdb1); if (rb1.isChecked()) { DisplayToast("Option 1 checked!"); } else { DisplayToast("Option 2 checked!"); } } });//---ToggleButton--- ToggleButton toggleButton = (ToggleButton) findViewById(R.id.toggle1); toggleButton.setOnClickListener(new View.OnClickListener() { public void onClick(View v) { if (((ToggleButton)v).isChecked()) DisplayToast("Toggle button is On"); else DisplayToast("Toggle button is Off"); } }); }private void DisplayToast(String msg) { Toast.makeText(getBaseContext(), msg, Toast.LENGTH_SHORT).show(); }}
