Android Menus
Menus are not directly visible on main UI of application
Two types:
Option Menu = info related to current Activity, activated by MENU button
Context Menu = info related to a particular view on an activity, activated by taping on view and holding it.
- Special Note: Currently, registerForContextMenu() does nothing except invoke setOnCreateContextMenuListener() so these methods do the same thing. However, check the Android API for changes on this and for details on the API level you are using
Options Menu
uses android.view.Menu and android.view.MenuItem
Menu instance autogenerated by Android when user hits MENU button
create MenuItems by menu.add(groupID, itemID, order, title); (where menu is Menu instance)
- groupID = group identify that the menu item should be part of, use 0 if no group
- itemID = unique item ID
- order = order in which item should be displayed (starting from 0)
- title = string to display for menu item
STEP 1 : implement onCreateOptionsMenu(menu) inside the Activity (@Override)
this will be called when the MENU button is hit on device!!! AND it will be passed automatically a Menu instance
call super.OnCreateOptionsMenu(menu);
setup your menu by adding items with MenuItem mnu1 = menu.add(groupID, itemId, order, title);
- MenuItem mnu1 = menu.add(0, 0 ,0,"Item 1"); //no group, id 0 and appears first with label Item 1
- optional = customize MenuItems you created in step 2.
- MenuItem.setIcon(*); used to set Icon associated with this MenuItem
- MenuItem.setAlphabeticShortcut('x'); associates MenuItem with shortcut of key x
STEP 2 : implement onOptionsItemSelected(menuitem) inside the Activity (@Override)
this will be called when a MenuItem in the associated Menu to the Activity is hit!!! AND it will be passed automatically a MenuItem instance
test which item is hit by called menuitem.getItemID() and based on this do what you want
Example of Options Menu all done in Code using above steps
public class MenusActivity extends Activity {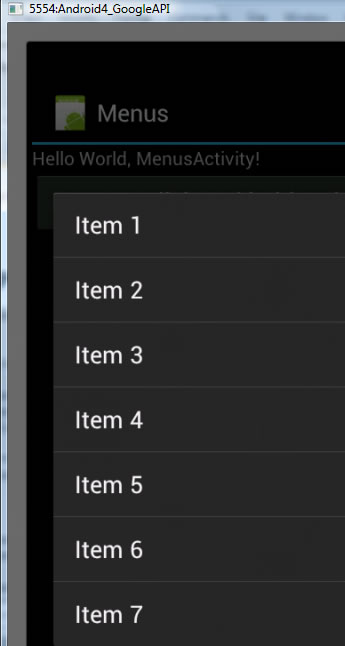 /** Called when the activity is first created. */
@Override
public void onCreate(Bundle savedInstanceState) {
super.onCreate(savedInstanceState);
setContentView(R.layout.main);
Button btn = (Button) findViewById(R.id.button1);
btn.setOnCreateContextMenuListener(this);
}
@Override
public void onCreateContextMenu(ContextMenu menu, View view,
ContextMenuInfo menuInfo)
{
super.onCreateContextMenu(menu, view, menuInfo);
CreateMenu(menu);
}
//STEP 1
//This is called automatically when MENU button on device is hit
@Override
public boolean onCreateOptionsMenu(Menu menu) {
super.onCreateOptionsMenu(menu);
CreateMenu(menu); //method call to setup menu with MenuItems
return true;
}
//STEP 2
//This is called when any MenuItem on the Menu is selected
@Override
public boolean onOptionsItemSelected(MenuItem item)
{
return MenuChoice(item);
}
//setup Options Menu with various MenuItems
private void CreateMenu(Menu menu)
{
menu.setQwertyMode(true);
MenuItem mnu1 = menu.add(0, 0, 0, "Item 1");
{
mnu1.setAlphabeticShortcut('a');
mnu1.setIcon(R.drawable.ic_launcher);
}
MenuItem mnu2 = menu.add(0, 1, 1, "Item 2");
{
mnu2.setAlphabeticShortcut('b');
mnu2.setIcon(R.drawable.ic_launcher);
}
MenuItem mnu3 = menu.add(0, 2, 2, "Item 3");
{
mnu3.setAlphabeticShortcut('c');
mnu3.setIcon(R.drawable.ic_launcher);
}
MenuItem mnu4 = menu.add(0, 3, 3, "Item 4");
{
mnu4.setAlphabeticShortcut('d');
}
menu.add(0, 4, 4, "Item 5"); //no customization on these MenuItems
menu.add(0, 5, 5, "Item 6");
menu.add(0, 6, 6, "Item 7");
}
//method to handle when a MenuItem has been selected in Menu
private boolean MenuChoice(MenuItem item)
{
switch (item.getItemId()) {
case 0:
Toast.makeText(this, "You clicked on Item 1", Toast.LENGTH_LONG).show();
return true;
case 1:
Toast.makeText(this, "You clicked on Item 2", Toast.LENGTH_LONG).show();
return true;
case 2:
Toast.makeText(this, "You clicked on Item 3", Toast.LENGTH_LONG).show();
return true;
case 3:
Toast.makeText(this, "You clicked on Item 4", Toast.LENGTH_LONG).show();
return true;
case 4:
Toast.makeText(this, "You clicked on Item 5", Toast.LENGTH_LONG).show();
return true;
case 5:
Toast.makeText(this, "You clicked on Item 6", Toast.LENGTH_LONG).show();
return true;
case 6:
Toast.makeText(this, "You clicked on Item 7", Toast.LENGTH_LONG).show();
return true;
}
return false;
}
}
/** Called when the activity is first created. */
@Override
public void onCreate(Bundle savedInstanceState) {
super.onCreate(savedInstanceState);
setContentView(R.layout.main);
Button btn = (Button) findViewById(R.id.button1);
btn.setOnCreateContextMenuListener(this);
}
@Override
public void onCreateContextMenu(ContextMenu menu, View view,
ContextMenuInfo menuInfo)
{
super.onCreateContextMenu(menu, view, menuInfo);
CreateMenu(menu);
}
//STEP 1
//This is called automatically when MENU button on device is hit
@Override
public boolean onCreateOptionsMenu(Menu menu) {
super.onCreateOptionsMenu(menu);
CreateMenu(menu); //method call to setup menu with MenuItems
return true;
}
//STEP 2
//This is called when any MenuItem on the Menu is selected
@Override
public boolean onOptionsItemSelected(MenuItem item)
{
return MenuChoice(item);
}
//setup Options Menu with various MenuItems
private void CreateMenu(Menu menu)
{
menu.setQwertyMode(true);
MenuItem mnu1 = menu.add(0, 0, 0, "Item 1");
{
mnu1.setAlphabeticShortcut('a');
mnu1.setIcon(R.drawable.ic_launcher);
}
MenuItem mnu2 = menu.add(0, 1, 1, "Item 2");
{
mnu2.setAlphabeticShortcut('b');
mnu2.setIcon(R.drawable.ic_launcher);
}
MenuItem mnu3 = menu.add(0, 2, 2, "Item 3");
{
mnu3.setAlphabeticShortcut('c');
mnu3.setIcon(R.drawable.ic_launcher);
}
MenuItem mnu4 = menu.add(0, 3, 3, "Item 4");
{
mnu4.setAlphabeticShortcut('d');
}
menu.add(0, 4, 4, "Item 5"); //no customization on these MenuItems
menu.add(0, 5, 5, "Item 6");
menu.add(0, 6, 6, "Item 7");
}
//method to handle when a MenuItem has been selected in Menu
private boolean MenuChoice(MenuItem item)
{
switch (item.getItemId()) {
case 0:
Toast.makeText(this, "You clicked on Item 1", Toast.LENGTH_LONG).show();
return true;
case 1:
Toast.makeText(this, "You clicked on Item 2", Toast.LENGTH_LONG).show();
return true;
case 2:
Toast.makeText(this, "You clicked on Item 3", Toast.LENGTH_LONG).show();
return true;
case 3:
Toast.makeText(this, "You clicked on Item 4", Toast.LENGTH_LONG).show();
return true;
case 4:
Toast.makeText(this, "You clicked on Item 5", Toast.LENGTH_LONG).show();
return true;
case 5:
Toast.makeText(this, "You clicked on Item 6", Toast.LENGTH_LONG).show();
return true;
case 6:
Toast.makeText(this, "You clicked on Item 7", Toast.LENGTH_LONG).show();
return true;
}
return false;
}
}
Context Menu
remember is associated with a View in an Activity --- like say when user selects a displayed image and holds it a Context Menu can be made to appear.
- when user taps and holds on the View that has a ContextMenu associated with it, the onCreateContextMenu() method of this View's OnContextMenuListener (this is registered in step 3 below) is called and passed the menu and other autogenerated parameters. This generates and shows the ContextMenu.
- NOTE: you may want to test which view generated this call if in this Activity there are more than one view with a ContextMenu and generate the apporpriate Menu items for THIS view's menu
- When a MenuItem is selected in this ContextMenu the onContextItemSelected() method of the OnContextMenuListener is called.
STEP 1 : implement onCreateContextMenu(menu, view,menuInfo) in Activity (@Override)
this will be called when the user taps and holds down on view that has a ContextMenu associated with it AND it will be passed automatically a Menu instance, the view, and menuInfo
In this overridden method you should
call super.OnCreateContextMenu(menu, view, menuInfo);
setup your menu by adding items with MenuItem mnu1 = menu.add(groupID, itemId, order, title);
NOTE: you may want to test which view generated this call if more than one view has a ContextMenu and generate the apporpriate Menu items for this views menu
- MenuItem mnu1 = menu.add(0, 0 ,0,"Item 1"); //no group, id 0 and appears first with label Item 1
- optional = customize MenuItems you created in step 2.
- MenuItem.setIcon(*); used to set Icon associated with this MenuItem
- MenuItem.setAlphabeticShortcut('x'); associates MenuItem with shortcut of key x
STEP 2 : implement onContextItemSelected(menuitem) inside the Activity (@Override)
this will be called when a MenuItem in the associated Menu is hit!!! AND it will be passed automatically a MenuItem instance
test which item is hit by called menuitem.getItemID() and based on this do what you want
STEP 3 : associate ConextMenu to a View using view.setOnCreateContextMenuListener(this)
To the View object you want to associate the ContextMenu you setup ---
NOTE: this is the Activity the view is in and means that the Activity has the method to created the ContextMenu (step 1 above) and to handle any MenuItems being selected by user (step 2 above)
suppose we have an ImageView called IV ----> IV.setOnCreateContextMenuListener(this);
Special Note: Currently, registerForContextMenu() does nothing except invoke setOnCreateContextMenuListener() so these methods do the same thing. However, check the Android API for changes on this and for details on the API level you are using. So alternative for doing Step 3 below may be
Button btn = (Button) findViewById(R.id.button1);
registerForContextMenu(btn);
Extending Previous Example Also contains A ContextMenu--and "lazily" uses the same Menu used and the same ItemListener
when user taps and holds on the Button (view) the onCreateContextMenu() mehtod is called and passed the menu and other autogenerated parameters. When a MenuItem is selected in this ContextMenu the onContextItemSelected() method is called.
public class MenusActivity extends Activity {


 /** Called when the activity is first created. */
 @Override
 public void onCreate(Bundle savedInstanceState) {
       super.onCreate(savedInstanceState);
       setContentView(R.layout.main);

       Button btn = (Button) findViewById(R.id.button1);  //STEP 3
       btn.setOnCreateContextMenuListener(this);    //register the button (view) to have this activity server as Listener
  }

//STEP 1
//called anytime a view with an a ContextMenu associated with it is called.
@Override
 public void onCreateContextMenu(ContextMenu menu, View view, ContextMenuInfo menuInfo)
 {
       super.onCreateContextMenu(menu, view, menuInfo);
       CreateMenu(menu);
 }


//STEP 2
//called anytime a MenuItem in a ContextMenu is called (that this Activity serves as a listener for)
 @Override
 public boolean onContextItemSelected(MenuItem item)
 {
       return MenuChoice(item);
 }

 private void CreateMenu(Menu menu)
 {
       menu.setQwertyMode(true);
       MenuItem mnu1 = menu.add(0, 0, 0, "Item 1");
       {
             mnu1.setAlphabeticShortcut('a');
             mnu1.setIcon(R.drawable.ic_launcher);
       }

       MenuItem mnu2 = menu.add(0, 1, 1, "Item 2");
       {
             mnu2.setAlphabeticShortcut('b');
             mnu2.setIcon(R.drawable.ic_launcher);
       }

       MenuItem mnu3 = menu.add(0, 2, 2, "Item 3");
       {
             mnu3.setAlphabeticShortcut('c');
             mnu3.setIcon(R.drawable.ic_launcher);
       }

       MenuItem mnu4 = menu.add(0, 3, 3, "Item 4");
       {
             mnu4.setAlphabeticShortcut('d');
       }

       menu.add(0, 4, 4, "Item 5");
       menu.add(0, 5, 5, "Item 6");
       menu.add(0, 6, 6, "Item 7");
 }


 private boolean MenuChoice(MenuItem item)
       {
             switch (item.getItemId()) {
               case 0:
                   Toast.makeText(this, "You clicked on Item 1",
                   Toast.LENGTH_LONG).show();
                   return true;
               case 1:
                   Toast.makeText(this, "You clicked on Item 2", Toast.LENGTH_LONG).show();
                   return true;
               case 2:
                   Toast.makeText(this, "You clicked on Item 3", Toast.LENGTH_LONG).show();
                   return true;
               case 3:
                   Toast.makeText(this, "You clicked on Item 4", Toast.LENGTH_LONG).show();
                   return true;
               case 4:
                   Toast.makeText(this, "You clicked on Item 5", Toast.LENGTH_LONG).show();
                   return true;
               case 5:
                   Toast.makeText(this, "You clicked on Item 6", Toast.LENGTH_LONG).show();
                   return true;
               case 6:
                   Toast.makeText(this, "You clicked on Item 7",
                   Toast.LENGTH_LONG).show();
                   return true;
             }

           return false;
       }

}
}
private void CreateMenu(Menu menu)
{
menu.setQwertyMode(true);
MenuItem mnu1 = menu.add(0, 0, 0, "Item 1");
{
mnu1.setAlphabeticShortcut('a');
mnu1.setIcon(R.drawable.ic_launcher);
}
MenuItem mnu2 = menu.add(0, 1, 1, "Item 2");
{
mnu2.setAlphabeticShortcut('b');
mnu2.setIcon(R.drawable.ic_launcher);
}
MenuItem mnu3 = menu.add(0, 2, 2, "Item 3");
{
mnu3.setAlphabeticShortcut('c');
mnu3.setIcon(R.drawable.ic_launcher);
}
MenuItem mnu4 = menu.add(0, 3, 3, "Item 4");
{
mnu4.setAlphabeticShortcut('d');
}
menu.add(0, 4, 4, "Item 5");
menu.add(0, 5, 5, "Item 6");
menu.add(0, 6, 6, "Item 7");
}
private boolean MenuChoice(MenuItem item)
{
switch (item.getItemId()) {
case 0:
Toast.makeText(this, "You clicked on Item 1",
Toast.LENGTH_LONG).show();
return true;
case 1:
Toast.makeText(this, "You clicked on Item 2", Toast.LENGTH_LONG).show();
return true;
case 2:
Toast.makeText(this, "You clicked on Item 3", Toast.LENGTH_LONG).show();
return true;
case 3:
Toast.makeText(this, "You clicked on Item 4", Toast.LENGTH_LONG).show();
return true;
case 4:
Toast.makeText(this, "You clicked on Item 5", Toast.LENGTH_LONG).show();
return true;
case 5:
Toast.makeText(this, "You clicked on Item 6", Toast.LENGTH_LONG).show();
return true;
case 6:
Toast.makeText(this, "You clicked on Item 7",
Toast.LENGTH_LONG).show();
return true;
}
return false;
}
}
