 CS351
CS351Project 1 - Front End: HTML + CSS + Bootstrap + React + Client-Side JavaScrip
This is INDIVIDUAL work
Start: 3rd Week of Class
Due: Oct. 2 start of class
Points 105 (see rubric on Canvas for Evaluation GUIDELINES)
 Project Details
Create a professional storefront for a fictitious company that sells products of your choosing.
The purpose of this project is to demonstrate your ability to build a modern React Single Page Application (SPA) using reusable React components, Bootstrap, HTML, CSS, and client-side JavaScript.
The application should run entirely on the client (browser). No Node.js, Express, or database should be used in this project. Those technologies will be introduced in Project 2.
Your project must use:
- React
- HTML (JSX)
- CSS
- Bootstrap 5 (for responsive/mobile-first design) Client-side JavaScript (ES6+)
- React Components with Props -ProductList, ProductCard, Cart, etc (see below)
- React state (useState)
- Event handling
- Rendering collections using.map()
- Conditional rendering
- Client-side form validation on all forms
Overall ReactJS architecture:
| index.html ↓ React ├── HomeView ├── ShopView ├── ProductDetailView ├── AccountView ├── CreateAccountView └── CartView |
Required React Components FOR Products: ProductList, ProductCard
ProductListThe ProductList component is responsible for displaying all products available in the store. This component must:
Required Use of .map() -- the ProductList component must use JavaScript's .map() function to iterate through the collection of products and dynamically create the corresponding collection of ProductCard components.
ProductCardThe ProductCard component is responsible for displaying a single product. Each card should display appropriate information such as:
The design of the card is your choice but should be professional, consistent, and responsive. Product DataDo not create 25 separate product pages instead, create a file: products.json
which contains an array of JSON objects currently representing a minimum of 25 products/services your website sells. (remember we do not have a database or backend yet ---here I am showing 2 products only). These are used to make a ProductList component of individual ProductCard(s)
The concept is / flow of control:
products.json |
- Home View (displayed when the application initially loads through index.html)= Attractive entrance to site that contains some images and some information about the website
- Shop View= displays products using ProductList, each is clickable and consider pagination to show only 10 products on a page at time.
- "Individual Product View" = When you click on a product, the corresponding ProductCard is used to display its information , options and add to cart form. See the following as a general example (your products and your style will dictate the look)
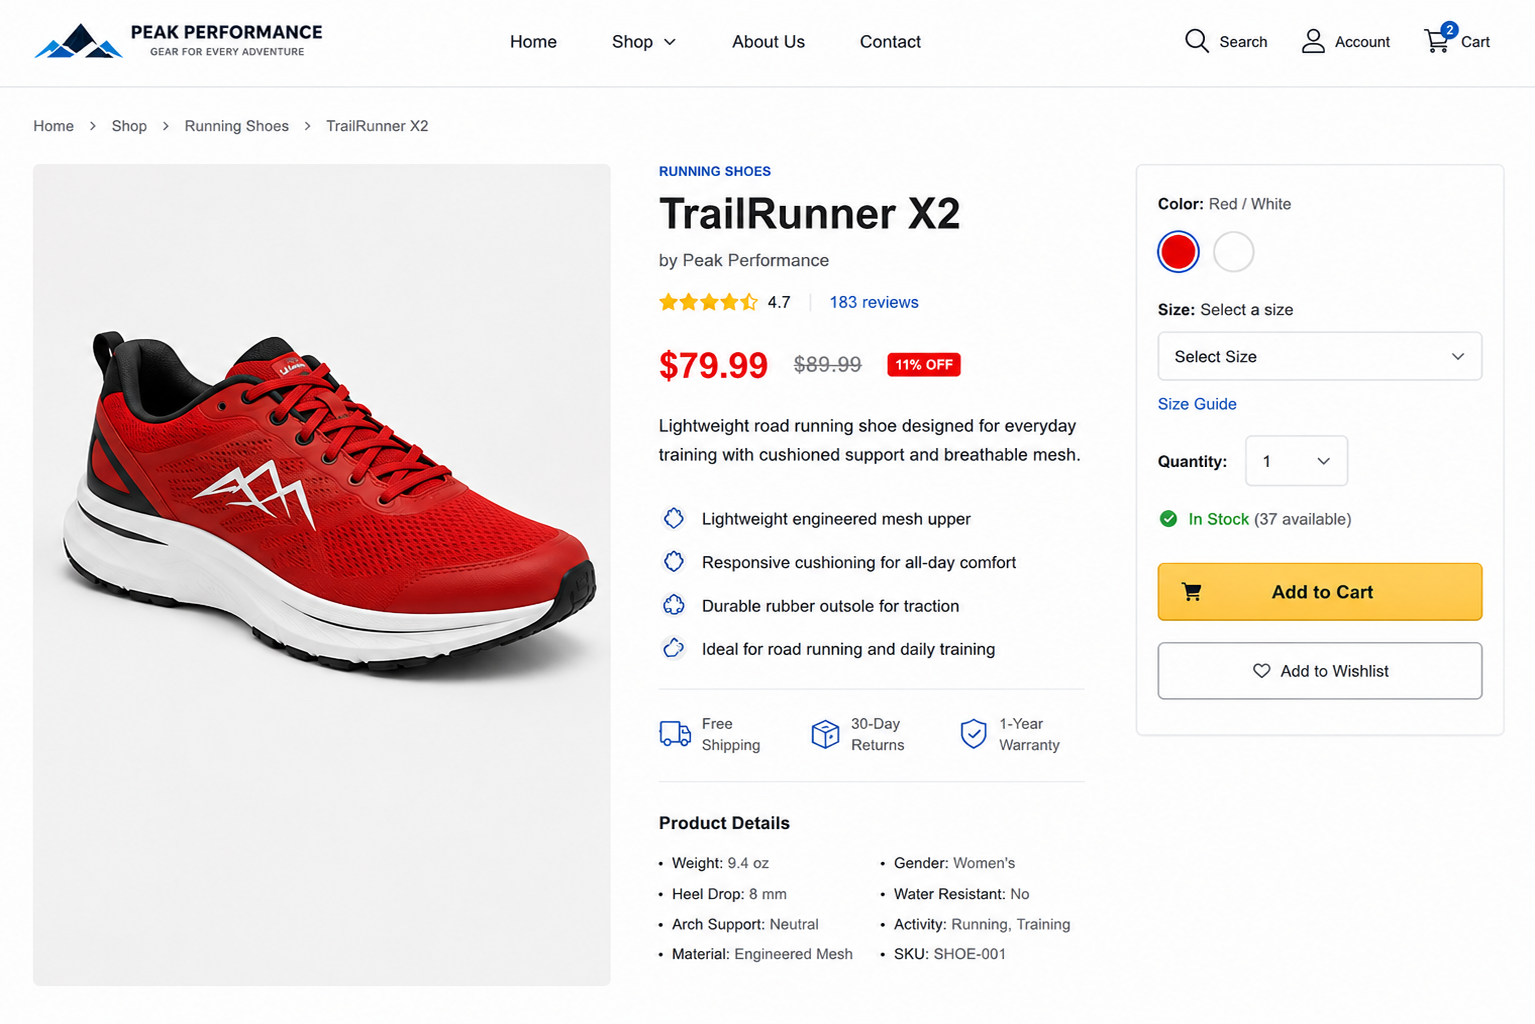
- Account View– provides the ability for a user to log in or navigate to the Create Account View. Create all the HTML forms for each of these operations.
- Create Account VIew - this contains a html form to create a user account. Collect login and password and email. Have optional fields for street, city, state, zip, email, phone. Perform JavaScript validation on the form requireing the login, passord and email fields and when others provided validate they are complete and the form of each.
- Navigation (on ALL pages) Navigation should be consistently displayed throughout the application and include links to the Home, Shop, Account, and Cart views.
- There should also be some identity (name + logo) that links to the Home View on all pages.
- Cart View=displays the current shopping cart including all CartItem components, selected options, quantities, line totals, subtotal, and the total number of items currently in the cart.
- Design using CSS+ = Organize your React project into a logical directory structure. Place React components, CSS files, images, product data (products.json), and other resources into appropriate directories. Regarding Design- use design principles including consistency, redundancy, allignment and proximity. Use good/safe colors that will work for your audience, consider readibility, clarity, and the mood of your choices. If you use a Design Template you need to discuss where you go this from in youir submission and explain it.
- javascript = organize appropriately most React applications will have code under src.
- mobile ready = when website running on larger and smaller (to mimic mobile device) resolutions (you can zoom in and out) the website uses Bootstrap to create a web design including navigation changes like horizontal to vertical layout when going from higher to low resolution. The exact design is something you should decide upon but, minimally include navigation layout changes. Part of this project is self-learning of Bootstrap. If templates are choosen, you will need to explain in detail the Bootstrap Javascript+CSS code and how it works in the demo.(see discussion of mobile ready demo below)
Required React Components FOR "Shopping Cart"
When the user selects options such as size, color, and quantity on the product-detail view and clicks Add to Cart, Each cart item should contain enough information to identify the exact selection:
The cart should support:
There is:
|
Cart componentdisplays current shopping cart.
Required Use of React State (useState)Your application must use React state (useState) to maintain the shopping cart. At a minimum, React state must manage:
The shopping cart must not be implemented using only global JavaScript variables. The cart count and subtotal should be calculated from the current cart state, rather than maintained as separate global variables. The cart state should be stored in a common parent component, such as App, so that the Product Detail view, navigation bar, Cart component, and CartItem components all use the same cart data.
Conceptually:
ProductCard (Detailed View) ├── calculates cart count └── uses .map() |
CartItem component
|
IMPORTANT You can not simply copy code from others, but you can use AI and other resources if YOU FULLY document and disclose what you used including links.
 Deployment
Upload all of the content to your Google Cloud (static site)
Then:
- Validate your HTML and CSS using the W3Schools Validator and fix any errors. Finally save the results of validation (you can do screenshots).
- Create a GitHub repository and upload the complete React project to the repository. Include the src, public, and other required project files and directories, such as package.json and the Vite configuration files. Do not upload the node_modules directory.Create a GitHub repository and upload the complete React project to the repository. Include the src, public, and other required project files and directories, such as package.json and the Vite configuration files. Do not upload the node_modules directory.
- Create a wiki for your Github repository that contains:
- home = Provide the URL to your deployed website and describe the overall application architecture, the React components you created, and any significant CSS and JavaScript/React functionality you implemented.l
- validation = contians screenshot of your validation and discuss any thing listed in the validation
- mobile ready demo = show screenshots of the website running on larger and smaller (to mimic mobile device) resolutions (you can zoom in and out) and in the low resolution (like mobile phone) it should display navigation and other important features in a vertical format or similar to be more accessible on a lower resolution device. Recall this involves the use of Bootstrap. Explain how Bootstrap's responsive grid, utility classes, and/or responsive navigation were used to support different screen sizes. If you added custom CSS or JavaScript/React code for responsiveness, explain how it works.
- createAccount demo = link to a YouTube video demonstration of the createAccount form and the JavaScript validation working -- try to hit submit when you have nothing typed in and then when partial information and fianlly with everything completed.(record and upload mpg to github or upload to youtube and provide the link).
- Templates and other code =Discuss any templates, Bootstrap examples, third-party code, libraries, AI tools, or online resources you used. Properly cite all external resources (IEEE or ACM citation format). Clearly explain how the code works and identify which portions you modified or wrote yourself. Simply stating "I used ChatGPT" is not sufficient; describe specifically how it was used during development.
 Deliverables:
- Oct. 2 start of class
-
Turn in BOTH URL to the Github repository AND the URL to deployed website to Post to Canvas->Assignments->Project 1 AND in the text post reference to links of where you got any templates for CSS, BootStrap, etc. that you used and how they work.
-
Point of Discusson (NOT part of our project 1)
For Project 1 you are implementing a SPA (single page application). However, there are 2 other options for the architecture of a commercial website that are popular today:
OPTION 1: Multi-Page Website Using Multiple React Applications
The application you build in this project is a single React Single Page Application (SPA). This is an excellent architecture for learning React and is commonly used for many modern web applications.
As companies grow, however, they sometimes organize their websites differently. Consider a hypothetical online retailer that begins by selling only shoes.
Initially, the company might have a single React SPA:
index.html
│
▼
React SPA
│
├── Home
├── Shop
├── Product Display
├── Cart
└── Account
Later, the company expands and begins selling shoes, clothing, bags, furniture, electronics, and many other product categories. One possible (but more complex) architecture is to divide the website into multiple sections, where each section loads its own React application.
For example:
shoes.html
│
▼
React Application (Shoes)
clothing.html
│
▼
React Application (Clothing)
bags.html
│
▼
React Application (Bags)
Each HTML page becomes the entry point for its own React application. Each React application may have its own components, navigation, product catalog, and business logic while sharing a common overall website design.
This approach is sometimes used when:
- Different development teams are responsible for different parts of a large website.
- Different product categories have substantially different functionality.
- A company gradually migrates an older multi-page website to React one section at a time.
For this project, you are NOT building this architecture.
Instead, you will build one React SPA that manages the entire storefront. In Project 2, this React application will continue to be used, but instead of loading product information from a local products.json file, it will retrieve data from a Node.js/Express backend and MongoDB database.
OPTiON 2: Hybrid (server + React)
A larger commercial website might combine traditional server-delivered pages with React applications.
For example, the website could have separate category URLs:
/shoes
/clothing
/bags
When a user requests one of these URLs, the server could first return a complete HTML page for that category.
Browser requests /shoes
│
▼
Server returns HTML for the Shoes section
│
▼
Browser displays the initial page
│
▼
React loads and adds interactive behavior
React could then control the interactive parts of the page, such as:
- Product filtering
- Product detail displays
- Size and color selection
- Shopping cart updates
- Account controls
- Recommendations
Conceptually:
Server-rendered Shoes page
│
▼
React application
│
┌─────┼──┐
▼ ▼ ▼
Product Filters Cart
List
The clothing and bags sections could work similarly
/clothing
│
▼
Server-rendered Clothing page
│
▼
React adds clothing-specific interaction
This is called a hybrid approach because the server provides the initial HTML while React provides much of the client-side interactivity after the page loads.
A hybrid architecture may be useful for large public websites because it can provide:
- Faster initial display of content
- Search-engine-friendly pages
- Direct URLs for categories and products
- Server-side caching
- Rich React interaction after the initial page loads
This is different from the architecture used in Project 1.