CS351 |website development
  • outline
  • projects
  • syllabus
  • links

MVC - using Controller concept to insert data into MongoDB Atlas collection.


STEP 1: setup your MongoDB Atlas database...(see other documents for help for this) & get connection information.


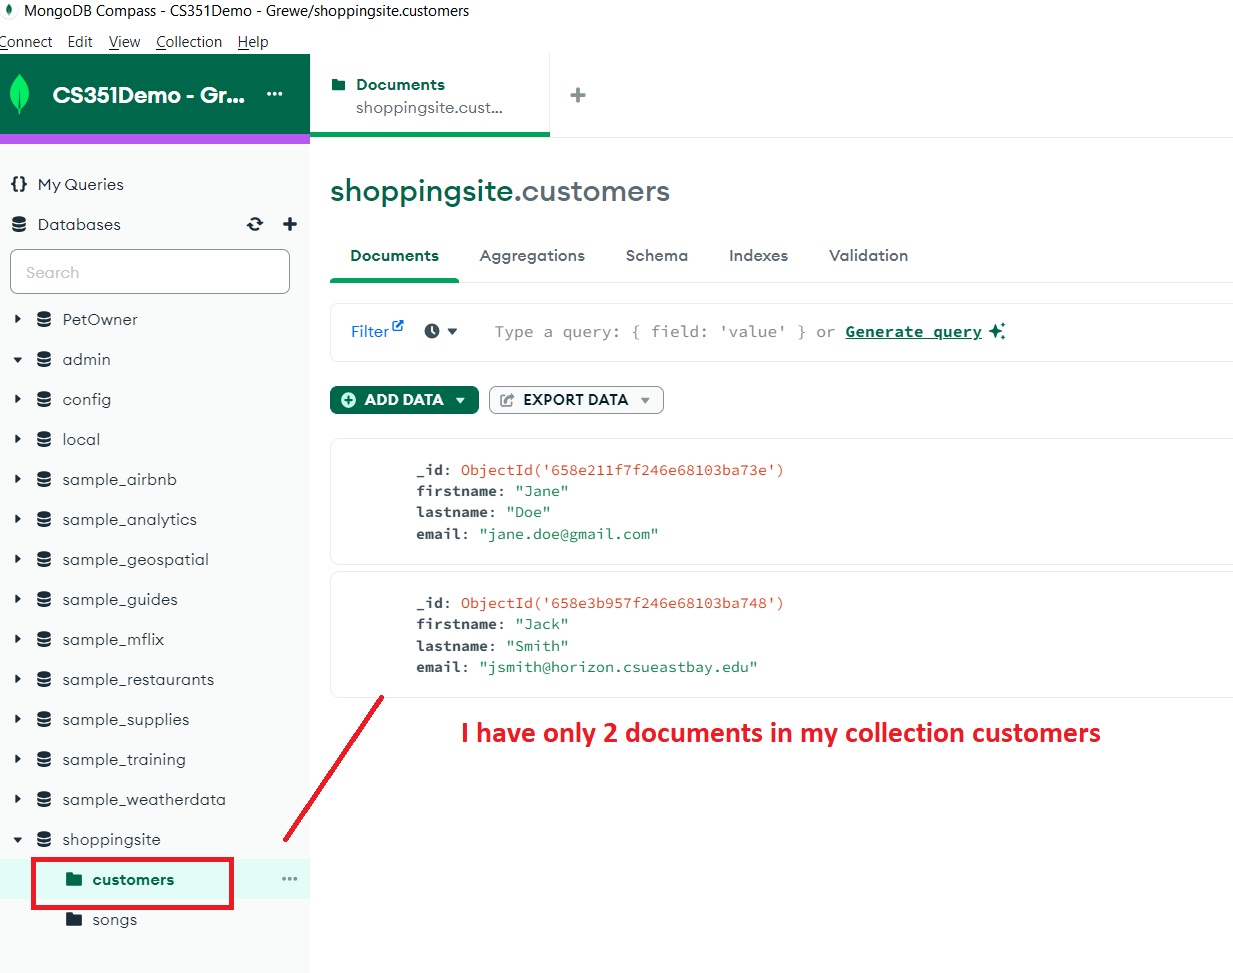
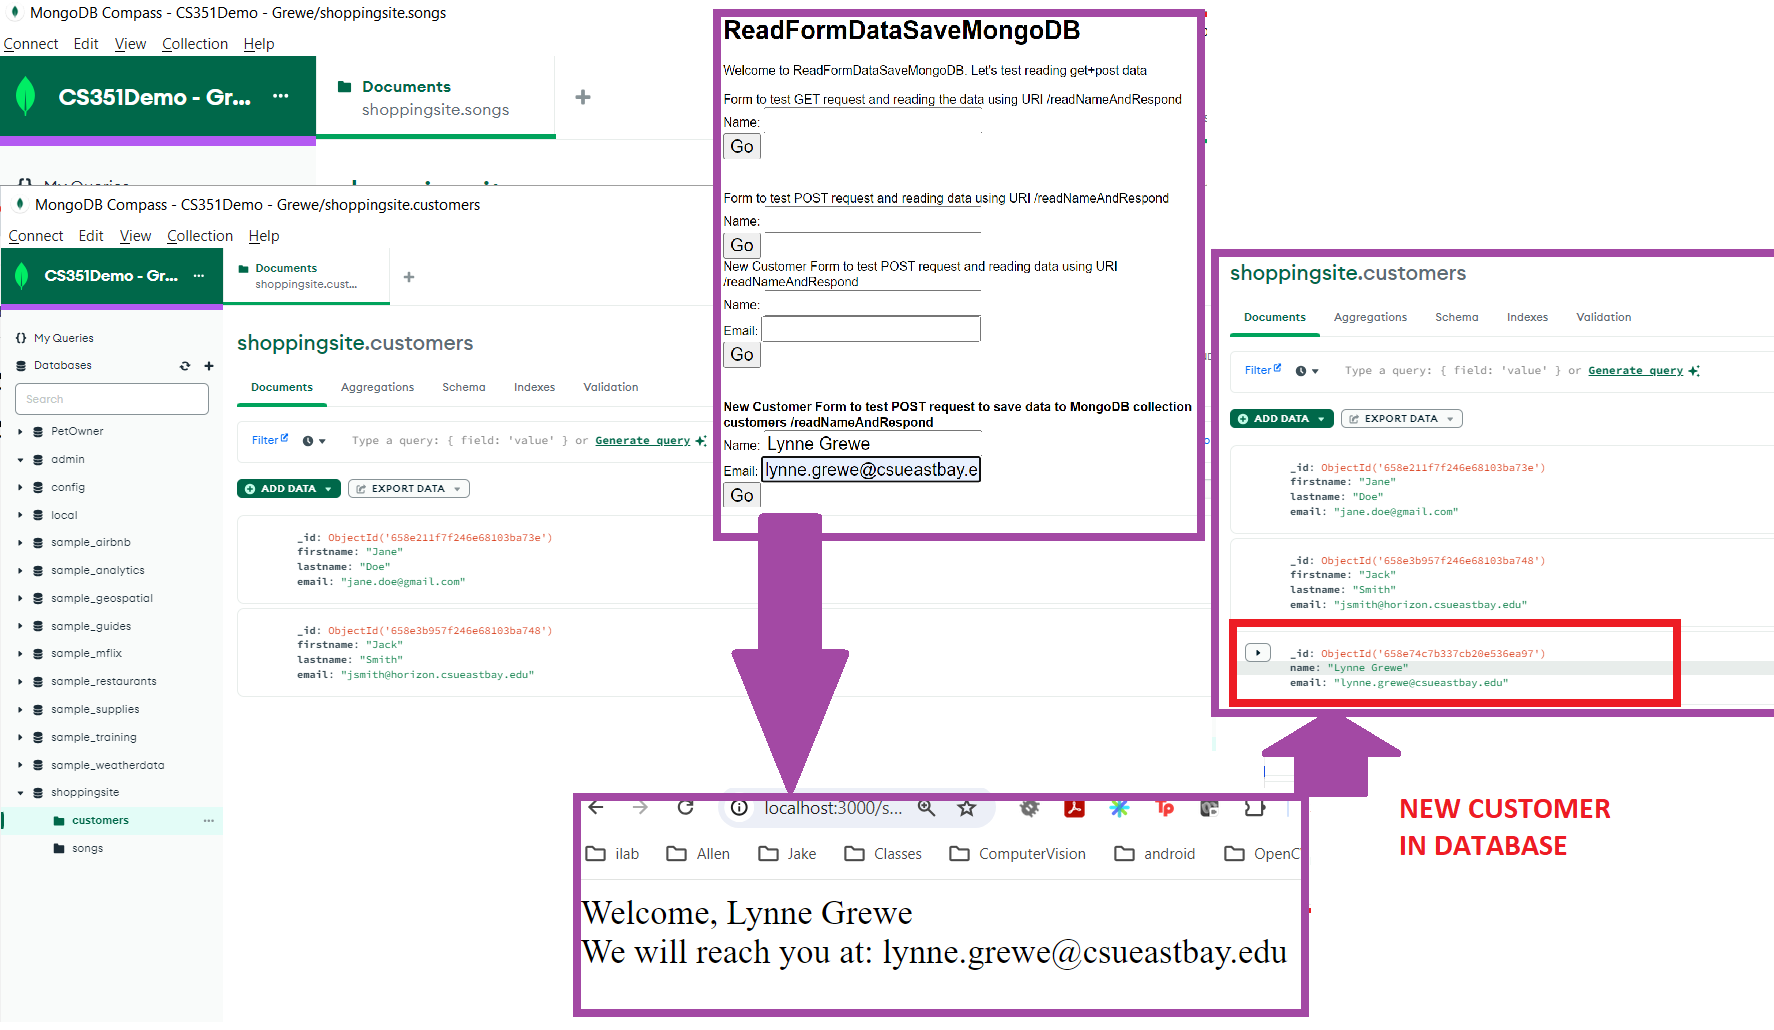
STEP 1.1: I have a database called shoppingsite with a collection call customers that I am going to access. Currently I have only 2 documents in it


STEP 1.2: Basically you follow the directions the MongoDB Atlas console gives you when you specify you want to connect from NodeJS code in order to get the URI for connection to use in your program.


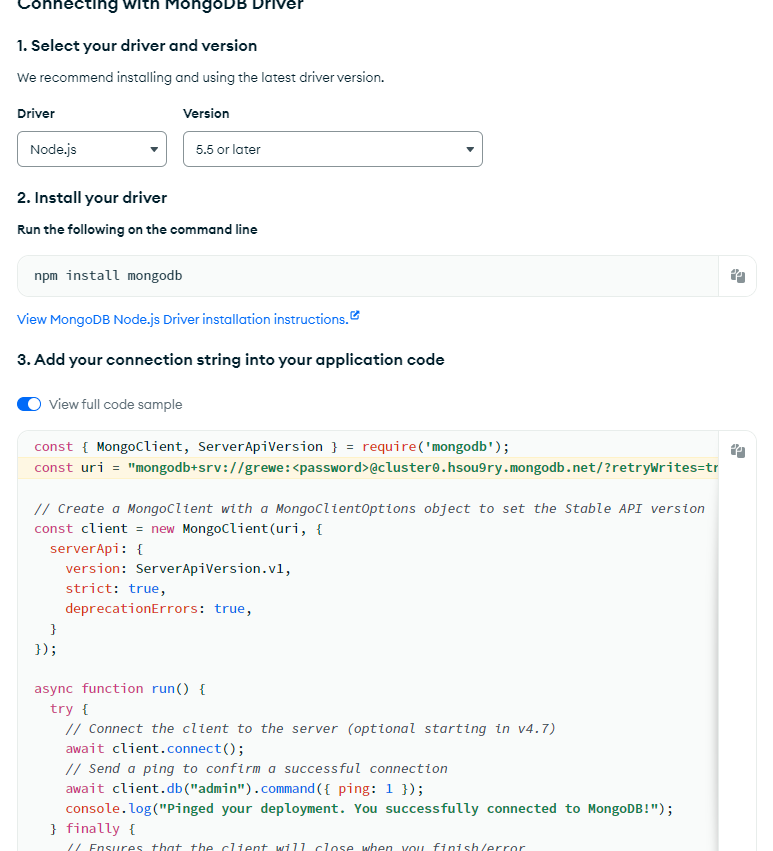
STEP 2) You will need to install the mongodb module in your project (step 2 below) by running in the terminal of your WebStorm NodeJS+Express project that you must create:

npm install mongodb


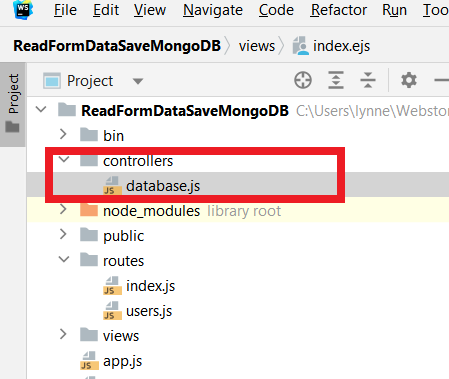
STEP 3) In your NodeJS+Express project add a directory called controllers and in there a file called database.js


Here is the directory structure of my NodeJS + Express project with the controllers directory with the database.js file


Here is the code ----Read the comments to understand what it does.

//Define some varibles needed for the database Controller functions
const { MongoClient, ServerApiVersion } = require('mongodb');

//connection string, fill it in with YOUR information for your MongoDB deployment
const uri = "mongodb+srv://YOURLogin:YOURPassword@cluster0.WHATEVER.mongodb.net/?retryWrites=true&w=majority";


// SETP 1: Create a MongoClient with a MongoClientOptions object to set the Stable API version
const client = new MongoClient(uri, {
serverApi: {
version: ServerApiVersion.v1,
strict: true,
deprecationErrors: true,
}
});

/* STEP 2: Controller function to save New customer data to the collection customers. */
module.exports.saveNewCustomer = function(req, res, next) {

//step 2.1 Read in the incomming form data for the customer: name, email
//expecting data variable called name --retrieve value using body-parser
var body = JSON.stringify(req.body); //if wanted entire body as JSON
var params = JSON.stringify(req.params);//if wanted parameters
var value_name = req.body.name; //retrieve the data associated with name
var value_email = req.body.email; //retrieve the data associated with email


console.log("NEW Customer Data " + value_name + " email: " + value_email);

//step 2.2 Call the function defined below that will connect to your MongDB collection and create a new customer
saveCustomerToMongoDB(value_name, value_email);

//step 2.3 Send a response welcoming the new user
res.send("Welcome, " + value_name + "</br> We will reach you at: " + value_email);

};


/**
* This is the main function save to your definde MongoClient defined at the top
* which connects to your database here defined as "shoppingsite" and in it will access
* the collection "customers" to create a new Customer with the name and email
* NOTE: no check if the user already exists (with this email) is done BUT, SHOULD BE DONE
* @param name
* @param email
* @returns {Promise<void>}
*/
async function saveCustomerToMongoDB(name, email) {
try {

//STEP A: Connect the client to the server (optional starting in v4.7)
await client.connect();
//STEP B: Send a ping to confirm a successful connection
await client.db("admin").command({ ping: 1 });
console.log("Pinged your deployment. You successfully connected to MongoDB!");


//STEP C: connect to the database "shoppingsite"
var db0 = client.db("shoppingsite"); //client.db("shoppingsite");
console.log("got shopping site");
console.log("db0" + db0.toString());

//STEP D: grab the customers collection
var customersCollection = db0.collection('customers');
console.log("collection is "+ customersCollection.collectionName);
console.log(" # documents in it " + await customersCollection.countDocuments());

//STEP E: insert the new customer and display in console the new # documents in customers
console.log("Insert new customer");
await customersCollection.insertOne({"name": name, "email": email });
console.log(" # documnents now = " + await customersCollection.countDocuments());


} finally {
// STEP F: Ensures that the client will close when you finish/error
await client.close();
}
}


STEP 3) In your NodeJS+Express index.js file where you have routing specify both "/" as the main new custoer form AND "/saveNewCustomer" which will call the controller function defined in STEP 2


this is not necessarily the entire index.js file but, what you need to add to it.


var express = require('express');
var router = express.Router();

/* GET home page which will call index.ejs which will have the form to collect data. */
router.get('/', function(req, res, next) {
res.render('index', { title: 'ReadFormDataSaveMongoDB' });
});

//########################################
//to process data sent in on request need body-parser module
var bodyParser = require('body-parser');
var path = require ('path'); //to work with separtors on any OS including Windows
var querystring = require('querystring'); //for use in GET Query string of form URI/path?name=value

router.use(bodyParser.json()); // for parsing application/json

router.use(bodyParser.urlencoded({ extended: true })); // for parsing application/x-www-form-urlencoded

var controllerDatabase = require('../controllers/database'); //this will load the controller file below
router.post("/saveNewCustomer", controllerDatabase.saveNewCustomer); //see controllers/database.js file

module.exports = router;


STEP 4: Here is the Form to capture the new customer's data (name and email). NOTE - I put this in the main index.ejs which will be called with the path "/". It will invoke the "/saveNewCustomer" path


<!DOCTYPE html>
<html>
<head>
<title><%= title %></title>
<link rel='stylesheet' href='/stylesheets/style.css' />
</head>
<body>
<h1><%= title %></h1>
<p>Welcome to <%= title %>. Let's test reading get+post data</p>


<br/>
<br />

<b>New Customer Form to test POST request to save data to MongoDB collection customers /readNameAndRespond</b>
<br/>
<form action="/saveNewCustomer" method="post">

Name: <input type="text" name="name"> </input>
<br/>
Email: <input type="text" name="email"> </input>
<br/>
<input type="submit" value="Go"/>
</form>
</body>
</html>


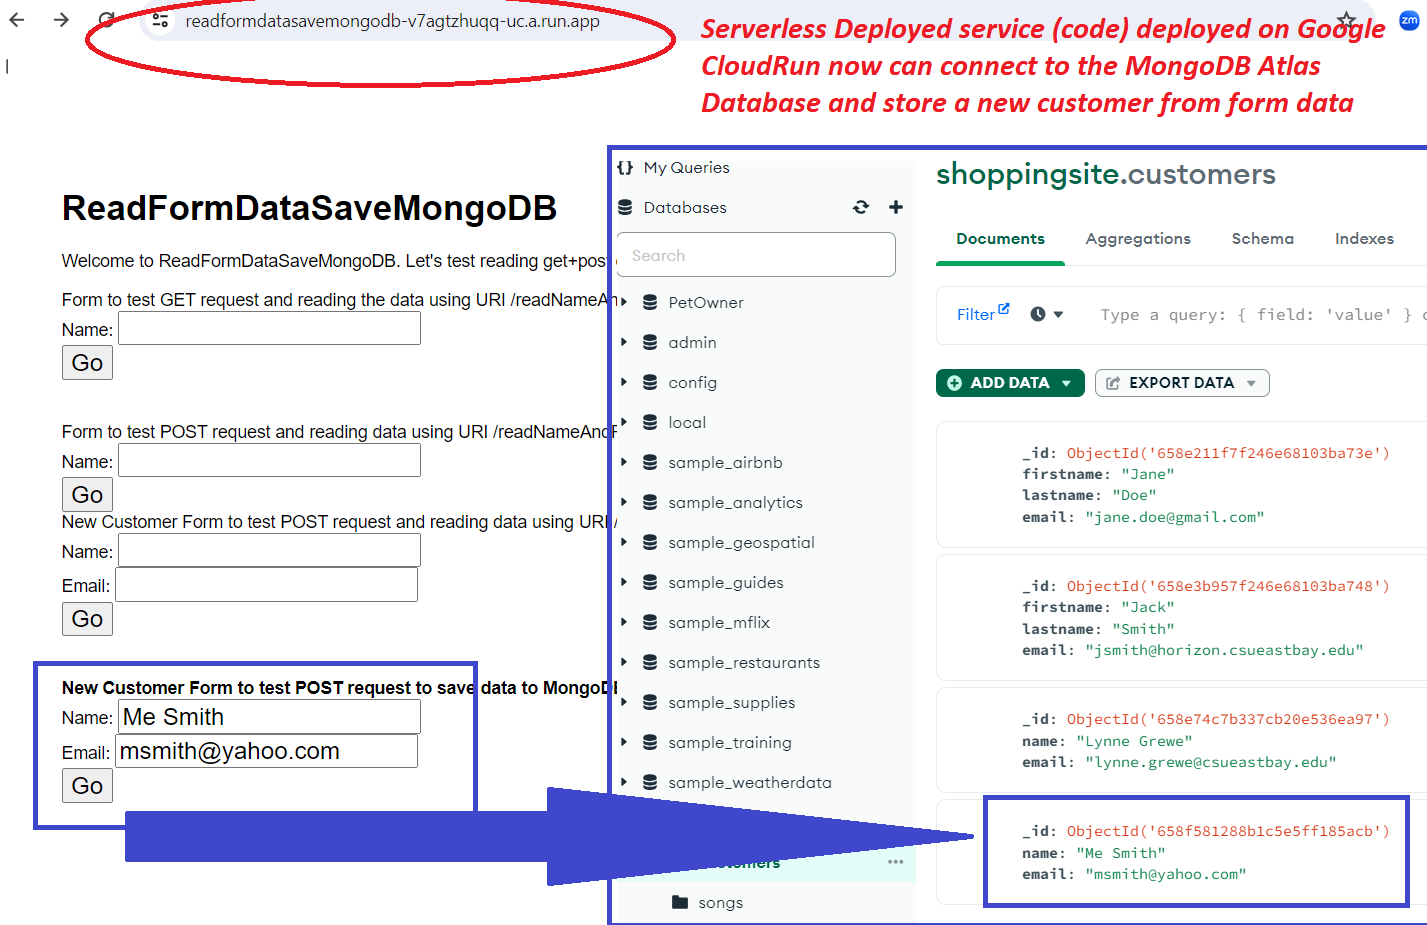
Here is the result of USING the form to create a new customer, running on the local machine


Follow the steps to deploy to Google Cloud Run --> BUT, you must ALSO MODIFY the MongoDB Atlas so it is accesible by Google Cloud Run!!!! Not just your local machine IP address. READ MORE ON WHAT YOU MUST DO... But, once you have setup this connectivity (from servlerless cloud to mongodb) it will work as shown below.


cs351: web site development

  • home
  • outline
  • projects
  • syllabus
  • links