Introduction to InstantVision
Keywords:
InstantVision,
GUI,
basics
Author(s): Mario Becker
Date: 2008-06-19
Summary: This tutorial shows you how to use InstantVision.
Introduction
InstantVision is a modular program for visual camera tracking and realtime image processing. It allows composing, testing and tuning of visual tracking systems starting with simple marker tracking going to markerless tracking like line trackers and KLT.
The program implements a vast collection of tracking methods, at the moment it contains marker tracker (4x4 code, image, or circular), KLT(Kanade Lucas Tomasi Tracker), LED and Blobs tracking, Line/Edge tracking, randomized trees. The packages is used as a development platform for our tracking research, thus state of the art methods are implemented.
The true power of the system lies in the ability to combine several such tracking procedures, for instance using a line tracker for initialisation with an absolute pose and KLT for frame to frame tracking. An inertial sensor can also be used in combination with Kalman filtering to spead up vision procedures and reach tracking framerates up to 100 Hz.
InstantVision comes with a configuration tool, which can be used for interactive configuration and testing of tracking systems.
The tracking can be used in InstantPlayer to realize Augmented-Reality applications.
How to find/start it
A link to InstantVision should be installed in the start menu and in the installation directory.
What it can do
- run Activities such as Camera Calibration or CameraSetup.
- Assemble configurations (ActionPipes)
- load/save configurations
GUI elements
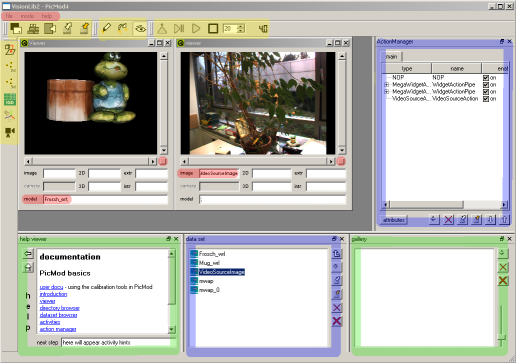
- Menu (red, on top)
- Toolbars (yellow)
- Dock Widgets (green, blue)
- Help Viewer (green, bottom left)
- Gallery (green, right)
- DataSetWidget, Editors and DataWatch (blue)
- ActionManager (blue)
- ActionEditor
- Viewer(s)
Help Viewer
Is a dock window which is usually located in the bottom left corner of the picmod window. If it is not visible, use a right click on one of the tool bars and select "help viewer".
The help viewer changing documents. Use the "home" button to go back to the start page showing the InstantVision documentation.
The help viewer also acts as a command interface for activities. When you select an activity from the left hand tool bar, the contents of the viewer change to show a activity dependent page. The links in this page can be used to trigger activity specific commands.
Gallery
Is one of the dock windows in InstantVision. It is by default located in the bottom right corner of the PicMod main window. If not visible use a right click on one of the tool bars and select "gallery widget".
The Gallery shows bundles of data which can be used together with certain activities. Double clicked a thumbnail in the Gallery to make it the current data which will be used by the activity.
DataSetWidget, Editors and DataWatch
DataSetWidget
here you can see the data objects generated and used by Actions.
The data objects in the DataSet can themselves be data sets and thus contain more data objects. To browse into an object, double click it. To go back to the parent level, use the up button on the right.
Buttons
..allow you to load and save the DataSet. Then Loading, the objects found in the DataSet section are added to the selected DataSet level.
See Whats Inside
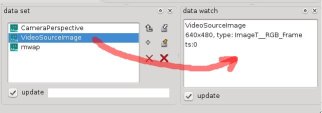
You can get information about an object by holding the mouse pointer over an object an watch the tool tip. The same information can be seen then dragging an object into the "data watch" widget without hovering the mouse there. This usually shows you information about the object type and some data from within the object.
Edit Objects
You can view or modify data objects by double clicking them. Their are two things which can happen..
Data Editor
..is a custom editor for the object it will be opened, otherwise a default editor is opened
The default editor allows manipulation of some generic object attributes.
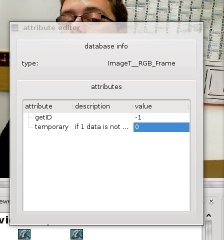
Specialized Editor
If an data object comes with a data editor?, it can be opened by double clicking the data object.
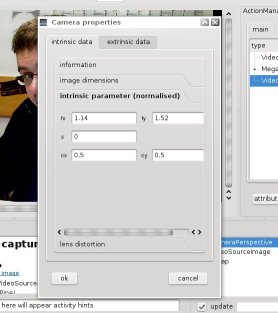
One example of such an editor is the Camera editor shown below. It can be used to change intrinsic and extrinsic data of a camera.
ActionManager
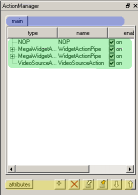
On the top is a tab bar (blue) for selecting the ActionPipe to edit. The ActionManager can have more than one but the second or third is usually managed by some activity and will not be saved with the configuration.
The center contains a list of the Actions in the main ActionPipe. Notice the + in front of some Actions, these are ActionPipes themselfes and can be expanded to see and edit their contents, which are more Actions.
The Actions can be turned on or off which might be usefull for debugging or for switching on extra processing steps.
The bottom of the window contains the following buttons:
- attrib button for calling the attribute/ActionEditor
- "+" button to add an Action. This opens the selection box shown above. The show Actions can be filtered by typing a piece of the name in the find field. Double click an Action to add it. If another ActionPipe (marked with the + sign) is selected, the new Action will be added to it, otherwise it is added to the main ActionPipe.
- "x" button deletes the selected Action or ActionPipe.
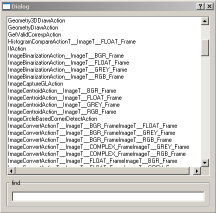
ActionEditor
If the Action double clicked in the ActionManager comes with an editor of its own, it will open. Otherwise or when you used the "attrib" button in the ActionManager the AttributeEditor will show up.
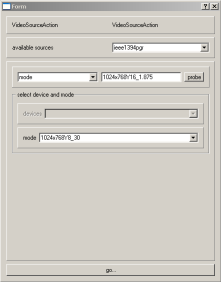
An ActionEditor is dedicated to one specific Action, here is an example for the VideoSourceAction. The Editor allows you to select a source (the driver plugin which handles the video device). The selected driver will look for a connected device as soon as it is selected.
The driver attributes are listed in the line above. Changing some of these attributes might enable the driver to find a device. If such a parameter was changed you can press the probe button to manually look for connected devices.
As soon as a device was found, the mode list will be filled with available video modes. You can select one of them or keep the default.
clicking "ok" will copy the parameter into the "source_url" attribute of the VideoSourceAction. You can choose to ignore the settings by closing the window.
AttributeEditor
By double clicking one of the Actions shown in the ActionManager, the AttributeEditor will open. It allows editing of Keys and Attributes for the clicked Action.
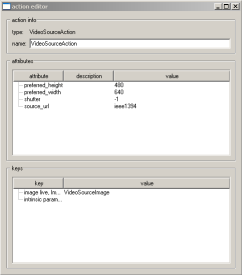
The values can be changed by double clicking one of the lines under keys or attributes.
This window can stay open during execution of the Configuration.
Viewers
These are the windows where you can display certain type of data.
A viewer can be opened by an activity like the CameraSetup shown here:
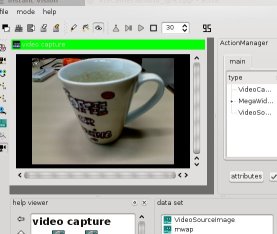
You can also open a viewer by clicking the "new viewer" button in the top toolbar. Then you can drag and drop data from the data set onto the viewer. If the object is known to the viewer, or in other words if their is some rendering object for it, the content of the data object is rendered into the viewer. Known objects are images like ImageRGB, 3d data alias OSGNodeData or geometric data in data object slang called GeometryContainer.
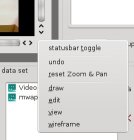
The viewer allows to zoom and pan images and also to inspect 3d objects using the mouse. Make sure the draw mode is set to "view" otherwise the mouse might appear useless.
The viewer also has a menu of it's own. Here you can toggle the viewer's statusbar, reset the zoom and pan levels and switch the mouse mode (draw, edit, view).
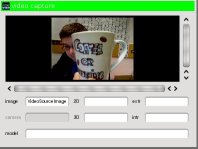
The statusbar gives you information about the objects in display. you can change the keys here to display the corresponding objects. The "model" line is special, it contains a colon separated list of OSGNodeData objects it must be finished with a colon. Then extr and intr point to ExtrinsicData and IntrinsicData, the 3d "model" is transformed by these data objects and cannot be moved with the mouse.
Activities
Activities are dedicated to special problems which require some sort of user interaction. You can find all available Activities in the left toolbar. Click one to activate it, clicking another one kicks out the previous and selecting "NOP" switches off any activity (actually it loads a "No OPeration" activity). Activities come in shared libraries and might need to be loaded using "add plugin" from the file menu or a button in the top tool bar. On startup, the lib folder of the distribution is searched for Activities and other plugins, so you should not need to do it yourself.
Activities operate together with the help viewer, the mode buttons from the top tool bar or the edit menu and one or more viewer windows. Furthermore the Activity uses the data as shown in the viewers and might operate with the Gallery to operate one multiple data.
The help viewer loads a help text for the selected activity which will also contain links acting like buttons, so clicking in the help viewer provokes some action from the activity.
The mode buttons from the top tool bar influence the behaviour of the activity when interpreting mouse clicks. In general,
- draw - adds points or thatever,
- edit - moves existing points,
- view - allows the viewer content to be draged, rotated (3d object) depending on what is visible (refere to viewer to see what a viewer can do).
Importing data
You can import certain types of data by using the "add data" button in the top toolbar. In this way you can load e.g. 3d data for augmentations. See also data types.
Configuration files
A configuration of Actions and data objects can be writen to a file using to save button from the top left tool bar or the file menu. The file will have the ending ".pm" which can be used to identify it as a PicMod file. It contains a XML conform description of the Actions you added and all data in the DataSet.
The file can be used to run the configuration in another application like Avalon.
Settings Files
InstantVision uses a config file to keep certain settings from one run to another. These are window configuration and update behavior. Additionally it contains startup options like fps="30" - the desired frame rate, run="0" - start running after loading some project when set to 1, wait4debug="0" - opens a dialog after starting giving you the chance to attach a debugger to your process. The Config files are located in:
- WIN32: C:/Document and Settings/username/IVSettings.xml
- Linux: ~/.InstantVision/IVSettings.xml
- MacOSX: ~/Library/Application\ Support/Instant\ Vision/IVSettings.xml