Interactive Textures as GUI
Keywords:
2D User Interface,
Interaction,
Pointing Sensors,
Texturing,
UITexture,
BrowserTexture
Author(s): Yvonne Jung
Date: 2010-05-04
Summary: This tutorials explains the usage of interactive textures as 2D user interfaces embedded into 3D scenes.
Introduction
Because existing 3D interaction techniques and widgets are often not specific enough to provide sufficient usability for many application types, we provide an extension to the X3D texturing concept by introducing interactive textures, which allows embedding standard 2D UIs, web-content or full applications into 3D scenes. This has the benefit that users are already familiar with the (well-designed) interface elements from standard 2D applications and that also additional textual information describing the interaction task can easily be provided. Furthermore, the new node set eases rapid prototyping of interactive 3D applications.
The base type of all textures that handle 2D GUIs is called InteractiveTexture and defines some basic slots to route interaction such as keyboard and mouse input to it. Input via mouse or other pointing devices is realized with two fields: 'pointer', which is the 2D position on the texture that internally is translated into the UI native space via a simple window-viewport transformation, and 'button1' to transfer clicking or similar binary actions. If this inSlot receives TRUE, a mouse pressed event is processed (and treated as left mouse button), else release is triggered. E.g. by using a standard X3D TouchSensor node, the 'pointer' and 'button1' slots can be filled with valid values by using the sensor's 'hitTexCoord_changed' and 'isActive' eventOut slots.
Keyboard input has been implemented according to the interface specification of the standard KeySensor node, which in essence maps all outSlots as inSlots for keyboard interaction. Obviously, the field 'updateMode' defines the update mode. It can have the following values: "onInteraction" handles mouse-move-like events (which is the default), "conservative" only regards click-like events and widget updates, and "always" can handle time-based content, but soon gets slow when having many textures in the scene due to the GPU upload.
The UITexture
The proposed UITexture can be used to draw a user interface defined by the Qt Designer tool (hence keep in mind that Qt 4.x need to be installed for first creating an UI file with the designer GUI). Therefore, the name of the Qt Designer based UI file can be set in the MFString field 'url'. If the node's 'show' field is TRUE, the dialog form is shown in a separate window, which is not only useful for debugging purposes, but also for developing interactive 3D desktop applications. This texture node is very specialized as it only accepts Qt-based dialog forms.
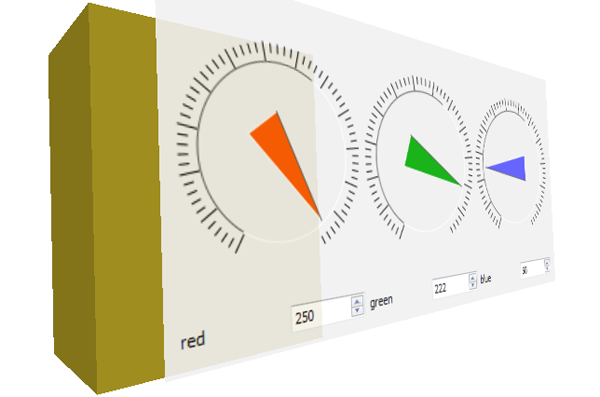
In the following we will exemplarily discuss the usage of the proposed interactive textures using the color chooser example shown in the screenshot below. As can be seen in the code fragment, the UITexture can be applied onto a 3D Shape the usual way. Whereas "color.ui" denotes the pre-designed Qt UI file, the texture additionally supports dynamic fields, which denote certain signals and slots (the Qt concept for event propagation) as defined in the UI file. In this example, the exposedField "reddial" references the Qt-specific QDial widget element for changing the amount of red in the material of the colored box behind the UI.
Because the widget can be used as input and output (slot and signal) respectively, in this case we are using an exposed field instead of an in- or out-slot. Finally, when a value was changed, the current state of all QDial widgets is routed to a Script node for assembling an SFColor value that is routed to the 'diffuseColor' field of the Material of the Box node. If the types match, the last step certainly can be skipped.Code: Code snippet showing the usage of an UITexture node for changing field values (in VRML encoding).
Transform {
  children [
    DEF GUI Shape {
      appearance Appearance {
        texture DEF colorUi UITexture {
        ...
        exposedField SFInt32 reddial   0
        exposedField SFInt32 greendial 0
        exposedField SFInt32 bluedial  0
        url "color.ui"
      }
    }
    ...
    }
    DEF colorUITouch TouchSensor {}
  ]
}
Shape {
  appearance Appearance {
    material DEF mat Material {}
    geometry Box { size 3 4 2 }
}
...
ROUTE colorUITouch.isActive TO colorUi.button1
ROUTE colorUITouch.hitTexCoord_changed TO colorUi.pointer
...
ROUTE colorUi.reddial   TO script.red
ROUTE colorUi.greendial TO script.green
ROUTE colorUi.bluedial  TO script.blue
ROUTE script.color TO mat.diffuseColor

The BrowserTexture
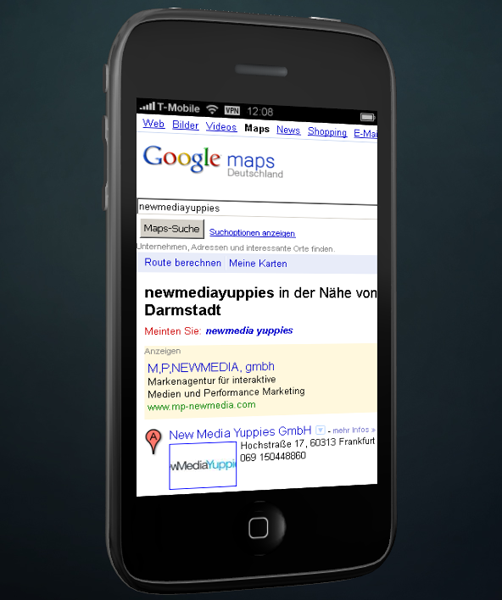
A BrowserTexture can be used to display web pages through a texture node. The texture thereby allows scene authors to integrate and navigate through web information inside an X3D scene. The fields 'updateMode', 'url' etc. were already explained previously, with the exception that here 'url' either denotes the location of the web page to be displayed and or directly contains embedded (D)HTML code. The latter exemplarily is depicted in the following code fragment.
If a link was clicked on the web page, the 'link_changed' eventOut is updated with the new URL. This is useful in combination with the 'delegateLinkHandling' field. If it is TRUE, the texture's location is updated and it displays the web page of the link that was clicked. Otherwise, the current page is kept and only the clicked link in the 'link_changed' eventOut is updated.
The eventIn 'back' triggers loading the previous document in the history list. Likewise, 'forward' loads the next document in the list, 'reload' reloads the current document, and 'stop' obviously stops loading the document. Similar to the X3D LoadSensor, the 'load_finished' event is sent when the page has finished loading, which is further refined by 'load_progress' field. The next image shows an example scenario.
Code: BowserTexture example with embedded HTML instead of using only a URL (in XML encoding).
<Transform>
  <Shape>
    <Appearance>
      <BrowserTexture DEF='webUi' minFilter='linear' magFilter='linear' delegateLinkHandling="false">
	  <![CDATA[
	   <div style='color:yellow;font-size:14pt;border-style:solid;background-color:olivedrab;text-align:center;'>
	   ...and here some nicely formatted text with CSS for testing.</div>
	   <div onClick='javascript:alert("A Message Box pops up :-)");' style='margin:15;text-align:center;border-style:solid;'>
	   Click me!</div>
	  ]]>
      </BrowserTexture>
    </Appearance>
    <IndexedFaceSet DEF='plane' texCoordIndex='0 1 2 3 -1 3 2 1 0 -1' coordIndex='0 1 2 3 -1 3 2 1 0 -1'>
      <Coordinate point='0 0 0 1 0 0 1 1 0 0 1 0'/>
      <TextureCoordinate point='0 1 1 1 1 0 0 0'/>
    </IndexedFaceSet>
  </Shape>
  <TouchSensor DEF='webUiTouch'/>
</Transform>
<ROUTE fromNode='webUiTouch' fromField='isActive' toNode='webUi' toField='set_button1'/>
<ROUTE fromNode='webUiTouch' fromField='hitPoint_changed' toNode='webUi' toField='set_pointer'/>

The X11Texture
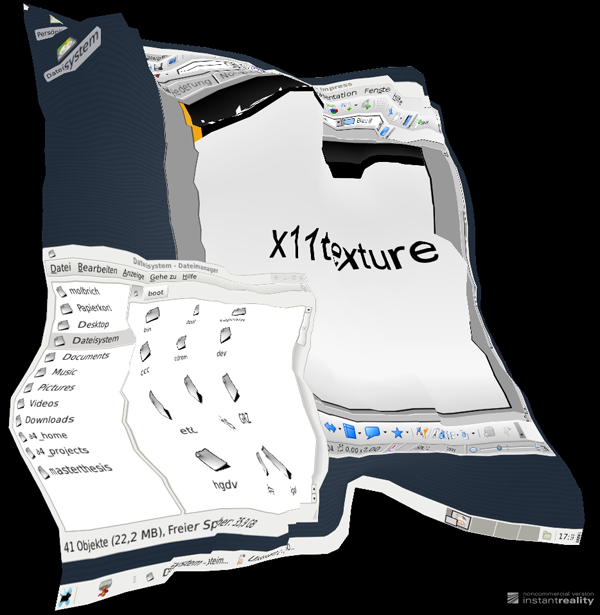
The most generalized approach of displaying UI elements is to map an entire desktop environment onto a texture. The X11Texture can display an X11 screen with the help of Xvfb, a virtual framebuffer exporting the X11 display into an image format. For this reason, this node is only available on Unix/ Linux platforms. Since X11 allows running single applications without a desktop manager, this texture type can be used to run anything ranging from games to full blown desktop solutions (see next image).
Most of the parameters of the X11Texture are related to Xvfb itself: 'xserver' specifies the location of the Xvfb server application to be executed in an environment defined by 'shell' (e.g. "/bin/bash"), where 'display' defines the X11 display to be used (e.g. 3). Here, 'maxFps' determines the update frequency. Finally, 'command' is the command or application launched inside the server (e.g. "xterm -e top&; xclock").
