Controlling Behaviour
Keywords:
humanoid animation,
h-anim,
behaviour controller
Author(s): Yvonne Jung
Date: 2009-05-20
Summary: This tutorial shows how to control the behaviour of virtual characters or other objects with the help of the BehaviorController component.
Overview
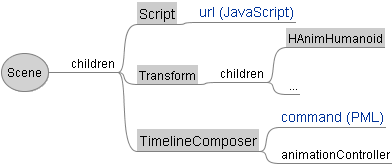
In this tutorial we assume that you are already familar with basic X3D animation concepts as well as H-Anim/ character animation, which was covered in the previous tutorials. In this tutorial we refer to Instant Reality's new BehaviorController component, which holds nodes that can be used for high-level animation and behavior control (including synchronisation - the next image shows a usage example) by means of a special interface and description language building on top of X3D. This language is called PML (Player Markup Language) - the specification of PML 2.1 can be found here.

Controlling Characters Efficiently
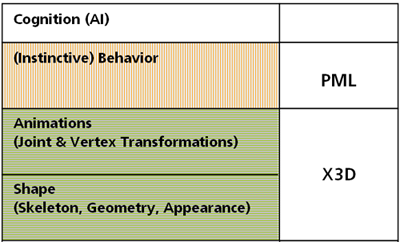
After having introduced the coarse idea, which is visualized in the next image, first PML is explained. Similar to the additional programming languages needed for "Script" and "Shader" nodes, a domain specific language is introduced for animations. Besides, when animating and visualizing virtual characters one also has to think about interoperability aspects. Thus, especially in web environments, it should be possible to specify the properties and behaviors of characters and objects in a virtual environment independently from their realization in a concrete setting, whilst still being able to provide detailed information like the required animation parameters and exact timing information. Therefore the Player Markup Language (PML) was developed.

Introducing an Animation Control Language
PML is an XML-based high level markup language for scripting the behaviour controller component, and thus comparable to a "Script" or "Shader" node, as it is a domain specific language to extend the current X3D concept. Additionally, it is designed to be independent of the implementation of a graphics engine and virtual environment, and hence can either be used as descriptive interface markup language between a graphics engine and some higher level behavior and dialog generation engines, or for directly scripting animations. Because PML is a language for controlling virtual environments with special regards to character animation, it defines a format for sending appropriate commands.
At the beginning of a new scene all objects and characters are defined by a <definitions> script. There exist three types of definitions: repository definitions, character definitions, and object definitions. Repository definitions specify where the resources for the various scene elements are located. Character definitions specify the acoustic parameters of the synthetic voice, the available animations including their default durations, the phoneme to viseme mapping to be used, etc. (a short example that defines a list of idle animations is shown next). Likewise object definitions are used to specify cameras, user interface elements, and various media types that will be used in the scenario. Each such element has a unique 'id' by which it can be referenced via the 'refId' attribute in other elements.
Code: PML definitions example.
<definitions id="iListDef">
  <character id="Valerie" src="Valerie.wrl" root="Trafo">
    <multiPoses id="a" src="a.wrl" dur="2350"/>
    <multiPoses id="b" src="b.wrl" dur="2533"/>
    <idlePoses id="iP" random="true">
      <multiPoses refId="a" dur="2350"/>
      <multiPoses refId="b" dur="2533"/>
    </idlePoses>
  </character>
</definitions>
Handling Animations with PML
In the course of the story all runtime dependent actions like character animations are described by so-called <actions> scripts, whereas the temporal order is given by a special scheduling block including sequential and parallel elements. Actions are used to specify the appearance and behavior of all characters and objects in the environment. Some actions like 'show', 'hide', 'transform', or 'startIdleList' can be applied to both, characters and objects, while others are only available for specific scene elements. Below a short example script is shown, in which the previously defined idle list is started. Examples of actions that are only available for virtual characters are 'speak' for verbal output, and 'complexion' for the change in skin color (like blushing and pallor).
PML defines a message format, which can be sent to the animation control component or received from it for enabling interactions with the scene via <message> scripts. A PML message is used to control the execution of actions and to exchange information between modules. There are three different types of messages: commands, states, and facts. Commands can be used to trigger the execution of actions; states are used to inform other modules about the execution state, e.g. started, failed, finished, what is important for later synchronization; and facts, which are represented by attribute-value pairs, can be used to inform about user actions.
Code: PML actions example.
<actions id="iListStart" start="true">
  <character refId="Valerie">
    <startIdleList id="iL" refId="iP" />
  </character>
  <schedule>
    <action refId="iL" begin="0" dur="0"/>
  </schedule>
</actions>
The animation tags of a PML actions script can either refer to preloaded animations, which are referenced by their name, or to simulated animations, e.g. via inverse kinematics. Different kinds of animations like morph targets and displacers for facial animation (<singlePose>), or key-frame animations (<multiPoses>) and simulated animations (<implicitPose>) for gestures and postures are distinguished, because every animation type must be handled differently and has a varying set of attributes.
An example of a rather unusual animation which can be handled quite easily this way, too, is the change of the face complexion. Usually only the changes in geometry by means of displacers or morph targets are addressed in computer graphics. This is a well-known problem, and the classification usually is based on the Facial Action Coding System by Ekman, which identifies certain Action Units for morphing the face geometry. But with the help of modern graphics hardware the more subtle changes concerning face coloring can also be covered via animated skin textures or shader programs (an example of how this can look like can be found in the H-Anim tutorial).
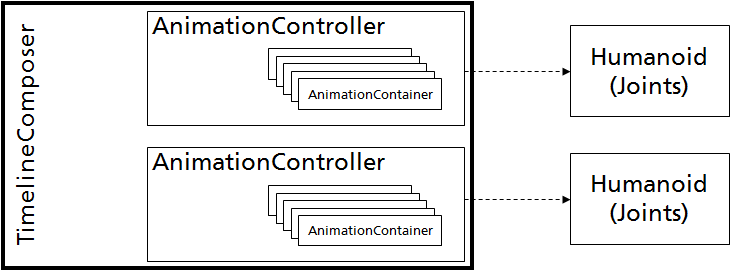
By introducing a more abstract mechanism to define and synchronize different kinds of animations without having to take care about correct routing, timing etc., it is also much easier to create digital stories with embodied conversational agents in X3D. Such a story can be described with PML by putting together story-lines, i.e. short scene acts, in an easy and intuitive way through PML scripts that define when and what a character or object in the scene is doing. By combining this with other script or sensor nodes that define when and how the user can interact with the virtual environment there can also be added some non-linearity and possibilities for user interaction in order to create an interesting story graph. The next two images show a possible system setup. As can be seen, PML can either be used for scripting and synchronizing within the X3D browser, or for handling the communication with modules that do not want to bother with problems concerning low level kinematics.


Scheduling and Controlling Animations
After having explained the high level language PML, the question remains, how this advanced animation control approach can be used in concrete settings. Thus, a generic scheduling and controlling element is needed, too (the image shown above gives a first impression on how to use it). Therefore, we added some additional nodes, whose X3D interfaces are already shortly described in the online documentation.
The Timeline
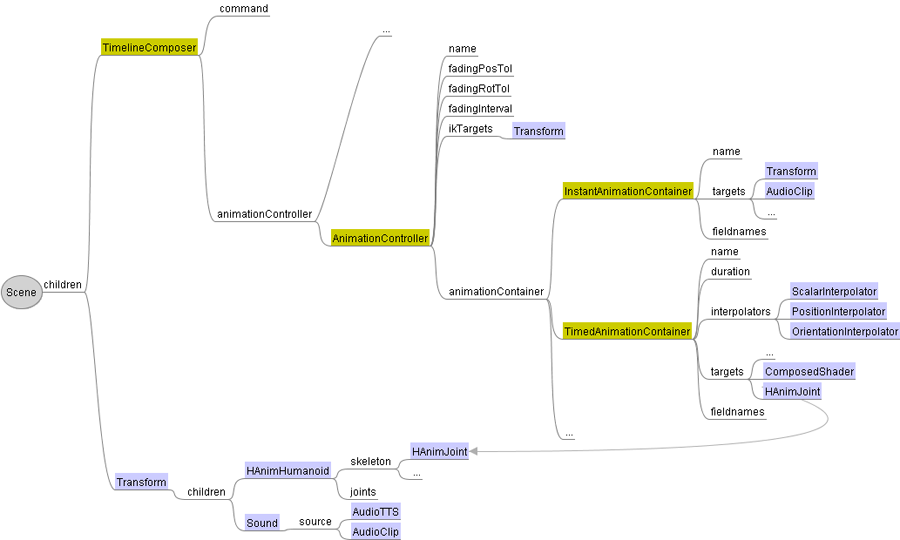
The next figure shows an overview of the proposed system architecture. Here, the TimelineComposer node is responsible for all scheduling and also deals as the PML interface and processor. Starting and stopping of animations and other actions is accomplished by setting the 'command' string of the TimelineComposer node with a valid PML file or string for defining the desired temporal order. This is similar in spirit to the 'url' field of a Shader node, which only is useful when having defined a valid GLSL or Cg shader program, or the 'url' field of a Script node, which only is useful when having defined some Java or JavaScript code.
Whereas the 'command' field contains an incoming PML script, the 'message' eventOut sends an outgoing PML message string. This way, the TimelineComposer node handles all communication with the system and forwards PML commands to its parser. During parsing, the scheduling block is sequenced and single action and definition chunks are created and transfered to the appropriate components. When having received a start message, the internal scheduler dispatches the action chunks to the AnimationController node of the corresponding character.
The MFNode field 'animationController' holds references to the AnimationController nodes of all objects, which shall be animated. Whenever an actions script shall be executed, the TimelineComposer triggers all AnimationController nodes, which in turn access the respective data of their referenced animation container nodes (the InstantAnimationContainer for referring to transitions, which are state changes like toggling visibility, and the TimedAnimationContainer for storing all time based animations like key-frame animations) for processing this request.

The Animation Controller
The AnimationController node controls a set of animations connected with a virtual character or any other object. Because a complex application can lead to an arbitrary number of postures and gestures or respectively animations, the main job of the AnimationController is to blend and cross-fade all kinds of animations. This is due to the requirement, that for correct blending, cross-fading, and generally updating the actions of an object at a single time step, the controlling unit needs knowledge of all animations, a task that sometimes can not be handled with the simple scripting and routing mechanisms of X3D.
The 'name' field contains the name of the object to be controlled, which is relevant for the later mapping to PML scripts: X3D 'name' and PML 'id' must correspond for enabling the mapping! The 'animationContainer' field contains references to all animations as defined by the animation container nodes. Hint: an AnimationController does not need to be defined explicitely but is created internally when receiving a new character or object definition.

AnimationContainer nodes contain the animated targets of an animation. The MFString field 'targetnames' references the target nodes to be animated or changed (usually the joints), and the MFString field 'fieldnames' contains the names of the corresponding fields in order to find this field inside the target. This is needed, because if for instance an SFVec3f value shall be sent to a target node, e.g. a Transform node, it is often ambiguous, which field was meant (in this example it could be either of 'center', 'scale', or 'translation').
The TimedAnimationContainer node contains a set of interpolators of an animation (in the 'interpolators' MFNode field) and the original default duration of the animation (in the 'duration' field). Whereas the TimedAnimationContainer denotes actions with a certain duration, the InstantAnimationContainer denotes transitions, i.e. simple state changes like show, hide, start or stop, which have a duration of 0. It therefore does not contain interpolators but instead it can hold the id of a media-object as defined in a definitions script.
Code: Code snippet showing the usage of AnimationController and AnimationContainer.
DEF AC_Valerie AnimationController {
  name "Valerie"
  fadingInterval 0
  animationContainer [
    DEF attract TimedAnimationContainer {
      name "attract"
      interpolators [
        OrientationInterpolator {
            #...
        },
        #...
      ]
      duration 4.2
      targetnames [
        "Bip01_Spine",
        #...
      ]
      fieldnames [
        "rotation",
        #...
      ]
    },
    #...
  ]
}
After having explained the high level interface, it will be shown how this corresponds to the nodes contained in the behaviour controller component, and how they can be used in a concrete setting. The code fragment above shows exemplarily how to define interpolator based animations in TimedAnimationContainer nodes, and how an AnimationController node for a character or object can look like. If you send a definitions script defining a new object, which not yet has a controller node, then an AnimationController will be created automatically. If you also like the character or objects to be dynamically loaded on definition, you simply have to provide the correct file name and root node in the 'src' and 'root' attributes of the definition.

As mentioned, here the interpolators are only used as data containers for key-value pairs, as depicted in the next figure. Thus, there is no need for routes or other difficult to maintain helper structures, because all interpolators, which are active at a given time frame t, are solely used for the internal calculation of joint rotations etc., in order to have access to all required animation data for mixing all animations, which are active at a given time t within the timeline, efficiently.
Code: Instantiating the TimelineComposer.
DEF comp TimelineComposer {}
Obviously each animation container has to handle lots of data, especially if the key times and values were taken from motion capture data. Therefore animation containers can be reloaded during run-time by sending an appropriate definitions script. This is quite convenient, because due to the large amount of data, file sizes soon get too big for handling them in any editor.
Thus, usually you will start with a scene that only contains the static background objects and an empty TimelineComposer node. By setting its 'command' field appropriately (first the definitions, then the actions), e.g. via a ROUTE from a script, you can also load all dynamic objects and setup your desired timeline, as visualized in the next image. Furthermore, via PML <message> scripts status information and the like can be also exchanged for interactive control.

First, the 3D assets including all character animations need to be created, which is usually done using a modeling tool like Maya or 3ds Max, and exported into X3D format. Therefore, we have extended our 3ds Max exporter InstantExport to be able to directly export animations as TimedAnimationContainer nodes.
Please note, that this component is called behaviour controller instead of behaviour creation. Thus, almost all behaviour/ animations you want to use, first need to be defined and specified within X3D. If, for example, you want to define a character with animations 'a' and 'b', then you need a file that contains the character's geometry (e.g. a Transform with an HAnimHumanoid child node) as well as files containing the AnimationContainer nodes for 'a' and 'b'.
As previously mentioned, the latter can have two types: The InstantAnimationContainer is referenced by actions that have no duration (i.e. transitions with dur='0') - e.g. by a <transform> in an actions script or a <fragment> in the definitions script respectively. And the TimedAnimationContainer simply contains the animation's default duration as well as all Interpolator nodes etc. for the desired animation. Please note here, that the order in which the fields 'interpolators', 'fieldnames', and 'targetnames' appear is important: the 1st interpolator is used for the 1st from 'targetnames'.'fieldnames' and so on.
A basic example that shows how to get started (as well as the PML specification) can be found for download below.
Files: